Playing some Reindeer Games
I was so excited to come home to some Dare 2B Artzy happy mail last week! I could not wait to get my hands on the latest release stamp set called Reindeer Games. Holy cow this is the cutest stamp set EVER! I love, love the little deer and his expression and that adorable hat! Plus this set comes with all of the fun extras like the Christmas ornaments, snowflakes and holly. I am so excited to finally get to play with it.
If you know me, you know I’m a Copic marker girl. I have been ever since I met my wonderful friend Carissa Ziglobicki of Inky Fairy Designs. Her fantastic Copic coloring and card making lead me down the Copic marker path….er rabbit hole, LOL! I love Copics, love the way they blend and the range of colors, however I’ve been branching out lately and trying some new alcohol markers. I think it is important to try other mediums to see what results they can give. Maybe even find something new that you love to work with in your crafting and card making. It’s good for you right!? Learning to use a new medium or technique builds new neural pathways in your brain.
Today I have colored the adorable Dare 2B Artzy reindeer with my Shinhan Touch markers. I’ve had these markers for a little while and just hadn’t had time to put them to the test. I like them and they blend pretty well, but I found it challenging because the color range seems limited in the mid and lighter colors despite having 120 markers total in my set. I ended up blending in a bit of a grey brown and an ochre yellow and some peach to get my mid-tones. Overall even though I had to get a bit creative with the colors for my deer by blending some unusual colors together I think it turned out pretty good. I did find plenty of bright, bold colors to choose from for the hat and the reindeers nose and the collar with the bells. I felt like the reindeer would look good with a red nose. Who knows, he could be the most famous reindeer of all!?!

Once I had finished my coloring the reindeer I used the coordinating die to cut him out. I also cut out the extra Christmas bulbs, holly leaves and snowflakes. I had intended on using them, but ultimately I only used the snowflakes as they coordinated well with my Dare 2B Artzy paper. I do plan to create another fun card using the ornaments stamps from this set and the coordinating die cuts.
To assemble my card, I cut a top folding A2 size card base from some Neenah Solar White 110lb cardstock and scored it to create the top fold.
I used the awesome Dare 2B Artzy Double Dot Circle Framelets Die set and cut a circle in the center of the card front.
To create a frame for the circle on the card front, I used two of the Circle Framlets dies and ran them through my die cut machine to create a fun frame using some Tim Holts Idea-ology light blue metallic cardstock. I love the pop of metallic cardstock that the little frame adds.
I wanted the deer to have a brightly colored winter backdrop so I used an older piece of snowflake cardstock from my Dare 2B Artzy paper stash. I did check to see if this in their current paper stock online but I could not find it so I’m unsure if it is retired or not – sorry! They do have alot of wonderful new Christmas themed papers though. I cut the snowflake paper to a smidge under 4 ¼ x 5 ½ and I cut a second piece of 110lb cardstock to the same size. I adhered the snowflake paper to my 110lb card stock using some be-creative adhesive tape. I added the panel to the inside of my card base so that the snowflake background would show through the circle in my card front.
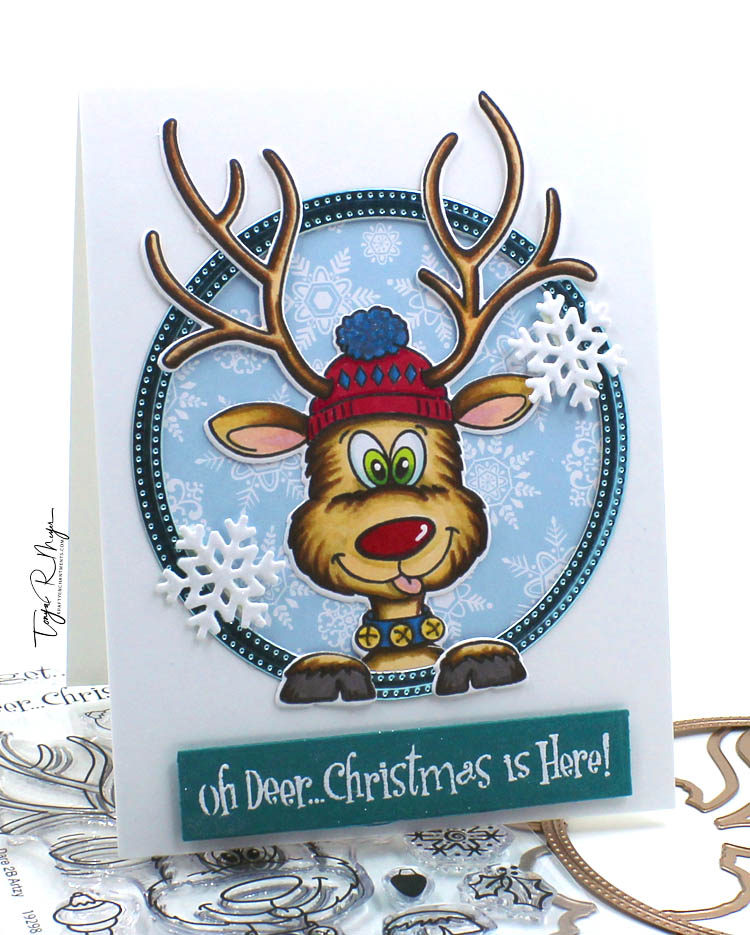
Assembling the card was a bit tricky. I glued my blue metallic frame to the card front leaving the bottom of the frame without glue. I wanted to slide my deer into that section between the frame and card front, but I wanted his antlers to be sticking out past the frame. Once the glue was set on the frame, I used a thin pair of tweezers to slide between the circle frame and card base. I added some liquid glue to the back of my reindeer and slid his neck into the space that was held open by my tweezers. I then carefully positioned him in the center of the circle. I added his front hooves to the edge of the card frame so he looks like he has his feet hanging outside of the circle. I just love this little detail for this stamp set. It is so fun! I added a couple of stamping blocks on top for weight while the glue dried.
For the sentiments, I used the “Oh Deer….Christmas is Here” sentiment and stamped it on some dark teal cardstock with some embossing ink and sprinkled on some ultra-fine detail White embossing powder and heat set it. I cut out the sentiment using the square from the Simon Says Stamp Nested Banners Wafer die set. I reach for it often when die cutting my sentiments as there is a nice variety and shapes for sentiment.
I added my sentiment strip to the bottom of the card front using a little dimensional foam.
With my deer and circle frame dried, I added a couple of the snowflakes I’d die cut from some white cardstock and added some Nuvo clear glitter pen to for some shimmer. I glued those to the card front inside my circle. I also added some Nuvo clear glitter to the reindeers hat and the bells on his collar for a bit of added shimmer. I also added a little white detail to his nose with a white Jelly Roll pen.
Eeeek! This card turned out just so cute! I am in love with the Reindeer Games stamp set from Dare 2B Artzy! I absolutely think it’s the best reindeer stamp set out there. So many possibilities with this the stamp and die set. I’ll be making more cards for the upcoming holidays for sure! You can see this stamp set and all of the other fun Dare 2B Artzy new releases at this link here: Dare 2B Artzy New Releases
Thanks so much for stopping by! Hope you’ve enjoyed today’s card. Have a great day!
Hugs,
Tonya


This card is absolutely adorable!!! It’s a joy to see you create with a fun Dare 2B Artzy stamp set!
LikeLike
Thank you Melody! Dare 2B Artzy will always be close to my heart! I love when I get to play with their stamps!
LikeLike
I love this card and I can see why you wanted this cute reindeer stamp set. I want it too now!
LikeLike
Thanks so much Verna! Hope you get to play with the Dare 2B Artzy reindeer stamp soon!
LikeLike