Birthday Sparkle & Shine with Anya Styles
Good evening!
Hope everyone had a great weekend and had loads of crafting fun or at least just had loads of fun with family and friends!
It’s been a while since I’ve blogged. I’ve been a busy bee as of late.
A bit of a shock was that a card that I’d submitted for the Water Challenge over at Some Odd Girl Stamps won.
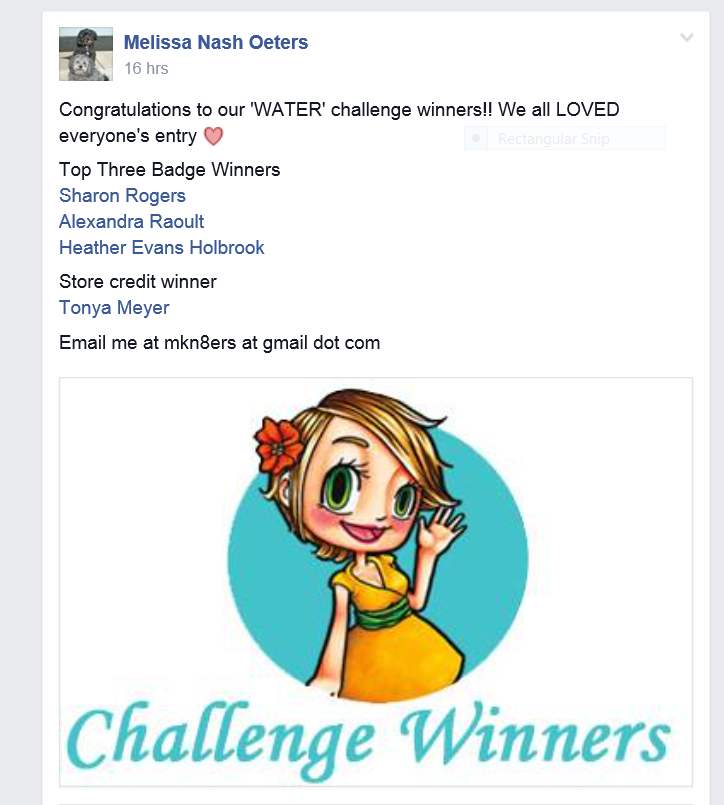
Shocked to see my name!
My little mermaid card that I blogged about a while back was selected and I won a $10 gift certificate to the online store!! Whoo-hoo! First challenge I’ve ever won so I’m feeling pretty excited about that. Congrats to the other Top 3 Winners as well!
I ordered some rubber stamps from them, hoping that I’ll have them soon as I’m anxious to play. One of them is a dress-up type stamp set so that should provide hours of fun and amusement for me, LOL!
Here are the details on my latest little card project. I put this one together for my co-workers daughter whose birthday is coming up in August. She’s turning 18 and her mom thought she’d like a personalized card. Eeeek – no pressure!
I used The Greeting Farm stamp Anya Styles for this card. I stamped her onto Neenah Solar White cardstock with some Memento Tuxedo Black ink and colored her with my Copics using some teal blue and bright pinks for her adorable outfit.
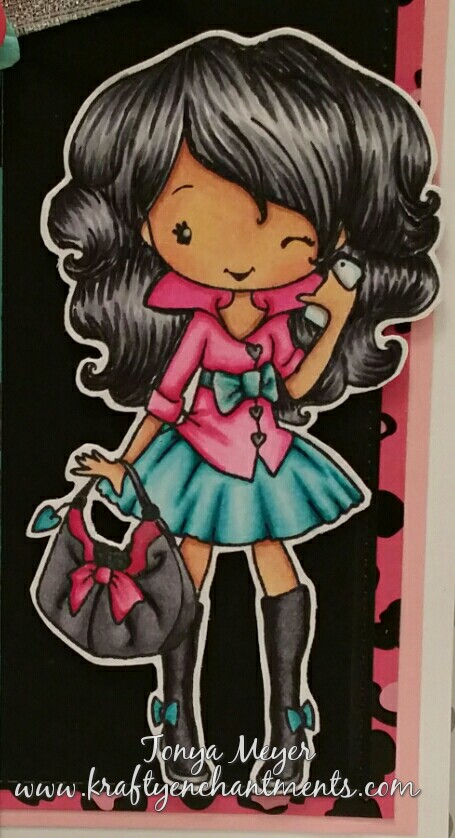
The Greeting Farm’s Anya Styles – isn’t she the cutest and so fashionable.
Once I was finished coloring her up I fussy cut her out and then tried to figure out my card layout. I’d purchased an awesome 4 ½ x 6 ½ animal print paper pack from Hobby Lobby called Safari Untamed by the Paper Studio. A little confession here; I’m a sucker for animal prints. I LOVE THEM!! From clothes to paper they are a bit of a guilty pleasure for me, LOL! I found a nice bright pink and a teal colored leopard print paper from this cardstock pack and used them in my card layout to enhance the colors I’d used in her outfit.
I used 3 layers for the main card base starting with bottom layer in a light pink, pink leopard print for the middle layer and then a layer of black cardstock. I wanted my colored image to pop and putting her against a black background was just the ticket. Each layer was cut 1/4 of an inch smaller than the previous layer.
Next, I used the Die-namics Fishtail Flags Stax to create a 3 layer side panel for the card in shades of teal. I started with the teal leopard print, then a solid teal for the middle layer and finally a white cardstock layer on which I stamped my sentiment using the Simon Says Stamp Handwritten Borders Happy Birthday stamp in some Magenta Memento ink. If you’re looking for a great set of sentiment stamps for all occasions, I highly recommend this set. It’s so great. Best stamp purchase ever, I think!
I adhered all of my Fishtail layers together and added them to the left side of the card. My co-worker said her daughter liked the Sugar Skulls, but I wasn’t able to find any of those to add to her card. I did find some really cute brads with a skull & crossbones and a little pink bow on them. I used one of those and added it to the center of a two layer pink and teal flower. I put that at the top of my card sentiment with a nice silver bow added to it.
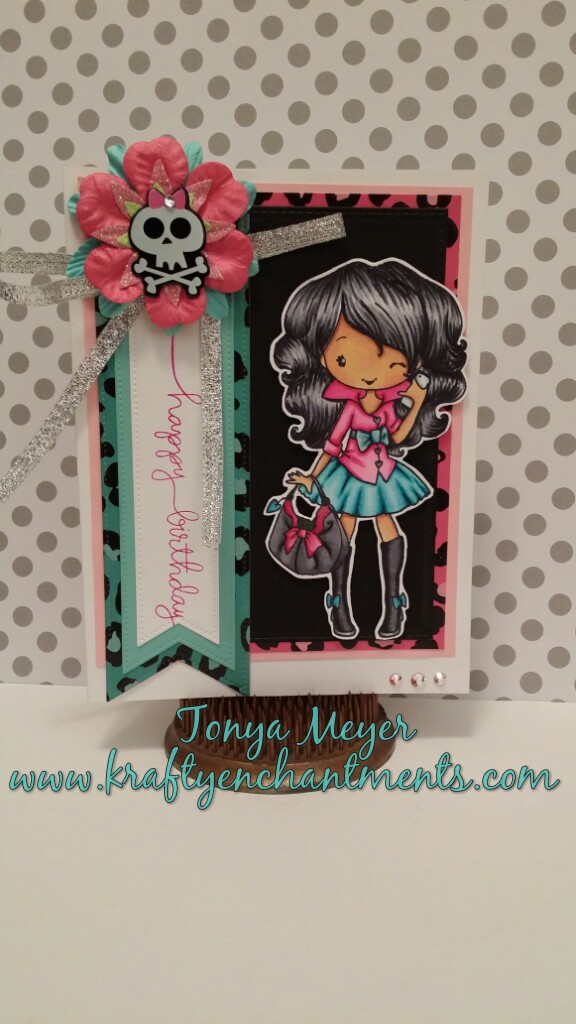
Completed card front
The final embellishment I added was some gorgeous HOTFIX Swarovski Rhinestones to the bottom right corner of the card. They didn’t photograph well, but I will say that the color on them is so pretty – it’s a sort of pinkish-purple color that has tons of sparkle.
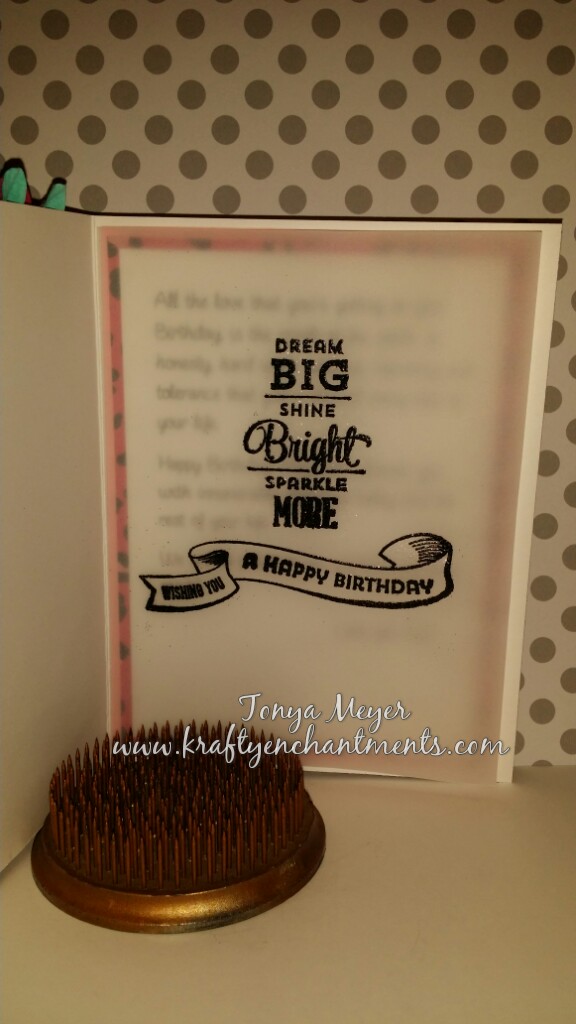
For the inside of the card, I had my co-worker pick between several birthday type sentiment stamps. She selected one from 3 Birds Studio, however she also had her own personalized sentiment she wanted added to the inside of the card.
I used a piece of vellum and cut it so that the left side was ½ inch wider so that I could score it and later glue that ½ inch overlap to the back of a piece of cardstock that would also go inside the card. The vellum would act as a nice overlay for that sentiment. Once my vellum was cut to the proper size for the inside of the card, I stamped it with some Palette Hybrid Ink in Black and quickly added some black embossing powder. I let my heat gun get nice and hot I quickly melted the embossing powder so as not to warp the vellum. There was a touch of warping but it wasn’t too bad for my first ever attempt at using vellum this way. This is definitely a technique I need more practice with as I had a lot of trial and error on what inks worked best with vellum and would still allow me to emboss them. Embossing and heating with vellum is a bit tricky.
Next I copied the personal sentiment message to a MS Word document and changed the font so that it would closely match the scripty font on the front of the card. Once I was done editing and tweaking the sentiment, I set my margins as wide as I could make them. The main reason for this is because I wanted my sentiment to print as closely to the center of the paper as possible so that when I cut it down to fit inside my card it would still be centered and there would still be enough space to write something at the bottom. Once I was done, it printed it on a piece of Neenah Solar White cardstock cut it down to fit the other two layers for the inside of the card and used some Ranger Glossy Accents to adhere the stamped, embossed piece of vellum to it as my overlay. The completed inside sentiment for the card was then glued to the inside using Ranger Glossy Accents.
Here’s a look at the inside of the card – I’m not showing the cardstock layer as it was a personal message from my co-worker to her daughter:
That’s pretty much it for this card.
This week I have another birthday card in the works for later in the week that I’ll be sharing featuring a Tiddly Inks image that is just too cute for words!
I’m also going to be working more on my Clothing Classes over at Kit and Clowder. Getting in more practice, practice, practice as they say.
Also, I’m anxiously awaiting word on some potentially exciting news that I might be able to share with you in the next week or so – hopefully I’ll have good news. Keeping my fingers AND toes crossed on this one.
I also need to get my nose to the grindstone and get crackin’ on some Christmas Cards so that I’m not waiting until the last minute to make them as I’ve done in the past.
Thanks for stopping by, hope you enjoyed this card creation. I’m looking forward to finding out what my co-workers daughter thinks of it. I’m really hoping that she likes it.

