Color is the Spice of Life
Hi All!
Hope everyone is doing fantastic! It’s been so dreary and grey here the past couple of weeks. I believe that Seattle must have stolen our sunshine! Someone please tell them that we’d like it back because we’re all very sleepy and crabby here in Colorado without our daily dose of sunshine!!
As you already know, I’ve been working diligently each week to try and complete my Skin & Hair coloring class over at Kit and Clowder. The classes are self-paced so there’s no set time frame in which to complete them. So it’s really up to me to make sure I set aside time during the week to work on lessons and practice each coloring technique in order to complete the class. I’m finally getting down to the final couple of classes and this week’s lessons were teaching us colored hair techniques (think funky hair – pink, purple, green) and monochromatic skin tones. It was so much fun learning to add some color to hair and the monochromatic skin tones really add to the image. These techniques are great for coloring fun images like fairies, zombies and Halloween witches. Color is the spice of life – at least in crafting, I say!
Unfortunately I can’t share my class work sample images because they are copyrighted materials & you probably wouldn’t want to see that boring stuff anyway. It’s just my endless hours of trial and error. Believe me there’s a lot of that in learning to color with Copics.
What I can share is a cute card I created this week using the colored hair technique.
For this card, I used one of the super cute fairies from The Greeting Farm’s Magical set. This particular set has 10 cute little girl images with crazy cute hairstyles and outfits (what woman doesn’t love that) and it also has three sentiments with it. These stamps all come mounted in one untrimmed sheet so you have to cut them out in order to use them. It really is an awesome set to have for card making.
The TGF fairy I chose has her hair up in twirled buns on her head. For some reason it kind of reminds me of cotton candy so for that reason I chose to do her hair pink. Makes me want to go to a carnival and have some cotton candy, don’t you? I colored her hair using my Copic markers. This particular hair color uses a 4 marker combo of R89, R85, R83 and R81. I kind of love this color combo so I’m sure it will become one of my favs. For the rest of her I wanted a bright contrasting color so I chose orange. I used that and a bit of green for the flowers in her hair and then more orange for her outfit. I love the bright spring colors. Although I could have done a monochromatic skin color as well and made her skin a lovely shade of pink as well, I decided to give her a warm sun-kissed glow instead. I added a bit of Wink of Stella clear glitter accents to her flowers, clothes and of course her wings. 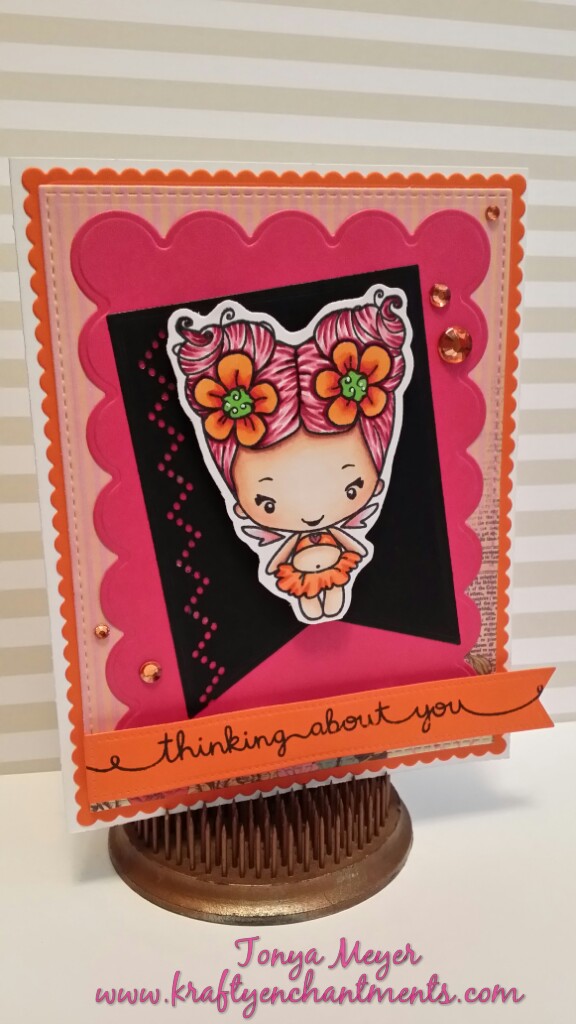
To create my card layers I used a Neenah Solar White 80lb cardstock as my card base. My layers from the bottom up were created using 3 different Blueprints die sets from Die-Namics. I’m so thrilled to have these die sets recommended to me from my dear friend, Carisa over at Inky Fairy Designs. The Blueprints dies are super versatile and really make putting cards together a cinch. They’re actually designed so that each Blueprint set can be used to create a card by itself or you can mix-n-match as I’ve done with this card.
The bottom layer was created using the small scalloped die from Blueprints 24. I cut that using some bright orange cardstock from Michaels Recollections collection. The next layer used the stitched square die from Die-namics Blueprints 20 and some fun pink & orange striped paper from a Kaisercraft 6 ½” paper pad called Lulu & Roy. It has lots of fun floral and polka dot prints in it. Then I used the large scalloped square die from Blueprints 1 set and cut the bright pink layer with the large scallops. For my final layer, used the Blueprints 20 set again and I cut the fishtail banner from some black cardstock and then used the little chevron dotted wave die from the Blueprints 24 to add a bit of geometric variance along one side of the fishtail. I also added a bit of Wink of Stella clear glitter within the dots.
After die cutting all of those pieces I layered them up on my card base and added my little fairy on top with some dimensional foam to pop her up. I just love how her bright colors stand out against the black fishtail die cut.
For the little sentiment banner at the bottom I used the Die-namics Fishtail Flags Stax set and stamped the Thinking About You sentiment from the Lawn Fawn Scripty Sayings stamp set with some Memento Tuxedo Black ink. I put this at the bottom of the card and also popped it up with some dimensional foam.
To finish it off I added some orange gem accents to the card.

I hope that you enjoyed seeing this card creation as much as I enjoyed creating it. Hopefully you’ll go out and color your world bright today!
Have a great rest of your week – Friday’s almost here!
Tonya
.


A very cute and pretty card. Great image.
LikeLiked by 1 person
Thank you so much for the kind word! Appreciate it!
LikeLike