Something’s Fishy
Happy Wednesday everyone! Hope you’re having a wonderful week.
As promised from my sneaky peeky earlier today, I’m sharing something fishy. First I wanted to share with you some info on the various forms of rubber stamps there are for use in card creations and crafting. I apologize in advance for the long post today, but I thought this info might be helpful to some people. You have my permission to skip to the end to see what’s fishy.
The first type is the traditional wood block rubber stamps. Several years ago, when I first began to get my feet wet with stamping there was really only 1 type of rubber stamp and that was the wood block stamp. Images were carved out of red rubber mounted to a layer of foam and then adhered to a wood block which had a picture of the stamp image on the back. Of course these types of stamps are still readily available today. They can come in many different sizes from the very large background stamps to tiny alphabet stamp sets. Even little tiny detail stamps can be mounted to the end of dowels – check out the cool things you can do with those over at Stamps by Judith.
Over the years there have been several different types of stamps introduced to the crafting market. We now have cling mount stamps, photopolymer clear cling stamps and acrylic clear cling stamps and digital stamps.
Cling mount stamps are still made from traditional rubber just like you’d find on wood block stamps, though it’s not always red. I’ve seen cling mount stamps in blue rubber, grey rubber and the standard red rubber and there are probably more. The image is made from a mold and then rubber gum is pressed into the mold to form the stamp impression and then adhered to the mount. In the case of cling stamps, a layer of foam about 1/8″ thick is adhered to the rubber and it has a smooth backing that will “cling” to an acrylic stamp block. The acrylic stamp block is what forms your base or handle to grip while you stamp the image. Occasionally stamp companies will simply produce the rubber with the image on it because it’s more cost-effective for them. In which case you would need to purchase mounting foam yourself to adhere the rubber image to for stamping. Some crafters chose to use double-sided sticky tape directly to the back of the rubber and then it will cling to your acrylic block. Personally I prefer to purchase a sheet of the 1/8″ Cling Mount Foam and adhere my unmounted stamps. You can purchase 8 1/2 x 11 EZ Cling Mount Foam sheets in 1/8″ and 1/16″ thickness relatively cheap and you’ll be able to mount several rubber stamps depending on the size of the images. Once your rubber is adhered to the sticky (and I do mean sticky) side of the cling foam you then need to cut the mounted image out of your Cling Foam sheet (trimming excess rubber around your image and the cling foam) and peel of the backing exposing the smooth side so that it will now “cling” to your acrylic block. I feel that you get a better stamp impression with that foam cushion on the back of the rubber image, but that’s just my personal preference.
Another kind of rubber stamp is the photopolymer clear cling rubber stamp. Until recently I’d actually assumed that photopolymer and acrylic stamps were one in the same but they are not. While both are clear, see through type stamps; they can produce very different quality images. Photopolymer stamps are manufactured in such a way that the image surface is porous so the rubber stamp doesn’t resist the ink that you’ve put on it to stamp your image. This may mean that the ink your using will stain the stamp itself. Staining shouldn’t affect the quality of any images stamped. Photopolymer stamps can sometimes feel a bit thicker and not as flexible as acrylic stamps. The fact that the stamp is clear makes it easier to see where you are placing your image which is a bonus for card making techniques such as masking and centering an image.
Then there are clear acrylic stamps. While these look similar to photopolymer stamps the quality of stamped images produced from acrylic stamps is not as crisp and clear. Acrylic stamps are a little more flexible. Many of the acrylic stamps on the market are imported. Acrylic stamps lack the porous surface so when you apply ink to them, the ink tends to pool a bit on the surface and therefore can produce an image that doesn’t have clean lines or doesn’t ink up entirely on the surface of your paper. One trick you can try to condition an acrylic stamp is to gently rough up the surface of the stamp image with a nail file or a clean eraser. A common complaint about acrylic stamps is that they lose their tack. I’ve not had that experience myself, however I am diligent about the storage (out of direct sunlight and heat) and cleaning of my stamps.
The final type of stamp image I wanted to share with you is called a digi image. With the computer age, stamp companies and artists have begun to offer what is known as digital stamps. Digital stamps or “digi” as they are referred to are black & white line art images that are made available for purchase from stamp companies and independent artists. When you purchase a digital stamp you receive a file that contains a .jpg image and a .png image with transparent backgrounds. Once you’ve downloaded your purchased image you would open it and print it onto cardstock just like printing a picture. As with rubber stamps, purchasing digital images means that you agree to that stamp company or individuals Angel Policy which outlines the rules for use of the purchased images. It’s always important to know what the usage limitations are. The other thing to consider with digital stamps is storage on your hard drive. Granted each image doesn’t take up much room, but if you get addicted to them they can take up space on your computer.
Now onto the reason for my card today. I’ve always liked the quirky, fun images from a stamp company called Some Odd Girl but I’ve never been able to purchase the actual rubber stamps for my favorite images because the places I’ve frequented have been sold out of the ones I wanted. Yesterday, I applied to be part of the new Oddvocates Team for Some Odd Girl Stamps. It’s basically a great opportunity to be provided some stamps to design with and showcase their stamps on my social media sites and here on my blog. Of course, I applied knowing that I didn’t have any cards on any of my social media sites that were made using their stamps. As my husband always tells me, ask for it, what’s the worst they could do – poke you with a stick. Well, I fully expect to be poked with a stick, particularly since I put the cart before the horse in this case. My wonderful friend Carisa over at Inky Fairy Designs suggested I color one of their digi stamps and make a card with it. I’m not really sure why it didn’t occur to me that they had digital stamps, but I checked and sure enough they did have digi stamps on their website. I love, love their fairy, mermaid and critter stamp lines as they are just so cute. I ended up buying 3 digi images and today I’m sharing with you the card I made with Some Odd Girl Stamps digi mermaid Pearl.
The thing I like about the SOG (Some Odd Girl) stamps is that the faces all have expressions on them so it’s fun to watch the expression come to life as you color up the image.
For my mermaid image, I wanted her to be a siren of the sea and have bright red hair and a beautiful multi-colored tail. I used my Copics to color her up and used a stippling technique on her tail to create a sort of multi-color texture. Once I finished coloring her I fussy cut her out.

For the card background, I used the Spellbinders Cascade Dots die. I cut a solid sheet of cardstock from a blue-green cardstock to use for the background. Then I cut another sheet of patterned paper from a watercolor scrapbook stack. This paper is a sea-foam green color with glitter dots accented all over it. I used the dots portion of the Spellbinders die to cut it so that little circles of the other color paper would show through. I glued the two layers of cardstock together and mounted them to my cardstock base in Neenah Solar White.
I didn’t have any sentiment stamps that seemed to go with my mermaid so I typed the sentiment, You’re Fintastic out in MS Word and selected a cute font and printed onto cardstock. I cut it out with the long oval die from Die-Namics Blueprints 21. I then cut a piece of teal cardstock with the Die-Namics Stitched Fishtail Flags STAX and adhered my cut sentiment to it. I popped the sentiment and my little mermaid onto the card with some dimensional foam. To embellish a bit I added some teal candy dots to the card front and used a bit of Wink of Stella to add some additional sparkle.
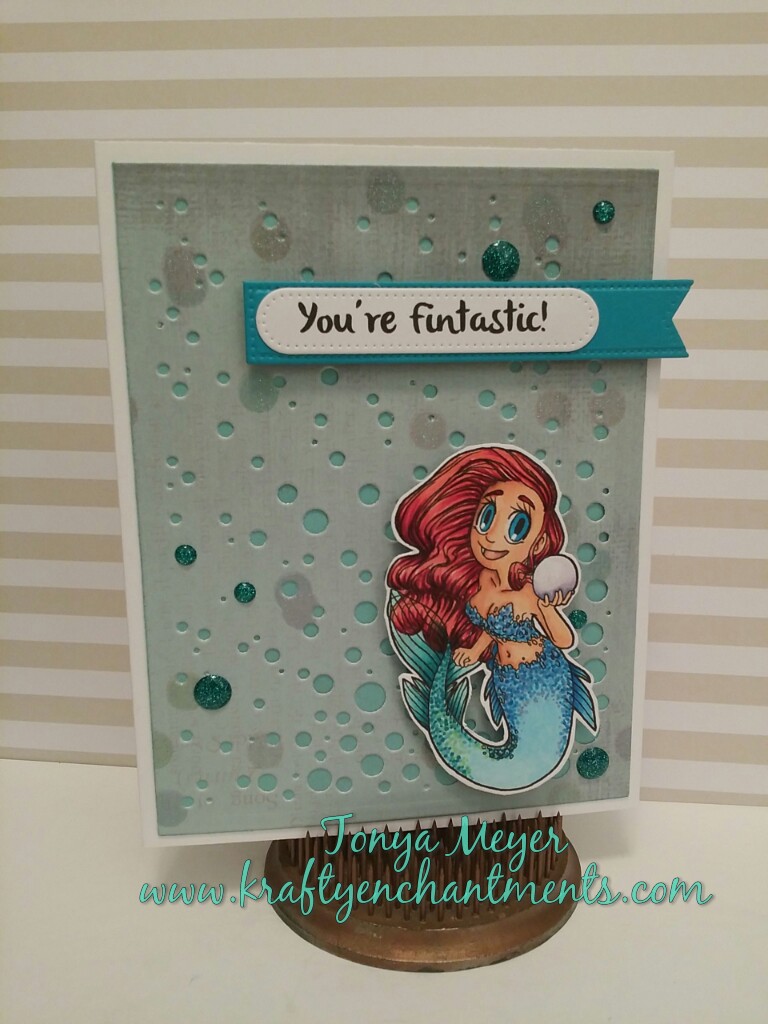
Some Odd Girl Stamps Mermaid Pearl card
This was my first attempt and coloring a mermaid and I just love how she turned out. There’s so much room to be creative with fantasy images and there definitely aren’t any rules when it comes to creativity or colors. The sky is the limit.
Hope my information about the various types of stamps is helpful to everyone. I know personally, I’m a very tactile person so I like to be able to touch and hold things in my hands. Stamps are no exception, but don’t be afraid to try using digital stamps. Many times they offer a wealth of possibilities in expanding your creativity and stretching your crafting budget, especially when you can’t purchase an actual version of a rubber stamp.
Hope you all have a great rest of your week. Go out there and try your hand at a new digi stamp and challenge yourself.
Crazy Fact: The first time a rubber stamp was ever used was in 1866.

