Christmoose Inspiration
Hello krafty friends!! I’m happy to be back with a new Dare 2B Artzy card today.
Raise your hands if you’re done making your Christmas cards. I am positive there are many over achievers out there!! You know who you are. As for me? NOPE, just gettin’ started. I am a pro-craftinator when it comes to making my holiday cards. Maybe that is because it is difficult to get in the Christmas spirit when it’s middle of summer?
Well, here we are today on one of the hottest days of the Summer so far in Colorado (at around 100) and I’m kicking off my Christmas cards with a Dare 2B Artzy Christmoose card.
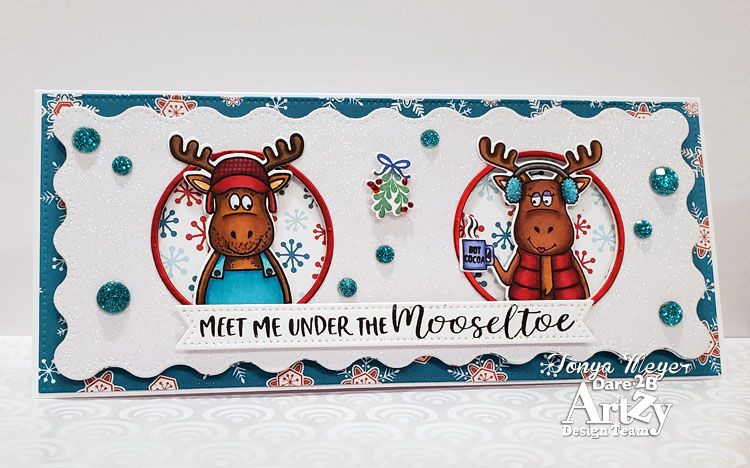
The Christmoose stamp and die set is just too adorable for words with the little moose couple. I knew had I had to make a Christmas card when I saw the “Meet me under the Mooseltoe” sentiment.
To create this card, I colored my little moose couple using a combination of Copic and Chroma markers. I love that you can add it some of your own details with this stamp set. For example I added the hand drawn plaid to his hat and gave him a bit of stubble on his face. I don’t know – do moose have to shave? I was picturing a woodsy lumber-jack moose. LOL! I colored his overalls to match the Dare 2B Artzy paper I used for the background on the card. I kept the whole color pallet with teal and red which is a favorite of mine for a retro-looking Christmas.

For the girl moose, I colored her jacket red. Again, I could have added a hand drawn plaid on her puffy jacket, but I decided she wasn’t a woodsy-looking moose. She’s a bit girly like me, sitting inside sipping her hot cocoa, LOL!
I die cut my moose couple using the coordinating dies. I love, love the little details of this die set. The die for the moose girl cuts out the little space underneath the ear muffs and the steam from the hot cocoa. How cute is that!
To prepare the rest of the card, I used the large slimline die to cut some Frosty Chalet paper for the background for my card panel.
Next, I used the large wavy slimline die to cut a piece of the Chocolate Moose paper with the fun retro-looking snowflakes on it.
I cut a second piece of white glitter cardstock using the large wavy slimline die. This will be the top most layer of my card.
Whenever I have stamp elements or critters that have antlers, like the moose; I love to have those positioned so that part of the stamp is on the inside of the card front and part is on the outside. It looks like they were walking by and just popped out through a window. I think it adds a bit of dimension to the card.

To do that, I used a 2 inch circle die to cut a hole in the glitter cardstock. Then I measured the distance and cut a second circle from the cardstock so that they were equally distanced. I framed the circles by die cutting a second circle that was just slightly larger from some red matte mirror cardstock and adhering it in place with some liquid glue.
I added some dimensional foam to the back of my white glitter cardstock. Then I figured out the placement of my boy and girl moose. I wanted the antlers over the front of the glitter cardstock and part of the hot cocoa mug with the rest of the body underneath the glitter cardstock. I used a bit of liquid glue to hold the moose in place. I did cut off the legs on both of the moose so that they wouldn’t poke out from the bottom of the cardstock. NOTE: You certainly don’t have to color the full image when you’re making a card like this. Particularly if you know a part of the stamped image will be cut off. It saves a bit of time. I was not sure how much of it would be sticking out so I colored the entire image in this case.
Now that the moose were glued in place, I added the chocolate moose cardstock behind the front panel so it could be seen behind the boy and girl moose. You could also easily make a shaker card just by adding a piece of acetate behind the moose and then positioning your dimensional foam around the circles and adding in your favorite sequins, beads or gems.
To add the sentiment, I needed to get a bit creative. I wanted to have the little piece of mistletoe in the center between the two moose but I also wanted the mooseltoe sentiment which is a two line sentiment. I decided to make it into a one line sentiment so I could put it at the bottom of the card. I did a little stamp masking and die stretching to make that work.
Using my MISTI I positioned the stamp and placed a Post-it note over the 2nd line of the stamp covering up the moosletoe. I inked up the Meet me Under the with some detail black ink, removed the mask and stamped onto white cardstock. I cleaned off the stamp really well. This time, I repositioned the stamp so that the Mooseltoe was at the end of the sentence. This time I masked off the “Meet me under the” with a Post-it note and just stamped the Mistletoe at the end of the sentence. This is a great way to stretch your stamp sets when you can use masks to change things up.
To die cut my sentiment, I wanted to use the coordinating flag banner die that comes with the Dare 2B Artzy slimline set. However, now that I had made a single line sentiment it was a bit too long for the coordinating die. An easy work around is to stretch your die.
To stretch the die, I placed the die cut over my sentiment and added a bit of washi tape to hold it in place so it didn’t shift. I placed it onto my cutting plate and positioned the top plate so that it only covered half of the die. The second half of the die and sentiment are hanging out the back and since there’s no cutting plate over them, they do not get cut. Run it through the die cut machine. Then simply move the die down and do the same thing so that the other half of the sentiment gets cut and the previously cut end is hanging out the back with no cutting plate over top. It’s as easy as not putting your cutting plate over anything you don’t want to be cut. This way you can make the die cut a bit longer or wider piece depending on what you need. This works well for most banner strip dies and similar shaped dies.
I added some Sakura sparkle pen along the pierced dots on my sentiment strip for some added sparkle.
The final touch was adding the die cut mistletoe to the card. I stamped it with some green and blue inks and added some Nuvo glitter drops in red where the berries would be.

I added some teal colored gems to my card panel for a bit of dimensional sparkle and they matched the Frosty Chalet paper perfectly.
The entire finished card panel was added to a card base of 100lb cardstock.
Whoo-hoo, my first Christmas card of 2020 is in the books. Only about 20 more to go, LOL!
Thanks so much for stopping by today. I hope you’ve enjoyed this fun Christmas card featuring the Dare 2B Artzy Christmoose stamp and die set along with the Slimline die sets.
The products I’ve used in today’s card are linked below if you are interested in purchasing these products.
Have a great day!
Hugs,
Tonya

https://linkdeli.com/widget.js?id=f5e8378456858c916708


Super cute!
LikeLike
Love this such a great fun design
Claire Mrs H’s Crafty Corner
LikeLike
Thank you so much! I’m glad you enjoyed it!
LikeLike
Thanks so very much!
LikeLike