A POP of Comic-like Fun!
Hi! I’m back today with something a bit different.
I’m combining products from a couple of different companies to create a fun birthday card!
Not sure about anyone else, but I’m a comic book nerd. I got started collecting comic books when I was in high school. My high school sweetheart was into collecting comic books so I got interested in them as well. I still have a small collection today and I really enjoy reading them.
I love the look of pop art and half-tone art that bring about the look and feel of comic books. There have been a few stamp companies that have come out with comic book elements from stencils, stamps and die cuts. Today’s card features some of those elements from I-Crafter and also a cute paper doll from Papertrey Ink.
To start, I colored the little girl from the Papertrey Ink Dress up Dolls basic set. This set is so fun as it features several customizable elements for the girls hair from braids to pony tail and even a cute hair flip. Plus the main set comes with a little boy and each has a set of t-shirt and pants. There are several add-on sets available for the Dress Up Dolls sets including Halloween costumes, a cute bunny costume and summer fun sets among others. There were coordinating dies for the Dress up Dolls basic set, however they were sold out (DISCLAIMER: I’m not really sure if Papertrey Ink will restock them as it seems they are kind of getting rid of old stamp sets, so I apologize if you’re unable to get these stamps. However there are several other stamp sets from other companies that would work to create a similar card). When I saw the Super Hero add on, I wanted it to make a fun card.
I stamped the little girl from the Dress Up Doll set onto some Accent 100lb cardstock from Amazon. I’m trying some different cardstock based on a recommendation I saw. I’m very impressed with the cardstock so far as it really holds alcohol markers well for coloring and it’s a bit brighter than the Neenah Classic Crest I normally use and as a bonus it’s a bit cheaper too!
Once I had my paper doll stamped, I colored her using my Art-n-Fly alcohol markers. I’m trying out a couple of different brands of alcohol markers as well as an alternative to my Copics. Art-n-Fly markers only have about 96 colors available currently but more are planned. I’ll have a review on the various markers I’m testing out soon so stay tuned for that.
I colored my paper doll girl head to toe even though I would be covering her body with the Super Hero add on suit. Once I was finished coloring her I fussy cut her out as I didn’t have a coordinating die set. Next, I stamped the fun super hero suit. This stamp set also features some fun accessories. There’s a shield, a tiara headband, a “S” emblem similar to Superman (woman) for the front of the uniform as well as a “Flash” symbol and a mask. These are great additions to customizing your little dress up super hero boy or girl.

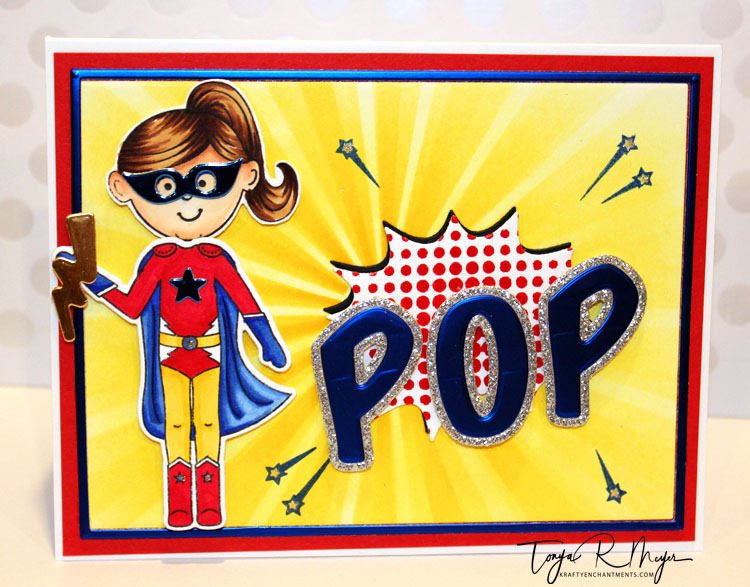
Comic books are printed using bright primary colors such as blue, red, yellow and black. I opted to use a similar color scheme of red, yellow and blue for my suit and I left a small amount of white on the trim and waist. The suit has a pre-printed star on it, however I ended up using a star from the die set to glue on the front as well as the mask. I thought that using the the die cut elements would add a touch more dimension to the image. When I finished coloring I use the coordinating Super Hero add on dies to cut it all out and then cut the mask and small star on the front of the suit from some blue foil cardstock.
To create my background, I used an awesome stencil from I-Crafter.com called Cosmic Flare. This is an A2 size stencil and it has a bit wider flare elements on one half than the other. That way you can flip your stencil around and get some different looks which I love. It’s always a plus when you can use your crafting supplies in different ways to get different looks or multiple looks from one tool. Love that!
I cut a panel of the Accent cardstock to 6 x 9. I inked some Hero Arts Squeezed Lemonade Distress Ink onto the stencil and background first and then added some more depth with the Mustard Seed. Next, I flipped my stencil so that it would re-orient where the wide and narrow rays would be on my cardstock and added some more Squeezed Lemonade and a bit more Mustard Seed. I love the layered effect that you can achieve with this stencil and the distress inks.
Next, I used a fun set of dies from I-Crafter called Comic Words. I was so amazed with these dies. First, they are an awesome teal color which is so pretty and so different from all of my other dies. Beyond that, the best part is that they absolutely cut like butter. The letter dies in this set not only cut the letter, but they also cut the outline around the letter and inside the letter. I was worried that they would be difficult to cut or wouldn’t come out of the die as is the case with some detailed dies. OH MY, I was pleasantly surprised. These dies cut so well, I was blown away. I cut the foil and glitter cardstock and it only took 1 pass through my manual die cut machine. WOW – just wow!
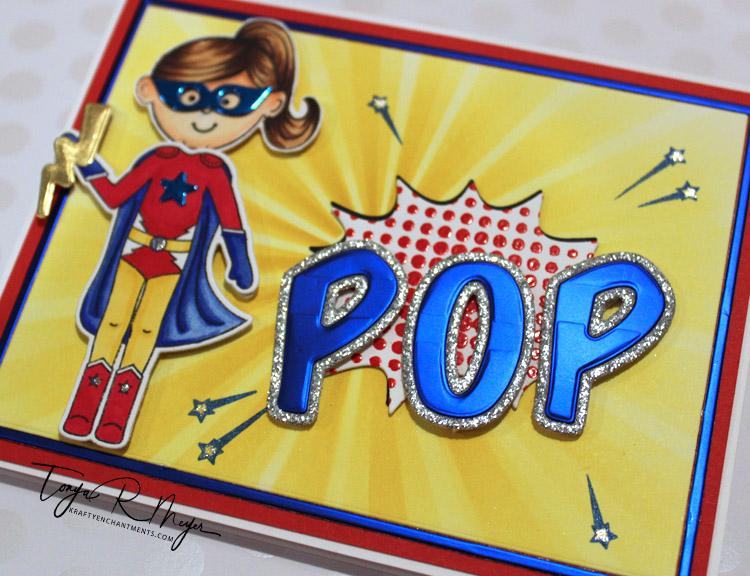
The Comic Words die set features several individual letters so that you can create words such as mom, wow, boom, dad, omg, pop and cool. Plus there’s an exclamation mark as well. I am sure that many more words can be made so this set is very versatile also. The die set also includes two exclamation starbursts and a speech bubble cloud. I guess that’s what you call them, not sure. I cut the POP word out with some blue foil cardstock and cut the word outline with some silver glitter cardstock.

The other I-Crafter product I used was the Comic Half Tone Dots stamp set. This stamp set allows you to create the look of half-tone printing on your card elements much like you’d see in the old comic books.
I utilized the circle half tone dots and stamped with some versamark ink and heat set it using some Hero Arts red embossing powder onto my white cardstock.
I used the starburst die from Comic Words and die cut the cardstock with my half tone dots. I cut a second piece using black card stock to give it a bit of a drop shadow on my card front.
To assemble my card, I used the Essentials by Ellen Rectangle die and cut the stenciled background with the largest rectangle. I cut a second rectangle from some blue foil cardstock and used the thin blue foil frame around the stenciled background. I adhered the background to a piece of red cardstock that measured 5 5/16 x 4 3/16 using some score tape.
I added my half tone star burst and drop shadow slightly off center from my background. I wanted to add some of the star bursts from the stamp set so I placed my background into my MISTI and stamped with some Delicata ink in Sapphire Blue.

In order to add the POP die cut sentiment to the card front, I had to add some 1/4 inch score tape to the back to hold all of the elements together. Once everything was secure, I added some dimensional foam to the back and popped it up on top of my star burst on the card front.
Next, I was ready to add my paper doll to the card. I layered on her mask and star to her uniform with some liquid glue. I glued the suit to the front of the paper doll. Once dry, I added some dimensional foam to the back to give her a bit of dimension on my card front.
As an after thought I added the lightening bolt cut from some gold foil cardstock and added it to the hand of the paper doll.
The Dress Up Dolls Super Hero add on features some fun sentiments that were perfect for the inside sentiment. I used Have a Super Birthday!
This card came together so quickly and I had so much fun putting together the different comic book style elements.
Thanks for stopping by!
Have a great day!
Hugs
Tonya


Awesome card! Looks like a fun stamp and die set!
LikeLike