Basket of Shimmer & Shine
Hi everyone! Wow it’s been a bit since I last posted. A lot has happened (aside from our current situation), but I’ll save the details for another post.
Today’s card is special because it’s Easter. For most with the current state of the world and the virus it’s probably a very different Easter than we’re used to. For our family, my husband and I live with my mom so we’re blessed that we can all be together for this Easter Sunday. I know many families aren’t able to celebrate Easter as they would normally with large family gatherings. Hopefully you’ve had a wonderful Easter no matter what! I’m sure we’ll all be able to get together with friends and family again really soon.
The card I’m sharing today uses the Spellbinders monthly Club Kits from the Large Die of the Month Kit as well as the Glimmer Hot Foil Kit of the month from March. I also used the Spellbinders Foliage Border Glimmer Hot Foil plate from Yana Smakula.
To start I cut out all of the large dies (both bunnies and the basket) using some Neenah 110lb Solar White cardstock. This card really was about playing with the dies and experimenting with the hot foil kit to see what I could make.
The March Glimmer Hot Foil kit included three sizes of egg dies in large, medium and small, three decorative hot foil egg plates, 5 hot foil sentiments and a sentiment die strip.

I used several rolls of Spellbinders hot foil including Moondust, Magenta, Teal and Gold to foil my eggs. I set the decorative hot foil egg plates on to my Spellbinders Glimmer machine and let them get hot. Once the plate is heated up I set the timer on the machine and placed my piece of foil with the shiny side up over the glimmer plate egg and a piece of cardstock on top. Note that I cut my foil down to be just slightly larger than my foil plate. This helps prevent over-foiling.
Once everything was ready I ran the entire thing through my die cutting machine. I found that with my machine, I didn’t need to use an additional shim as that lead to over-foiling more often. It’s good to experiment with your machine to see what works and what doesn’t with foiling.
I created several eggs using the decorative egg foil plates, but I also incorporated the Foliage Border plate from Yana Smakula’s Spellbinders release as well. It added a beautiful foiled foliage to my eggs.
Once I had about 13 eggs in varying sizes foiled, I used the coordinating Spellbinders egg dies to cut them out.
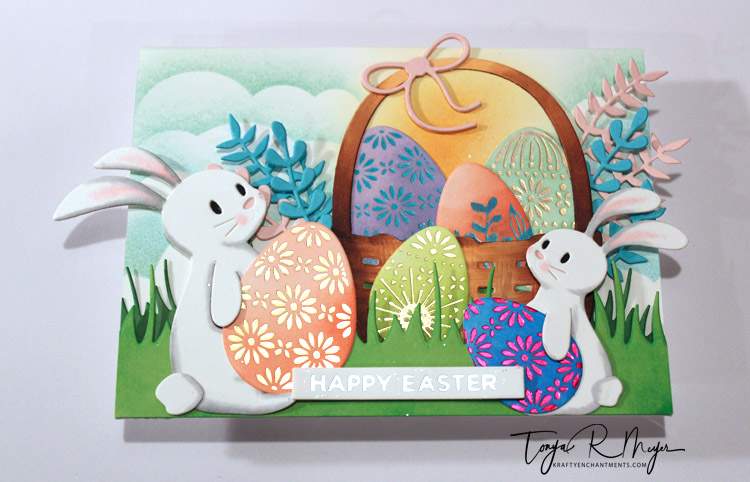
I also took the time to use one of the Glimmerplate sentiments that came with my March kit to foil the Happy Easter sentiment and cut it out with the sentiment strip die cut.
Since I had foiled onto my white cardstock, that allowed me to use a blending brush and Distress Oxide inks to add color my eggs. The Distress Oxide blends beautifully over the foiling and once finished a gentle buffing of the egg with a soft cloth will remove any ink that might dull the foiling details. You could easily foil onto colored cardstock and skip the ink blending step to save time, but I like the look of the ink blended eggs.
To add some detail to my bunnies, I colored them with some soft grey Kuretaki Zig Clean Color brushes with just a hint of pink on the cheeks and inside the ears. The added color gives the bunnies some depth. The bunny dies are very detailed and do include dies for the inside of the eyes, nose and ears that are very, very small. I decided to color the inside of the ears and rather than inlay the die cut nose and eyes, I used colored cardstock behind the bunny’s face to give them detail. It’s a good way to cheat when the die cut pieces are so small.
For my basket, I colored it with my Copic markers using E11, E13, E15 and E18. The basket has a nice embossed basket weave to it and the Copic color sort of enhances that. I added a die cut ribbon to the basket from another Spellbinders set that I had. I though the bow added a nice touch to the basket.
At this point, I was ready to assemble my card. I started with creating a backgound by ink blending on some yellow to represent the sunshine. I gently started blending yellow Distress Oxide ink onto the card base. I made the center nice and bold yellow and then made it softer out the outer edges. Next, I used a cloud stencil to blend some soft blue-greenish cloud layers onto the background using a blender brush.
For the grass, I die cut two different colors of green cardstock with the Lawn Fawn Grassy Border and the Meadow Border dies. I added just a touch of ink blended dark green to the grass to give it some depth. The darker grass was added to the ink blended card front with some liquid glue.
Next, I realized that with my basket you could see the sky through the spots in the basket that were die cut. I opted to cut a piece of green cardstock to layer behind the basket so it would appear to match the green grass.
I began to add my eggs to the basket by layering them into the basket and gluing them in place with some liquid glue. I’d opted to use the large and medium eggs so that only allowed me to add 3 to the basket. Once the eggs were dry, I added the basket to my card front with some additional liquid glue. I set some stamping blocks on top of them to make sure that they stayed in place while drying.
The next layer of grass was added over the basket using some dimensional foam. I was then able to add in 1 small egg behind the layer of grass in front of the basket.
The two bunnies with their eggs were added to the top layer with their foiled eggs glued in place so that they wouldn’t move or shift.
At this point, I realized that I hadn’t added any of the foliage that came with the Large Die Kit. I die cut a bunch of the foliage with some soft pastel pink and teal cardstocks and added it into the card on the sides of the basket. I was able to tuck them in behind the basket and adhere with some liquid glue.
Finally I added the foiled sentiment, Happy Easter at the bottom of the card front.

For the inside of the card, I stamped Happy Spring using the Simon Says Stamp set Bunny Butt Peek-a-Boo.
Hope you enjoyed today’s card featuring the Spellbinders Large Die of the Month Kit and Glimmer Hot Foil Kit of the month for March. While you can no longer get these kits, Spellbinders does sometimes re-release their previous months kits. You can check out their kits here: https://www.spellbinderspaperarts.com/clubs/
Happy Easter!
Hugs,
Tonya
.


OMGoodness, what a sweet Easter card! Love the foiling and all the die cuts. Just beautiful! So glad to see a post from you! Very happy to hear that you, Gary and your Mom were together for Easter. xo
LikeLiked by 1 person
Thank you Leslie! It’s good to hear from you! I’m glad you like the card. It was a bit of work but the finished result was so fun!
LikeLiked by 1 person