A Very Special Anniversary Wish
Hi crafty friends!
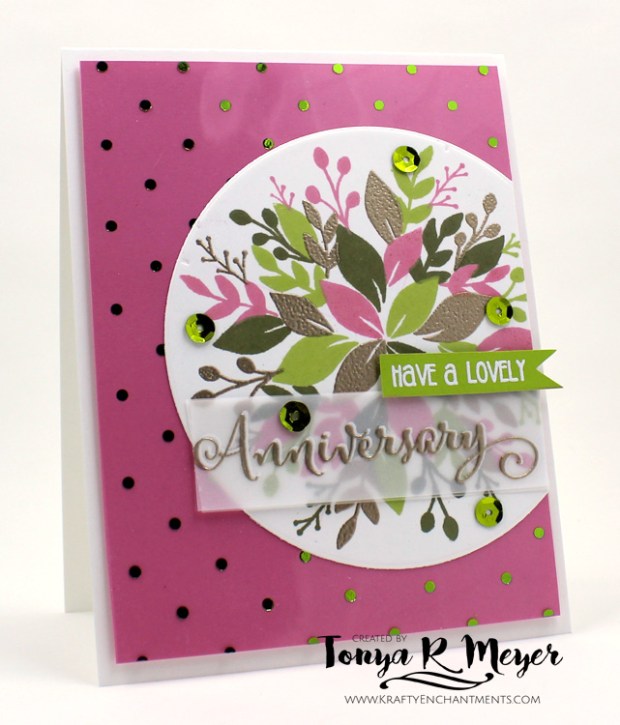
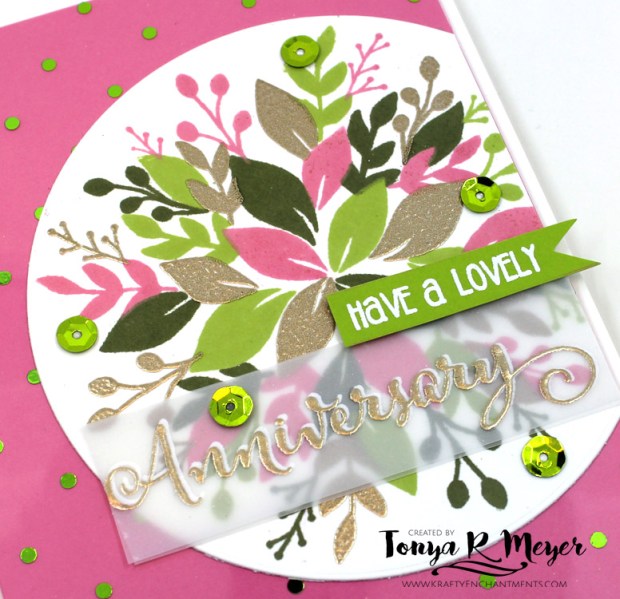
I am popping in today with a special card. Today is my parents Anniversary and I wanted to make a special card for them. I was excited last Friday when my new stamps arrived from Concord & 9th because I knew the Wreath Turnabout would make a gorgeous card.
Following the instructions that come with the Wreath Turnabout, I marked my center-point on the back of the stamp with a permanent marker and I was ready to stamp with the help of my MISTI.
I cut a piece of Neenah Solar White cardstock to a 4 x 4 square. Using a ruler, I placed a faint pencil line from one corner to the other until I had a light X marking my cardstock.
Next, I placed the cardstock into the MISTI and placed the stamp over the X and aligned the center lines I drew on the stamp with the center pencil lines on my cardstock.
Once it was centered, I closed the door on the MISTI to pick up the stamp and inked it using the Gina K Designs Fresh Asparagus ink. I inked and restamped a couple of times to get a crisp, clean image. Then I cleaned off my stamp using a baby wipe.
With my stamp still in place in the MISTI, I turned the cardstock, 90 degrees to the right and repeated the process of stamping the Wreath Turnabout once again, this time with some Gina K Designs Jelly Bean Green ink. I stamped the image a couple of times again to make sure I had full coverage. I cleaned the ink off the stamp again.

Once again, I rotated the cardstock (not the stamp), 90 degrees to the right. This time, I inked up the Wreath Turnabout with some Hero Arts Soft Cantaloupe ink. Repeating the process of stamping a couple of times to get a clean image and then cleaning off the stamp.
Rotating the cardstock 90 degrees one final time. I used some anti-static powder on the cardstock to prep it. For the last step to complete the image, I used some Versamark ink and stamped it a couple of times and then removed the cardstock from the MISTI and sprinkled on some Champaign embossing powder and heat set it.
Once all of the stamping and embossing was finished, I used a large circle die and die cut a circle with the wreath on it.
I knew I wanted to create a background with some pizzaz so I decided to try out some Deco Foil clear toner sheets with a polka-dot pattern on them. I love using Deco Foil, but I hadn’t had the chance to try the clear toner sheets yet so I was excited to see how they turned out.
The Clear Toner sheets come in a full sheet of 8 1/2 x 11 and there are 4 sheets in each package. To make it easier, I cut the 4 sheets down to A2 size to use with cards. Once I had those cut down, I cut a sheet of the Grass Green Deco Foil down so it was just slightly larger than the A2 size. I turned on my MINC machine and set the heat setting to 3 to let it warm up.
While my MINC was warming up, I took a piece of cardstock and folded it in half and placed the clear polka-dots toner sheet into the folded cardstock with the toner side facing up and I placed my deco foil on top of the toner sheet with the shiny side up. I ran the folded cardstock with the foil & toner sheet inside through the MINC machine. Normally when I’m foiling cardstock, I run things through my MINC twice, but I didn’t do that with the toner sheets.
I love the reveal when you pull back the foil to find this gorgeous foiled image or sentiment. These polka dot toner sheets were no exception, and the beauty is that they are clear so you can put any color of paper behind them.
The wreath took up a bit too much of my card front, so I cut one edge off by 1/4 inch
Next, I cut a piece of salmon-pink cardstock to A2 size which matched with my clear Deco Foil toner sheet. In order to adhere the two together, I used the circle that my wreath was on to disguise my adhesive.
.
I placed adhesive on the back of the wreath and adhered it to the clear toner sheet. Then I placed adhesive on the back of the toner sheet where the wreath was to hide the adhesive.
Finally I was ready to add my sentiments. I used a set of sentiments from the Honey Bee Stamps, Happy Everything sentiment set. I love, love the swirly, pretty font on these sentiments. They’re so pretty!
I didn’t want to cover up too much of my wreath so I decided to stamp the words, Have a Lovely on a piece of green cardstock and heat set it with white embossing powder. I cut it down and added a fish tail onto it as well and added it to the card front with some dimensional foam.
Initially, I’d stamped and heat embossed the word Anniversary onto some vellum using the same white embossing powder. However, it seemed to get a little lost with the wreath behind it. Unfortunately, I’d already glued the vellum down before I realized that I didn’t like the way it looked. It didn’t look quite as flat and lost into the background when I just held it up to see what it looked like, but it looked totally different when I’d glued it down. I couldn’t peel it up without damaging the wreath, and I wasn’t going to scrap it and start all over again. I decided to try to fix it by embossing another piece of vellum using some champagne embossing powder. I tried to get it cut down to the exact size – it was close, but not perfect so I just overlapped the two pieces and made the white appear to be a drop shadow.
I added a layer of dimensional foam to the back of the pink cardstock and adhered it to a top folding card base made from Neenah 110lb Solar White cardstock.
To add some finishing embellishments, I glued on some green sequins to the card front.
This card was so fun to make and I’m in love with the new Wreath Turnabout from Concord & 9th. As I was stamping it, I was imagining all the other colors of wreaths I want to create. It would be easy to make a fun set of cards for various occassions or even seasons to give as gifts with this stamp.
I love how this card turned out – it’s bright and springy and the color combination looks great together. I think my parents will enjoy it! Hope they have a wonderful anniversary!
Thanks for stopping by, hope you’ve enjoyed today’s card.
Hugs,
Tonya
https://linkdeli.com/widget.js?1523599839355


This is absolutely stunning, Tonya! I’m sure your parents will love it!
LikeLiked by 1 person
Thank you Melody! They did really enjoy the card. I’m really happy with how it turned out.
LikeLike