Something for the Book Nerd!
Hi All & Happy Friday!
TGIF Right?! It’s been a long one here capped off with crazy stormy weather last night here in Colorado.
I’d hoped to share this little creation with you earlier in the week but my evenings have been so jam packed with to do’s and must do’s this week that I didn’t have time to get this post out earlier.
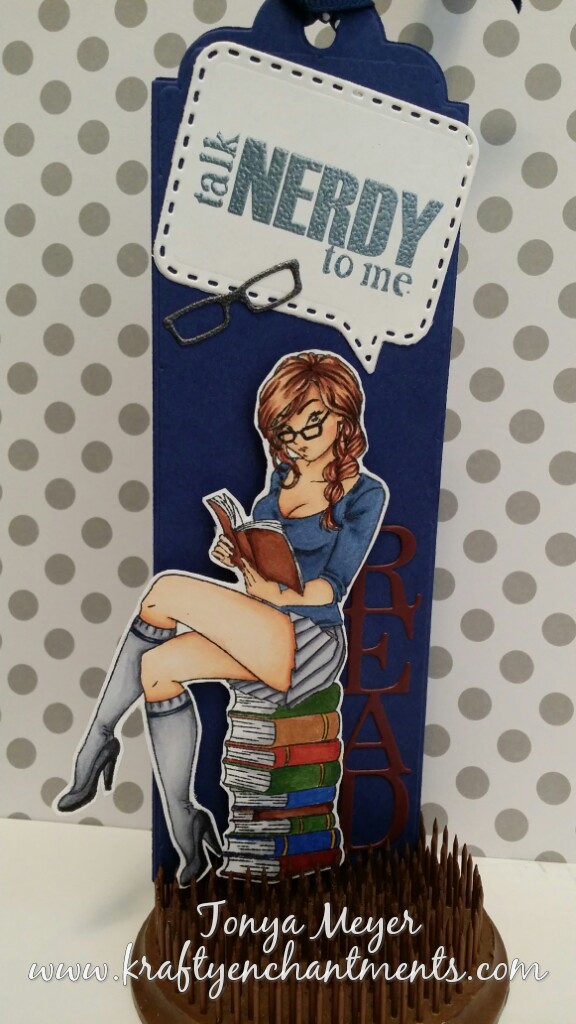
So without delaying any further I wanted to share this sassy, sexy librarian bookmark I made for my husband.
My hubby and I are both avid book lovers. I don’t get to read as often as I’d like, but he reads every day, one of the many things that I love about him. His favorite types of books are Sci-Fi so he’s usually reading the latest Star Wars book or the occasional Stephen King book.
When I saw this new release stamp set called I Like BIG Books from Sugar Pea Designs, I couldn’t resist getting it and the SugarCuts bookmark die that went with it. I just thought it was so sexy and sassy – right up my husband’s alley so I was sure he’d love to have a bookmark made just for him.

Stamp from the Sugar Pea Designs I like BIG Books stamp set.
I colored up the stamp of the girl sitting on the stack of books with my Copic markers. I kept the colors pretty dark because I envisioned her being the sexy librarian in an old library that’s dark and musty. Once I had her colored I fussy cut her out and tried to keep the white space to a minimum.
Using the bookmark die I cut two pieces of blue cardstock. I decided on two because this particular paper was not as thick a cardstock as I would have liked and wanted to make sure my bookmark was pretty sturdy. I glued the two pieces of cardstock together with some Ranger Glossy Accents.
Next I die cut the vertical word READ out of a burgundy cardstock and glued it onto the bookmark so that it would be in the background.
I couldn’t decide which sentiment to use because the ones that come with this stamp set are so cute, but I ultimately decided on the Talk Nerdy to Me. My husband is a nerd at heart. He’s pretty darn smart and sometimes he does talk to me about nerdy or technical things and admittedly my eyes will sometimes glaze over, but I love that he’s so smart and a bit of a nerd.
I stamped my sentiment with a Tsukineko Memento Luxe Nautical Blue ink and then embossed it with some awesome embossing powder from WOW called Superfine Embossing Powder in White Pearl. The great thing about this embossing powder is that it kind of takes on the color of its background and then adds a bit of shimmer to it. So my embossed sentiment is a dark blue-grey but it’s got just a hint of shimmer.

Sentiment embossed with WOW Superfine Embossing Powder in White Pearl
Once I had my sentiment embossed I cut it out using the Spellbinders Conversation Bubbles 2 dies. I’m really loving these dies. They come in very handy for adding sentiments to cards and small spaces in a pinch. I think I’m drawn to these for their cartoonish nature. I’ve always thought word bubbles were pretty cool in cartoons and such. Love that I can now use something similar in my cards.
I also added a little set of die cut glasses to the edge of the sentiment piece. Those were cut out of some shimmery blue-black cardstock scrap I had leftover from another project. A word of warning, the small glasses die in this set is super small and would be very easy to lose. I keep my dies on magnetic sheets with clear protective sheets over them. The brand I use is called Papermania Stamp & Die Cut Storage Pockets. They’re a bit hard to find here in the US, but you can find them online at various places. They have changed my world for the better and my dies are organized and safe in these.
Finally, I laid out everything to see how I wanted to adhere them to my bookmark. Once I had my layout I glued them in place using more Ranger Glossy Accents. For my little sassy librarian I used some dimensional foam over most of her so that she’d pop off my bookmark. I left the dimensional foam off of her leg though since it’s hanging off the bookmark.
To finish off my project, I tied a little dark blue polka dot ribbon at the top. Here’s a look at the finished bookmark.
Sugar Pea Designs, I Like BIG Books stamp set and die.
My husband said he loved it but wasn’t going to use it for fear of messing up my work. I had a solution for that. I used my new We R Memory Keepers Photo Sleeve Fuse Tool to create a protective cover for the bookmark.
You may have seen some other crafters using these for their shaker cards or to create their own photo page keepers for scrapbooks. This was my first attempt at using this little gadget. Basically the end comes with a little wheel and a point. You plug it in and let it get hot a few minutes and then you can use it to “fuse” the clear plastic photo pages (and probably even acetate) to seal things inside like photos, sequins, etc.
I can speak from experience though, it doesn’t work for sheet protectors. They’re too thin and it just melts a hole right through it.
To create my little cover I had to use a scrapbook photo insert page that was already partitioned off and kind of put my little bookmark into one at an angle and then fuse the sheet together around it and cut off the excess. It wasn’t very pretty for my first attempt and it wasn’t even long enough to cover the top of the bookmark as I’d hoped, but my husband didn’t care – he just didn’t want my creation to get messed up or torn. Awe, he’s so sweet!!!
I’m sure with practice and the right kind of materials this tool will be awesome for creating shaker cards which I very much want to try in the near future.
Hope you enjoyed this little bookmark creation of mine as much as I enjoyed making it and sharing it with you.
Next stop, Father’s Day cards…and free-time willing I will actually finish my Skin & Hair Class over at Kit & Clowder. I’ve only got two images left to color – one of which is my final test image. Hopefully I can carve out a couple of hours this weekend to work on that. EEEKKK, where does the time go??!!
Have a great weekend!

