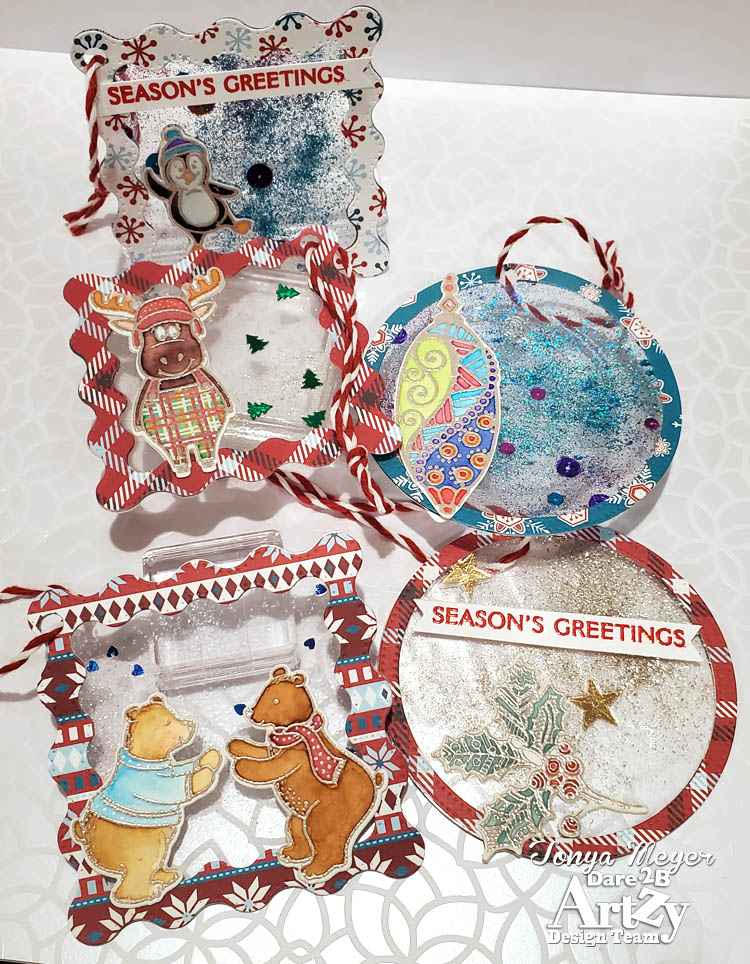
Dare 2B Arzy 3D Holiday Project Inspiration
Hello everyone! I thought I’d pop in today to share the projects I created for the Dare 2B Artzy 3D Holiday Project Instagram Hop and give you a little more information on how I created these fun ornaments or tags, as they could be used for both. This was a technique that Jennifer McGuire used to create a sort of non-shaker card. I’m taking it a bit further today.
First, I started by using several sheets of thermal laminating sheets. These are the kind that you run through a laminator to heat seal the contents.
I grabbed a bunch of glitters and small sequins. I had some holiday themed sequins in my stash and those worked especially well for this project.

I warmed up my MINC Laminator to a setting of 4. If you’re using a lot of glitter or sequins inside, I’d bump that temp up to a 4 to be safe but otherwise it should work on 3.

To start, I opened the thermal lamination sheets on a flat surface with a piece of heavy weight printer paper underneath the bottom page and put something heavy on the other side to hold the page open as it kept wanting to close on me.
I sprinkled glitter and added in the sequins inside the area of the laminating sheet, placing them liberally throughout the sheet. It doesn’t have to be perfect because keep in mind these will be die cut down into ornaments/tags so if you have a bunch of glitter in one space and not in another it’s OK. Once I felt that I had enough sparkle & shine (as if you can ever have too much), I closed the top of the thermal laminating sheet.
I placed a peice of heavy weight copy paper on top and carefully picked up the entire thing using the sheet of copy paper that I put underneath and the thermal sheet sandwiched in between. Be careful to keep everything flat – trust me – speaking from experience I spilled glitter, LOL!
Next, you’ll run the thermal sheet sandwiched by the copier paper through the laminator twice. It may not be necessary to do it twice, but I felt like it couldn’t hurt.
I made several sheets with different colors of glitter and sequins.

Once all of the glittering was done and I was covered in glitter, I cut the completed sheets in half lengthwise so that they would fit in my die cutting machine.
I pulled out several of my Dare 2B Artzy layering die sets and found a medium to small size. It really depends on whether you’ll be using for ornaments or gift tags. The size I used for the Wavy Square Framelet was 3 1/4 and the Double Dot Circle Framelet was 3 1/2.
Next, I cut my glittered laminating sheets with the dies I selected. I also cut several different peices of Dare 2B Artzy scrapbook papers to be the same sizes as well. You’ll need enough paper to cover both front and back of your ornament/tag.

Once the paper was cut, I needed to figure out which smaller die to use to cut out the center of the paper for the back and front to create the window opening so that the glitter and sequins could be seen inside. My dies were the 2 1/2″ Wavy Square Framelet and the 3 1/4″ Double Dot circle die.
I used the dies to cut the center from the Dare 2B Artzy scrapbook paper. This gave me about a 1/4 inch frame for the front and back of each ornament.
To adhere the frame to the thermal sheet, I used double sided Scoretape. I think that if you had a Xyron machine that would probably work as well. Not sure about how well glue would adhere to the laminating sheets.
Once the ornament bases were done, I set them aside and started working on the Dare 2B Artzy images to add to each.
I went through my Dare 2B Artzy stamps and found several stamp sets that I could use. It was a nice mix of older and newer sets. Really the sky is the limit with these as you can make the ornaments/tags as big or small as you need. I used the Dare 2B Artzy Poinsettia Tangle, Ornament Tangle, Just Chillin, Bear Hugs and Christmoose stamp sets.
For each stamp image I used, I stamped and heat embossed it all of my images with some Hero Arts Platinum embossing powder on some Canson 140 lb watercolor paper.

To color the images, I used my Karin Brush markers and a little paint pallet – actually just a flat piece of acrylic. I scribbled my ink color onto the acrylic sheet and used a waterbrush to pick up the color and add the color to my image. I find this works better for me than using the Karin Brush markers directly to paper.
For each image, I was able to add several different layers of color to get the desired look for the image. Karin markers are very vibrant as you add more layers.

Once the colored images were dry, I used the coordinating Dare 2B Artzy dies to cut them out. For the Christmoose stamp set, I did use some metallic Uniball roller pens to give him a plaid suit. I call it his ugly Christmas overalls, LOL! He’s ready to celebrate Christmas.

Next, I cut a second set of the same images from just some plain white Canson 140 lb watercolor paper. These would be the silhouette images used for the back of the tag/ornament. They also hide the Scoretape double sided adhesive that was used to adhere the images to the front. Of course you could also stamp and color the flip side as well, especially if you’re creating these for ornaments. Mine will be used for gift tags.

When the images were added, I used a couple of sentiment strips to heat emboss the Seasons Greetings sentiment and die cut it out for a couple of the images. You could really dress these up with ribbons, buttons, pine branches and make them so fun and festive. This would be a great project to do with your kids or grandkids to let them decorate the ornaments/tags.

To finish, I punched a hole in each of the ornaments. I actually didn’t have one of the smaller 1/16″ hole punch so I had to use my larger one which was fine, but I think that a smaller punch would work better. It wasn’t too hard to punch all the way through the paper and laminating sheet which is good. Once the hole was punched, I added some red & white string to use as a hanger.

That’s my Dare 2B Artzy 3D Holiday Project. I hope you’ve enjoyed it and found some inspiration for your own holiday projects using some Dare 2B Artzy stamps, dies and paper.
Don’t forget to check out all of the other Dare 2B Artzy designers projects over on Instagram and hop along as there are many fun projects to inspire you. Join in our IG hop for your chance to win one of the two $10 gift certificates to the Dare 2B Artzy Store. Dare 2B Artzy is also having a sale! 15% off orders, with code XMAS2020 Sale starts now and ends Sunday, Dec 6, 2020 at midnight CST. The IG hop starts at the D2BA IG page and continues on…@dare2bartzy over on Instagram.

Thanks for stopping by today. The products used in today’s projects are linked below for your convenience and no cost to you. (PS. I added in a link to the We R Memory Keepers mini desk vaccume that I used to clean up my glittery mess. They are sold out online right now, but well worth the wait as it works great).
Hugs,
Tonya
https://linkdeli.com/widget.js?id=f5e8378456858c916708


Love all of these!
LikeLike
Thank you!
LikeLike