Christmas Greetings 2022
Hello and Merry Christmas to everyone! Hope you are having a wonderful day spent with the ones you love the most and making joyful memories to last a lifetime.
I wanted to add a post today to share just a few of my favorite Christmas cards that I created this year. I have not quite gotten into the mass production of Christmas Cards so for my cards they are each unique and very much a one of a kind. Maybe some day I’ll get the hang of mass producing cards. I am sure it would be a great time saver during the holidays.
For 2022, I have been really getting into creating with non-traditional colors for Christmas cards and some of the cards here show that.
To start, I used a layering stencil from one of my favorite companies, The Ton Stamps. The Ton Stamps always seems to have some very cutting edge, realistic looking layering stencils and 2022 was no different.
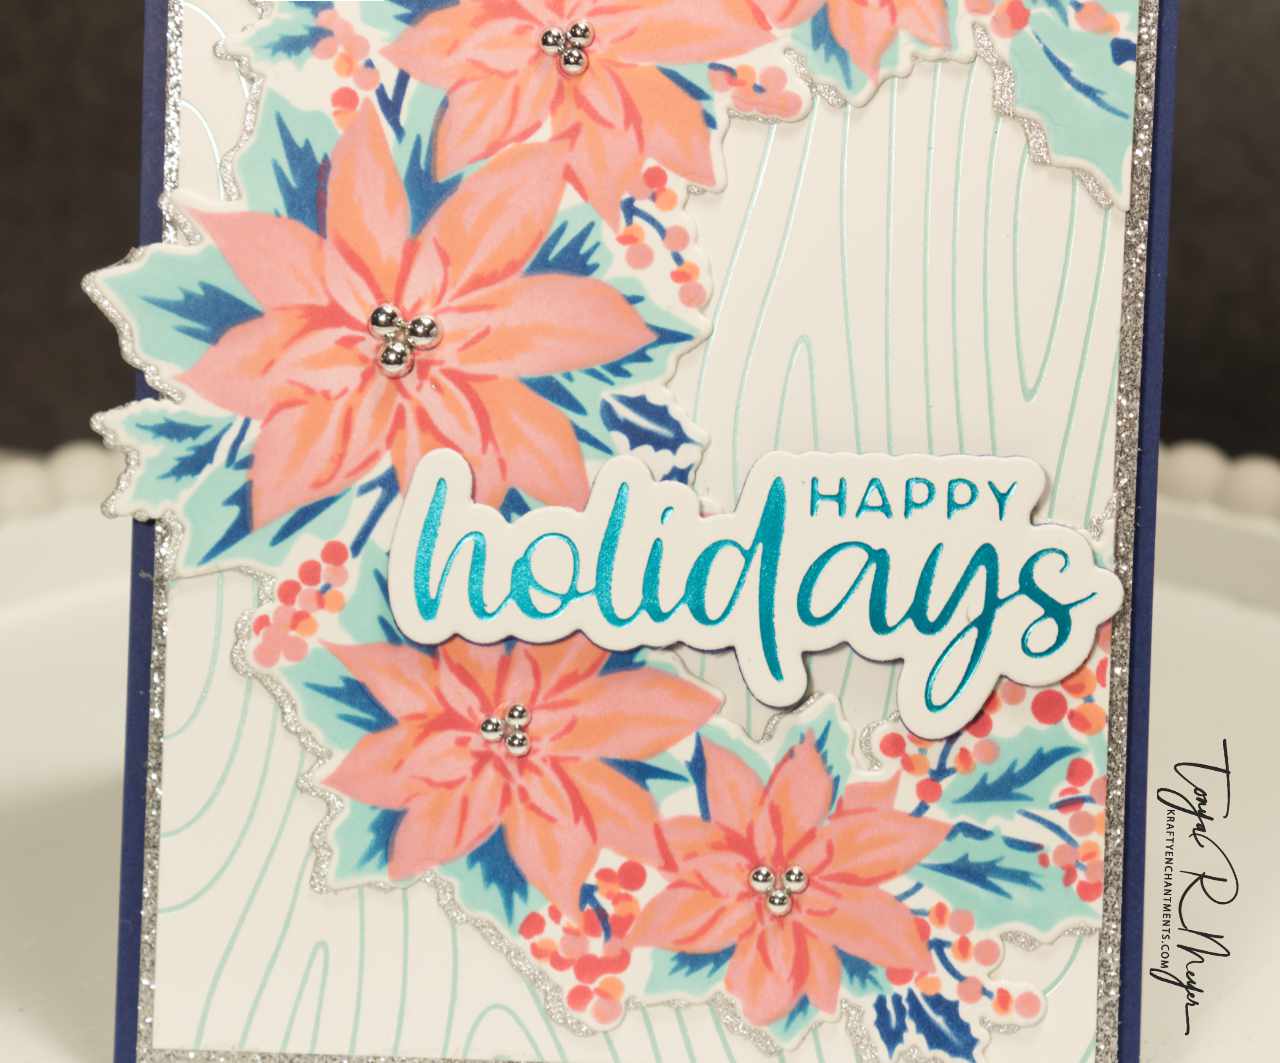
This card features the Poinsettia Wreath Layering stencils. This is a 5 layer stencil and I chose to ink it up with some brightly colored inks from Simon Says Stamp’s Pawsitively Saturated Inks in Blush, Guava and Watermelon paired with Cadette, Royal and Surf inks to create a brightly colored poinsettia wreath. I used the coordinating die to cut out the wreath and also a shadow layer from some silver glitter cardstock.
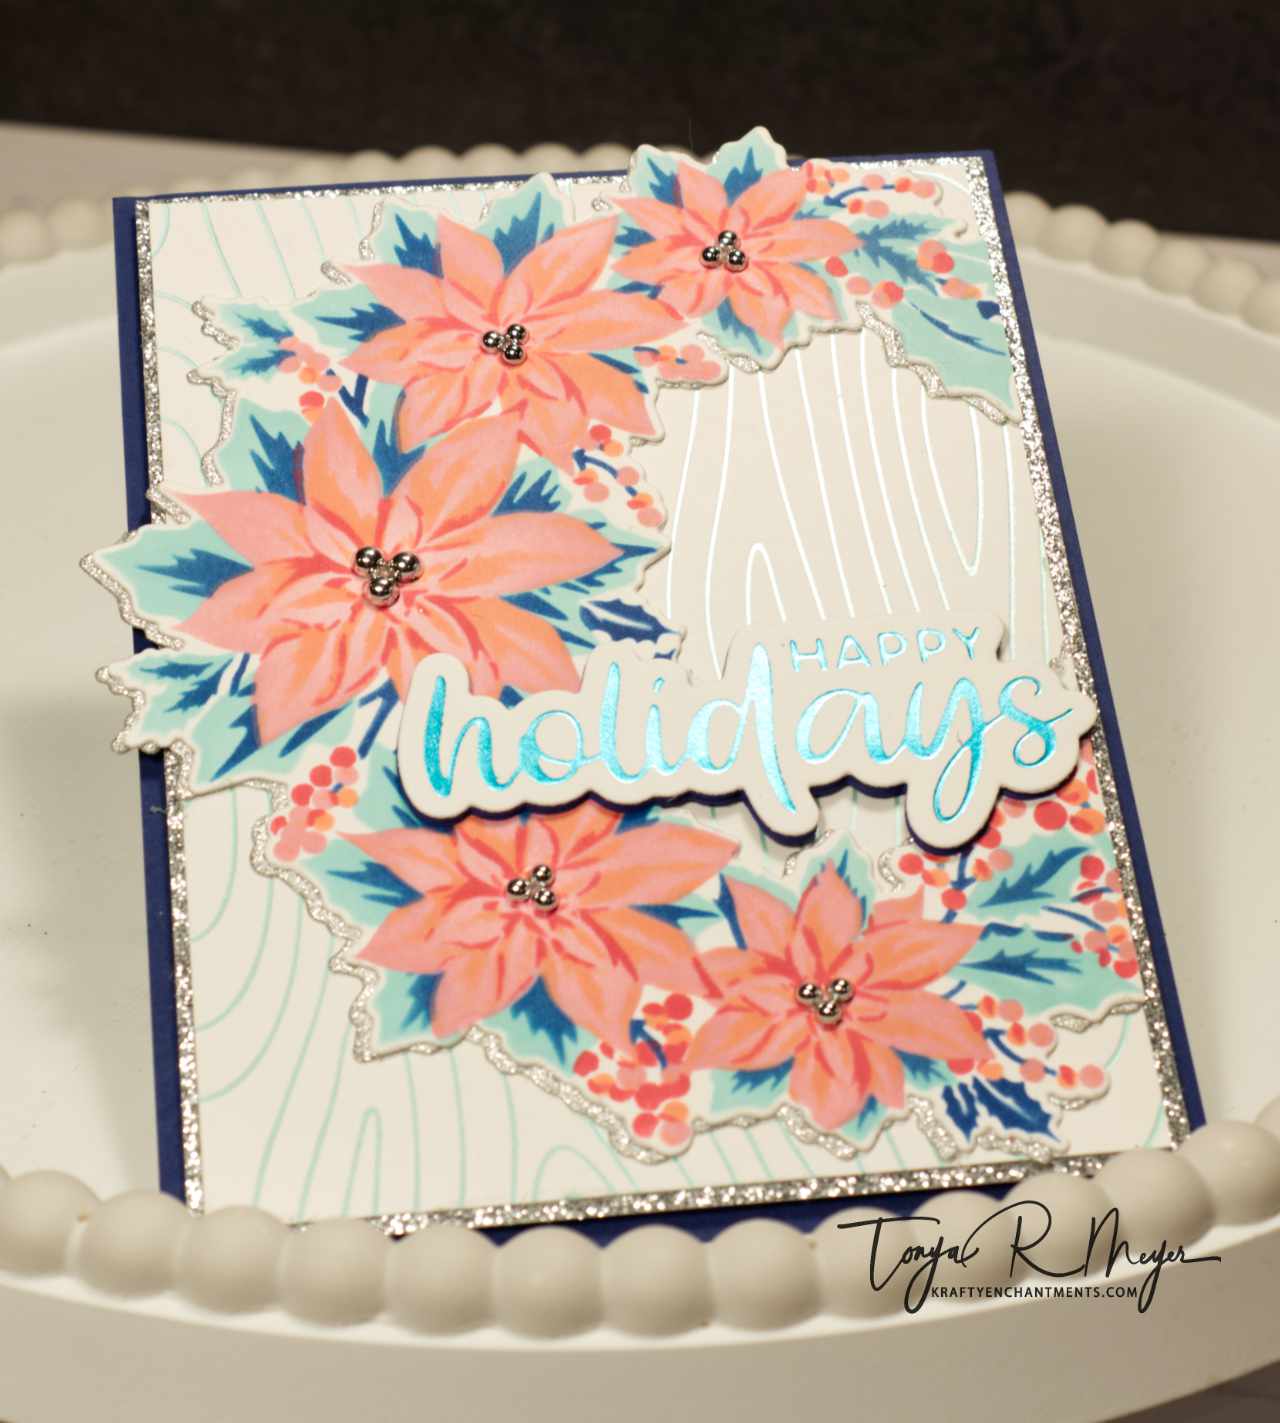
For the background, I used the Spellbinders Wood Grain hot foil plate paired with one of the new pastel hot foils called Pastel Mint. I love these soft, matte foils they are so pretty and unexpected for a Christmas card.
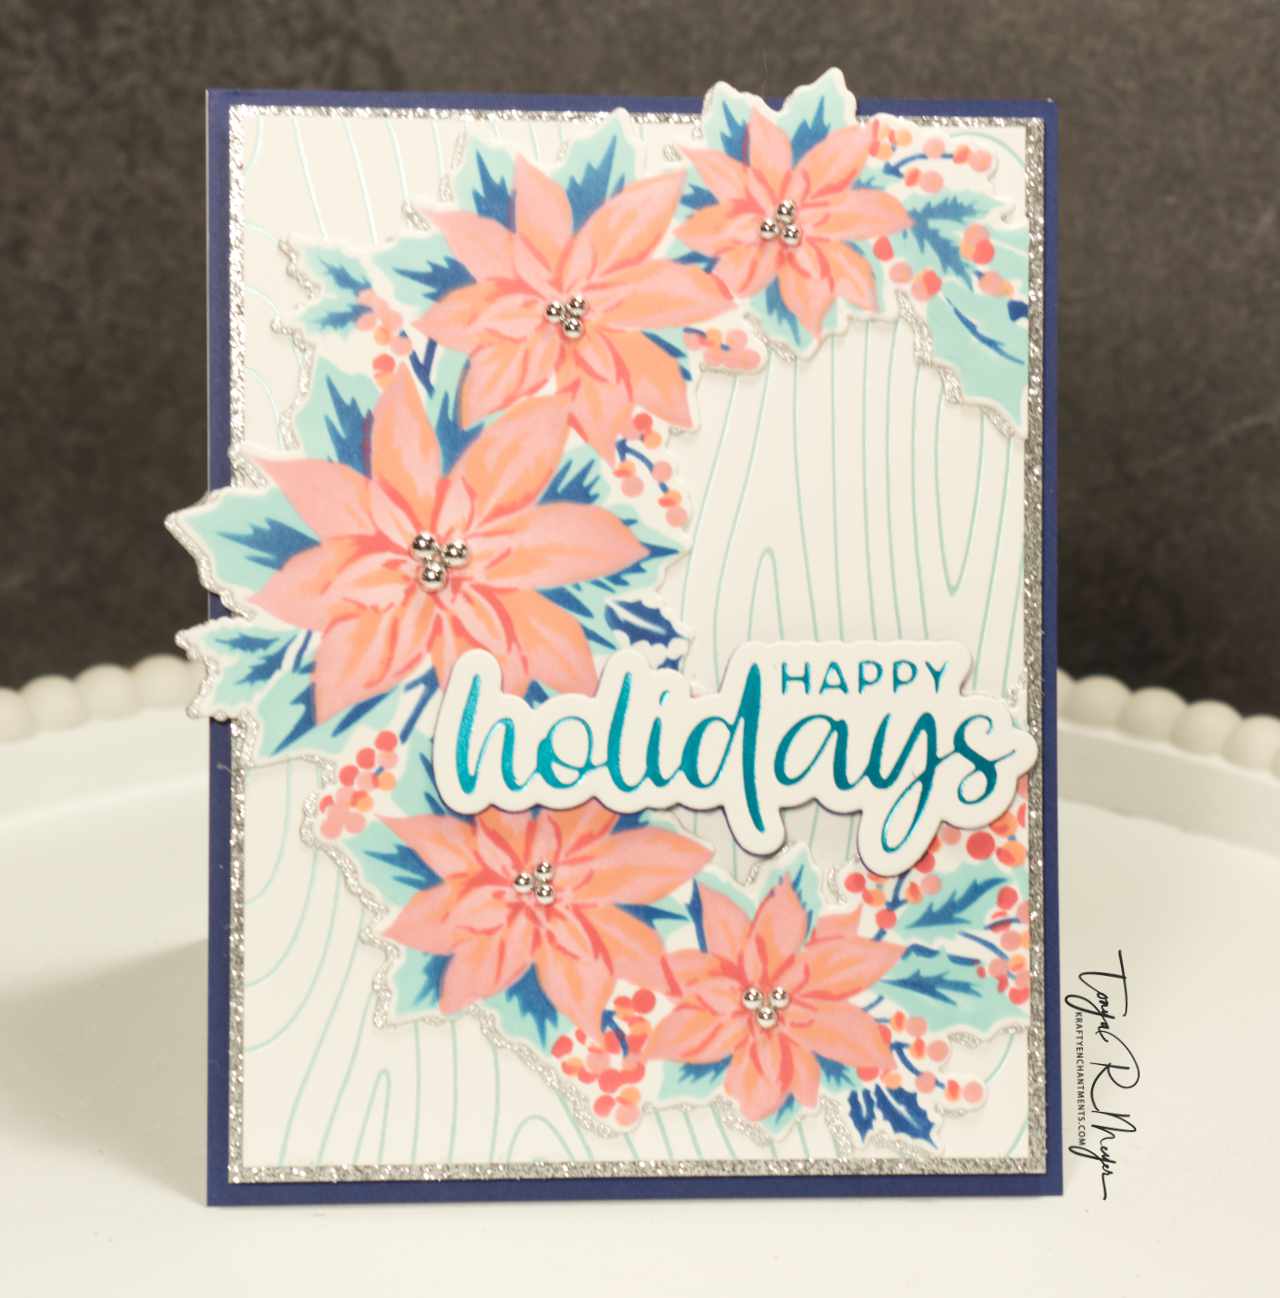
I added a foiled sentiment from the Altenew Hot Foil Holiday Sentiments. I love that this set has the coordinating outline die and they foil beautifully. I paired it with Teal foil from Spellbinders and finished off my card with some silver embellishments from Crafty Meraki.
For my next card, I had to create a scene card with a layering stencil set from another one of my favorite companies, The Greetery. I love everything that The Greetery puts out but their Holiday Releases are always a favorite of mine. I love that they always think of every little detail for their releases. This year there were some great sets but the Stencil Scapes Winter Stencil set was my favorite from the Song of Christmas Release in October. It creates this fun winter scene from a 6 piece layering stencil set. I just love this cute little scene with the pond and the couple ice skating.
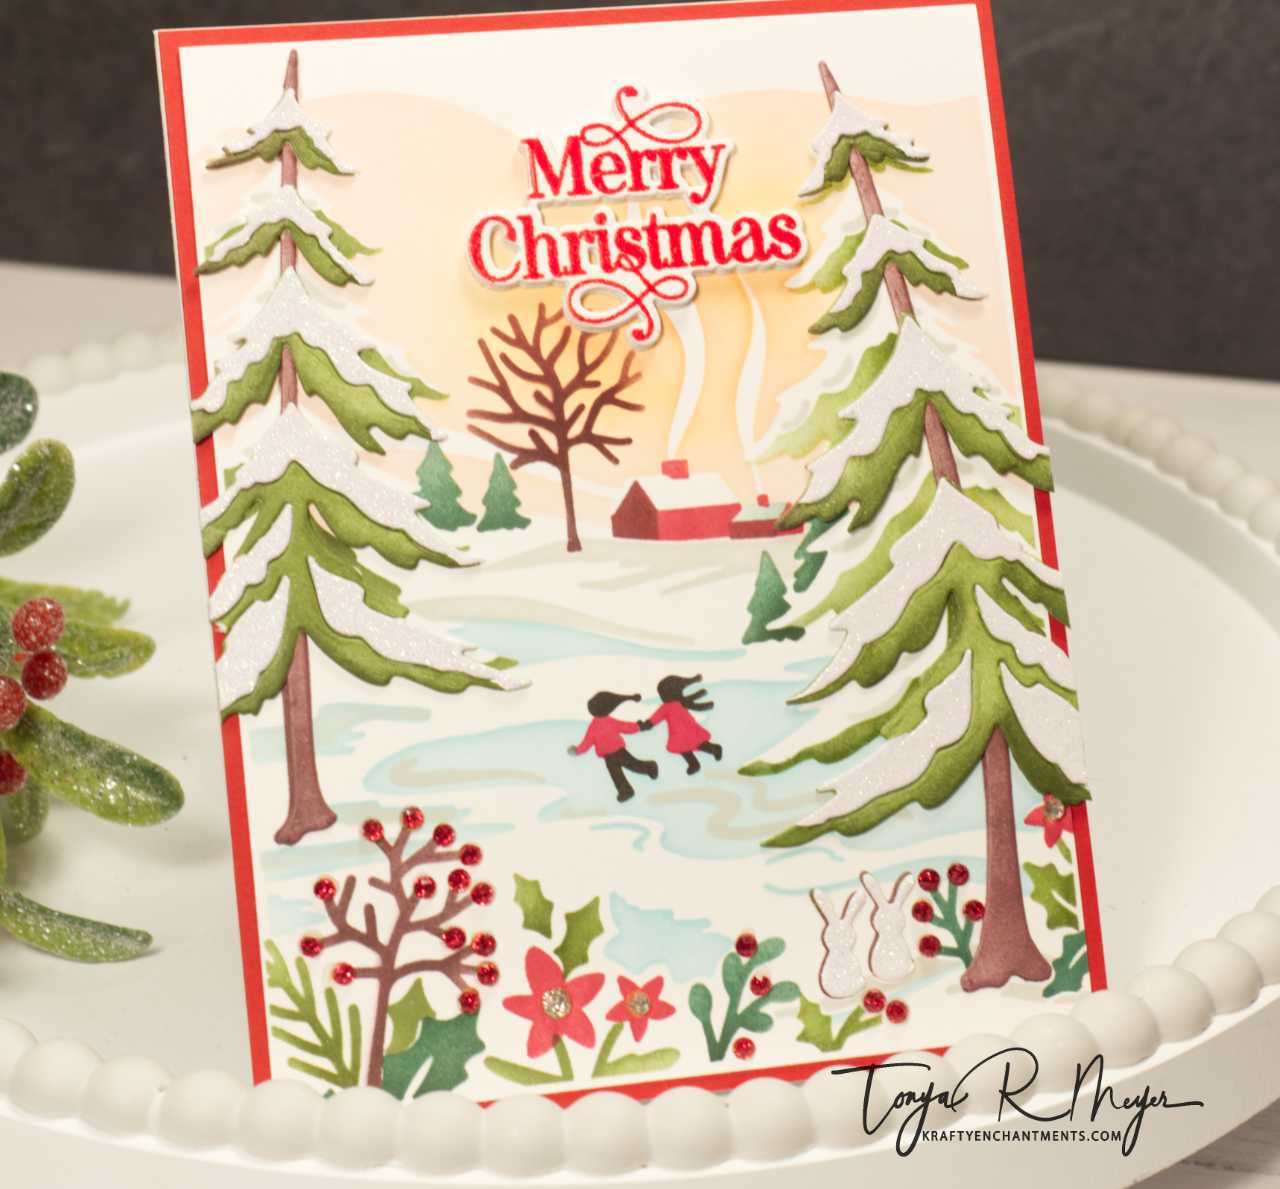
They always have some fun coordinating dies as well and the Frosty Pines die set really brings the scene to life by adding the dimensional trees and the adorable little bunny silhouette. The trees are easy to either cut from colored cardstock or cut from white cardstock and ink blend with your favorite colors. This card was so simple to create with the ink blending and layering using some Distress Inks and some glittered gem accents.
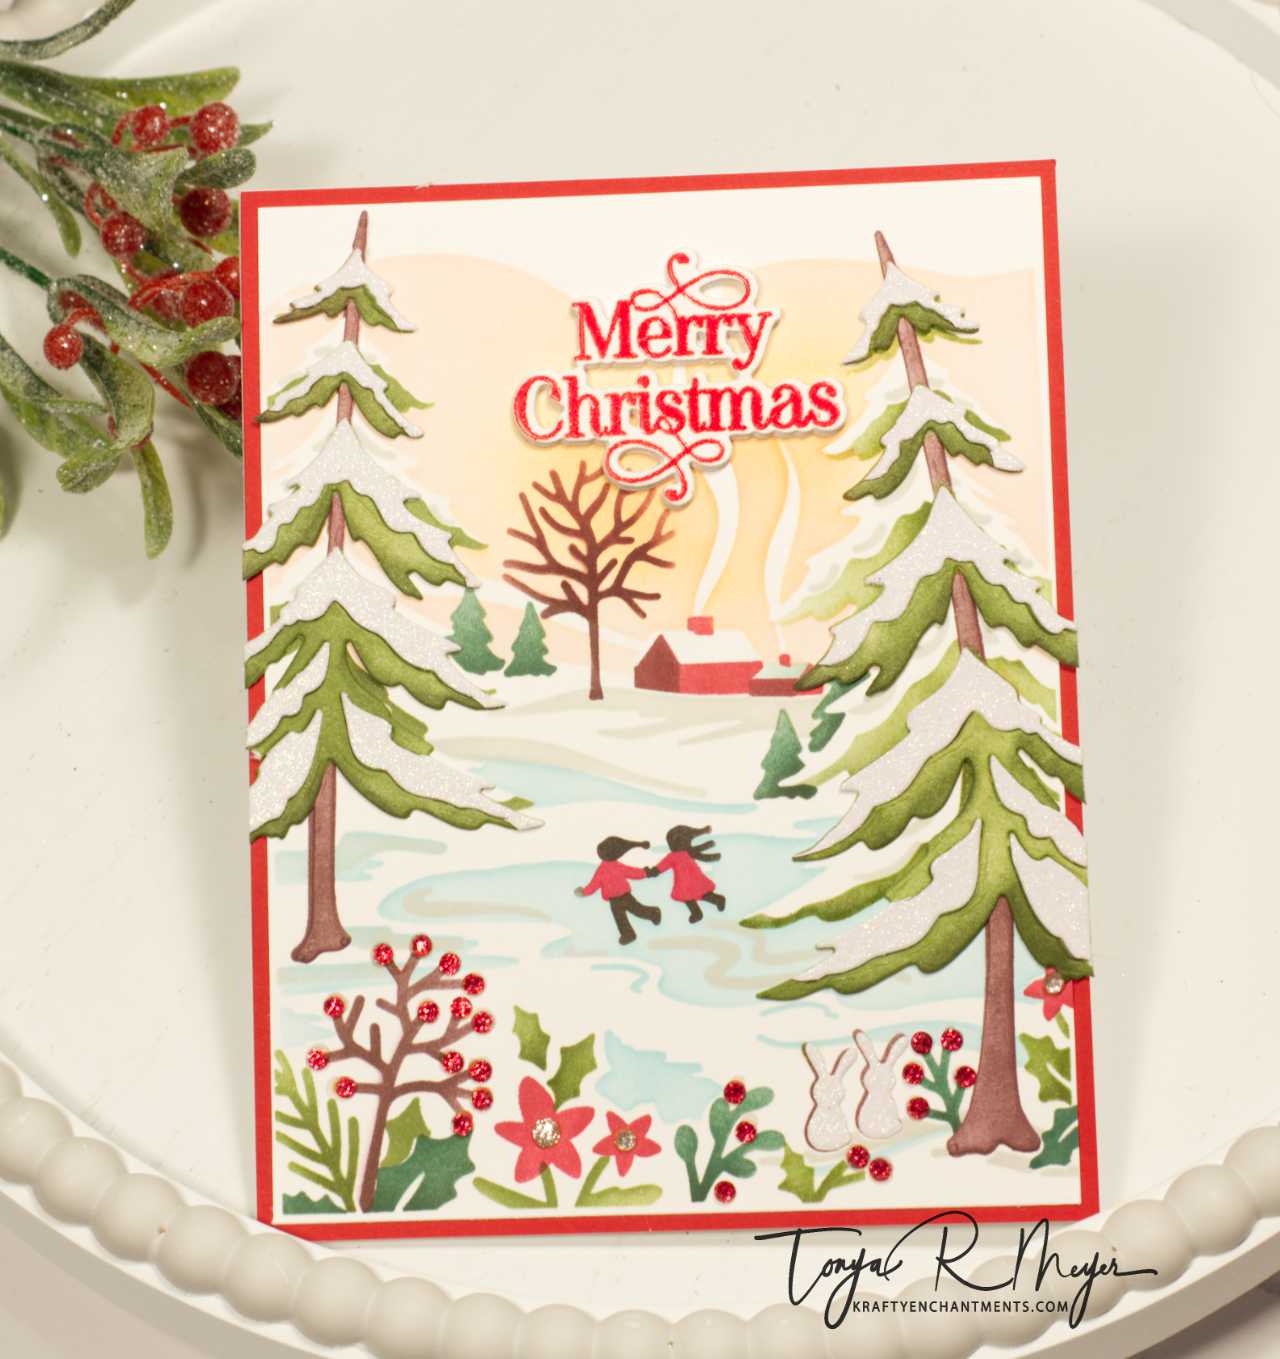
To finish off the card, I added a Merry Christmas sentiment from Taylored Expressions that I stamped and heat embossed and cut out with the coordinating dies.

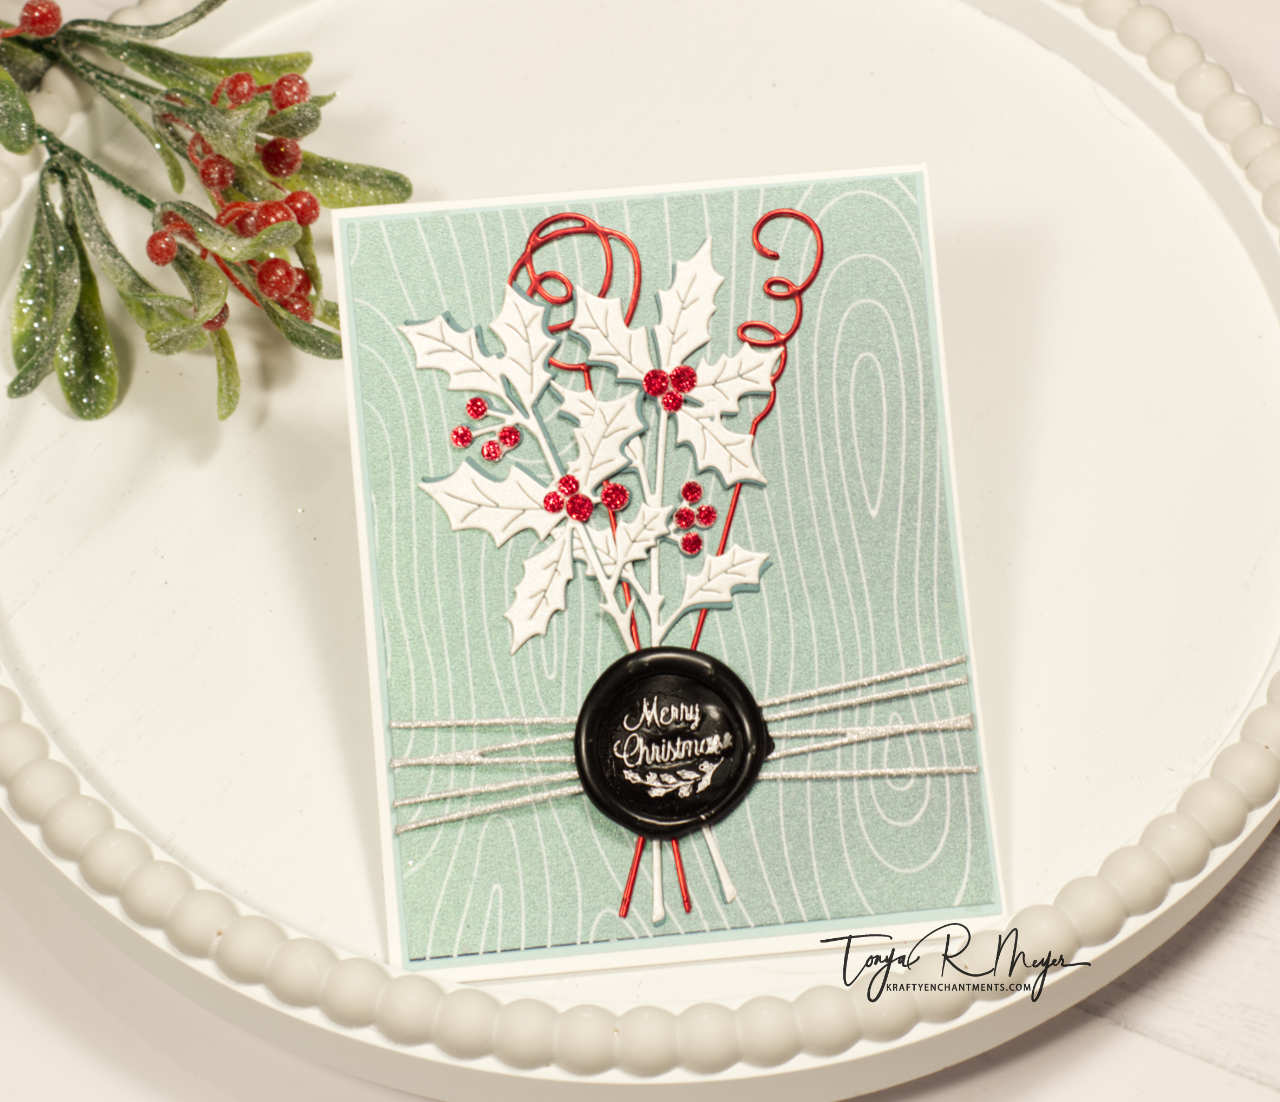
This year Spellbinders launched their new Wax Seals line called “Sealed” and it turned out to be a great intro into to wax sealing. The starter kit comes with everything you need to get started on creating your own wax seals. I had the kit and a limited color pallet of wax (two colors), I played and tried my hand a making seals for cards. It’s great because if you mess up a seal, you can just re-melt it and try again. I love that!
This next card also features the Spellbinders Wood Grain Hot foil plate. This time, I used the new Navy hot foil roll and created a negative image of the plate using a solid hot foil plate to reverse foil onto some Hammermill cardstock. The Navy foil was very dark and to be honest did not foil very well. The pigment from the foil came off onto my plates and my machine, it was a bit of a mess. I am wondering if Spellbinders has discontinued this particular foil as I no longer see it on any of the sites that sold it – I will link to some good alternatives below. To soften the dark navy, I cut a piece of iridescent vellum from my stash and added a sticky back with my Xyron machine and layered it over the foiled background. I love the look this gives and it’s a great alternative to cover up not so great foiling.
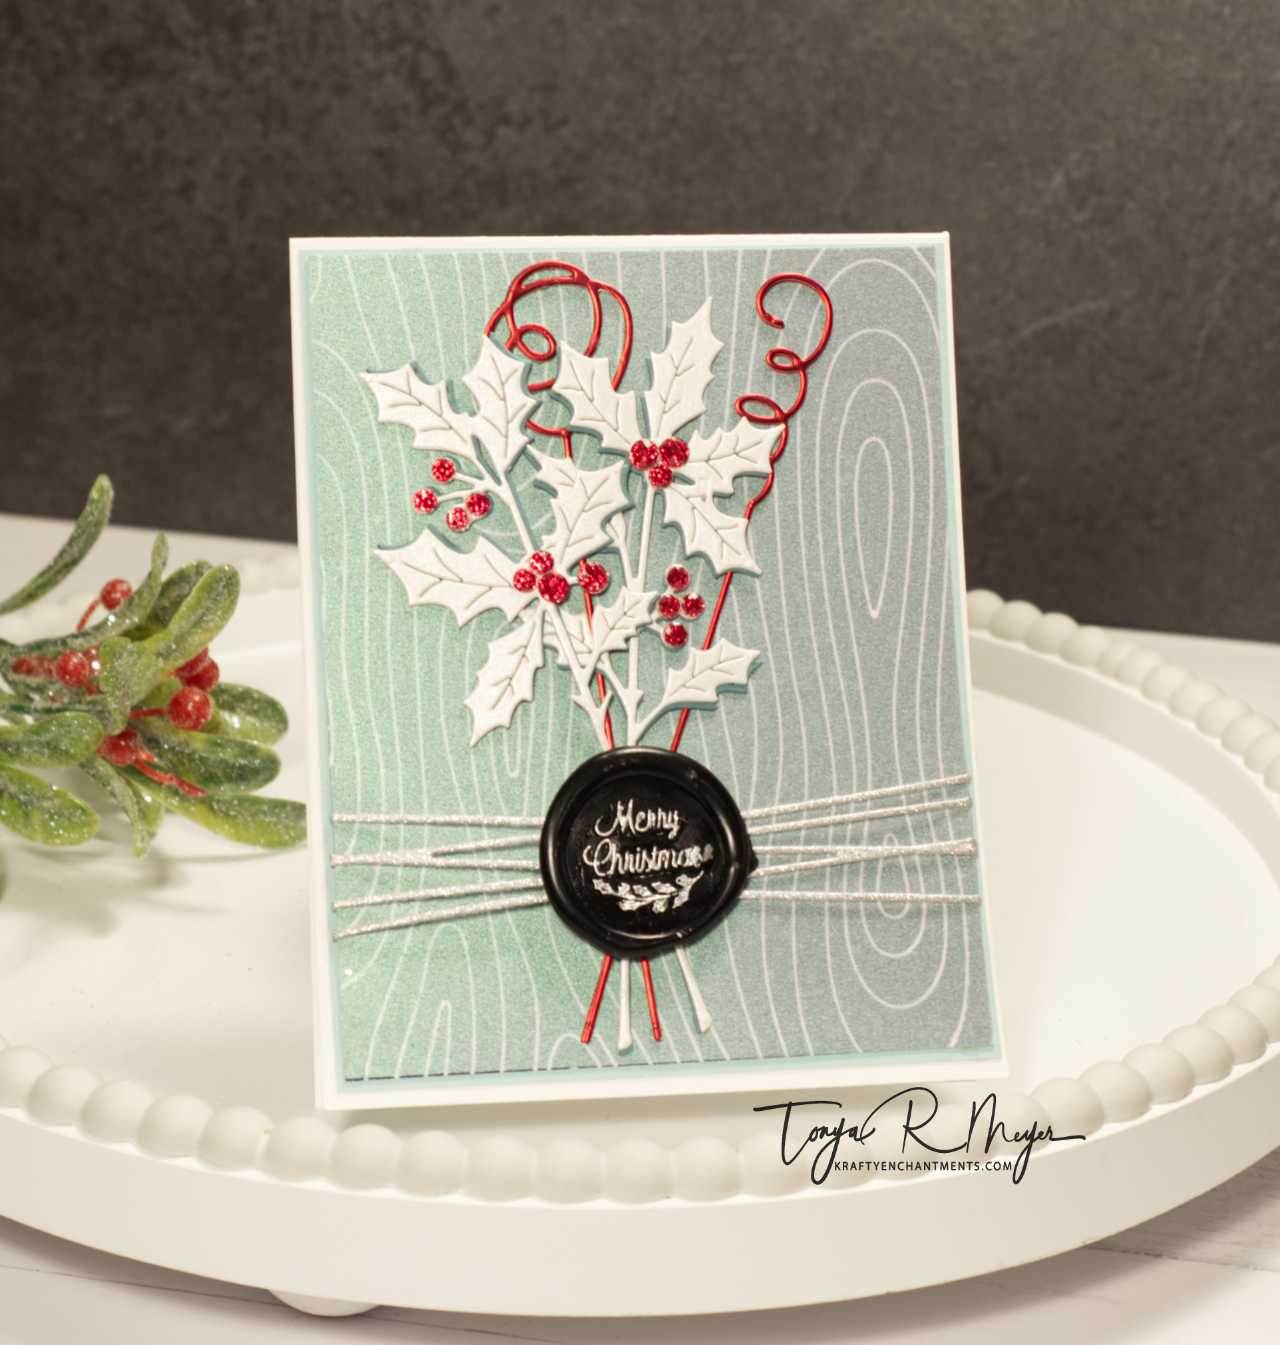
To create my wax seal elements, I die cut the Spellbinders Holly Sprigs from some white shimmery cardstock in my stash and cut a second lighter teal green cardstock to create a shadow layer. The Sprigs are very delicate when they are cut so I thought that a shadow layer would provide some stability when glued together. I also cut a couple of the Squiggles dies from the Sealed Collection using some red foil cardstock from Tonic. I did layer these as well to provide more stability to the delicate die cuts.
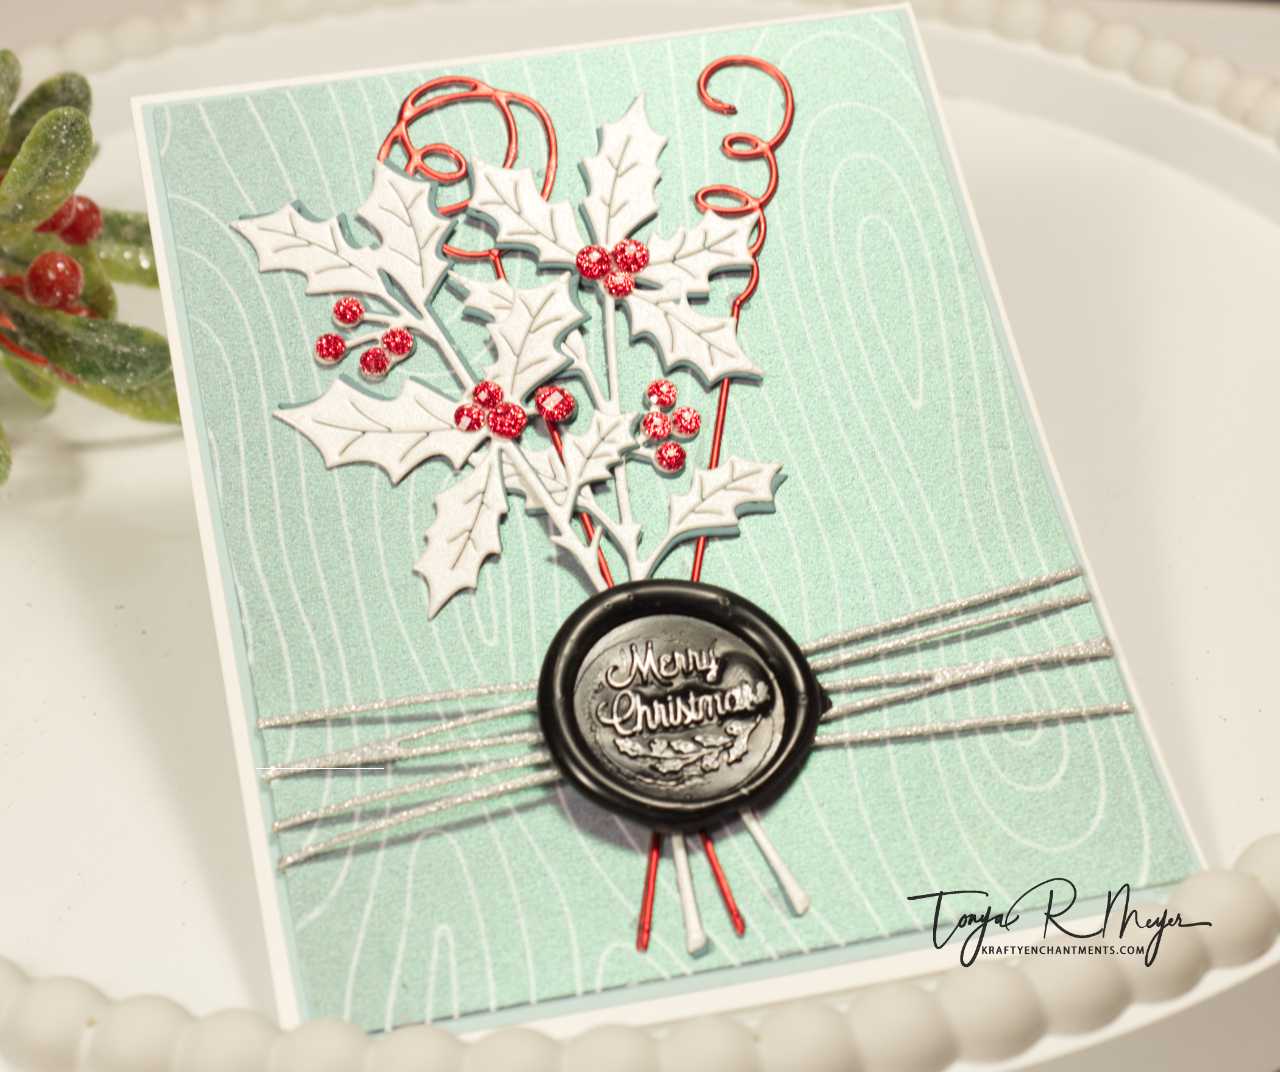
The added fun element of the Twine die from the Sealed collection really pulls together the wax sealed look and gives you a place to add your wax seal. I die cut the Twine from some glitter cardstock, tucked the flat ends behind my panel and adhered them and folded around the edge of my card.
Using some black wax, I melted and poured it onto the silicone mat that comes with the Sealed Kit and then added the Merry Christmas seal with the holly accent. I let the wax cool, removed the seal stamp and then I used one of the Silver Deco Color paint markers to color the wax sentiment.
To add a bit of bling to the Holly die cuts, I added some Pink Fresh Studio Ruby Glitter Drops to the berries on the holly die cut. It’s the perfect pop of red and sparkle.
The last Christmas card I have to share today is another one created from The Greetery’s 2022 Holiday release. I think I mentioned how much I love their products. This time I cased a card I saw on their Instagram page and used products from the November All Wrapped Up collection. Who doesn’t love being able to create custom gift tags for your packages?
I made a card using the Pinked Stars Ribbon Maker Die which I cut from some Tim Holtz Distress Black Heavy Card stock. I can’t describe this cardstock, it feels like butter and it’s really smooth and very dark. It definitely makes a statement.

I added the Pinked Stars to a piece of A2 size matte Scarlet Organza cardstock from Tonic. I trimmed about 1/4 inch off of the left and right of the cardstock.
To create the wreath, I die cut the Round About Winter Foliage die from some green cardstock and some green foil cardstock. The Winter Foliage die can be used to create gift tags as well. I cut 3 of each type of cardstock to complete the full wreath. I adhered a layer of foiled cardstock to each layer of green cardstock to give it a shiny shadow. I used some Bearly Arts liquid glue to adhere all of the wreath layers together and then placed the completed wreath onto the background.
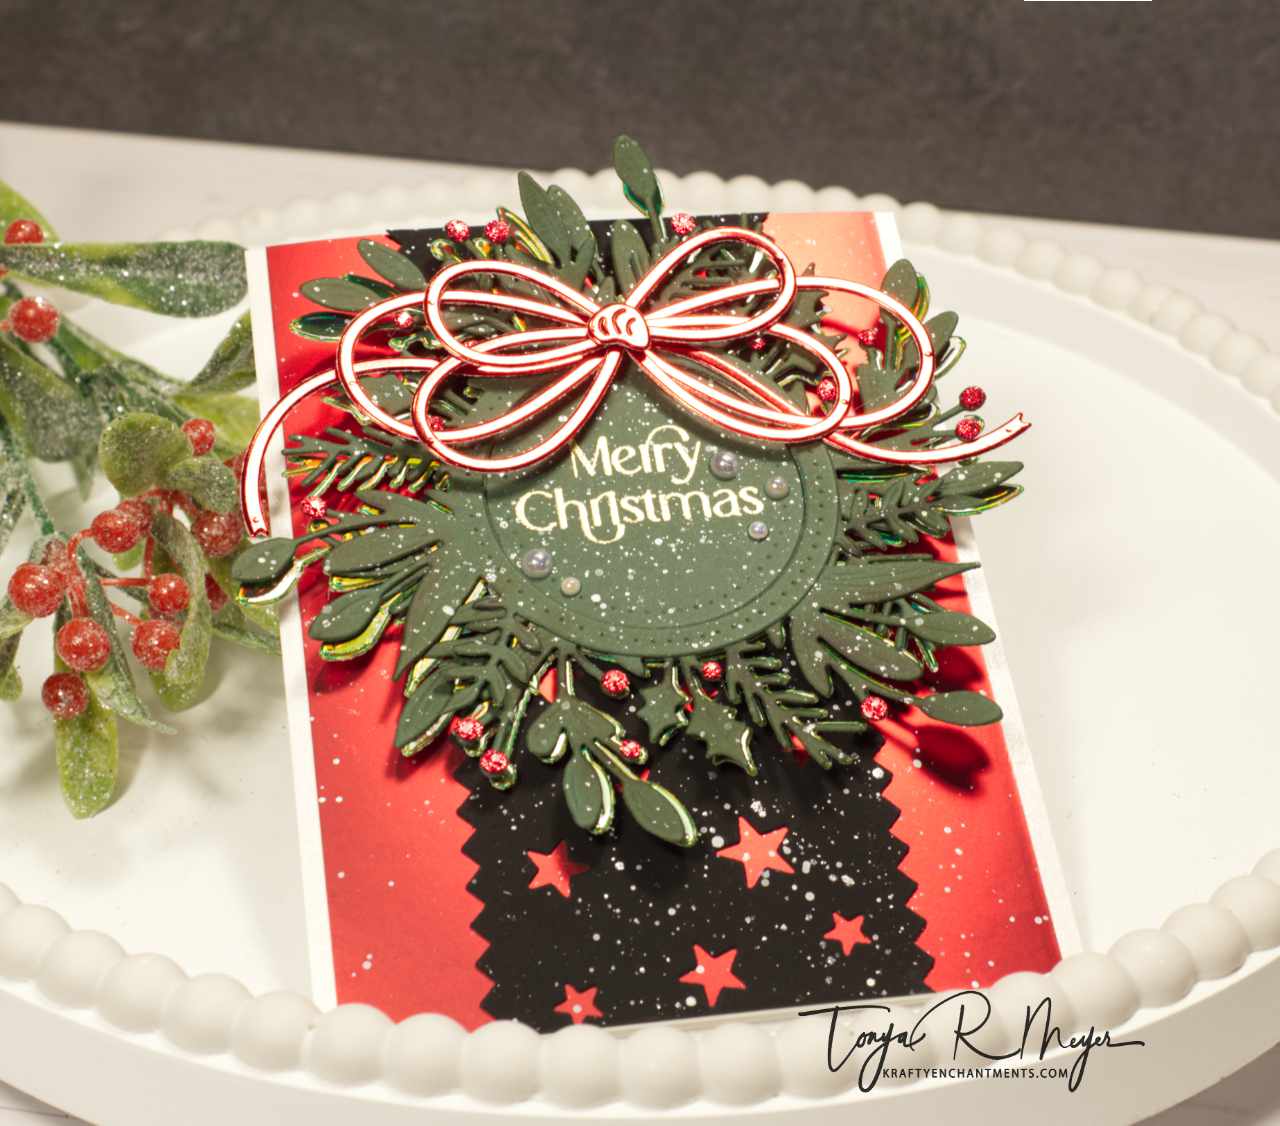
For the sentiment, I used The Merry Christmas from the Tagged Elegance Stamp Set and heat embossed it with gold embossing powder onto the center of the wreath.
To give the wreath and background a bit of distressing, I splattered on some white paint and some Lawn Fawn Liquid Stardust splatter also.
To add a bit of bling, I glued some Pink Fresh Studio Ruby Glitter Drops to each of the places on the wreath were there would be berries and added a few white pearls to the center around the sentiment.
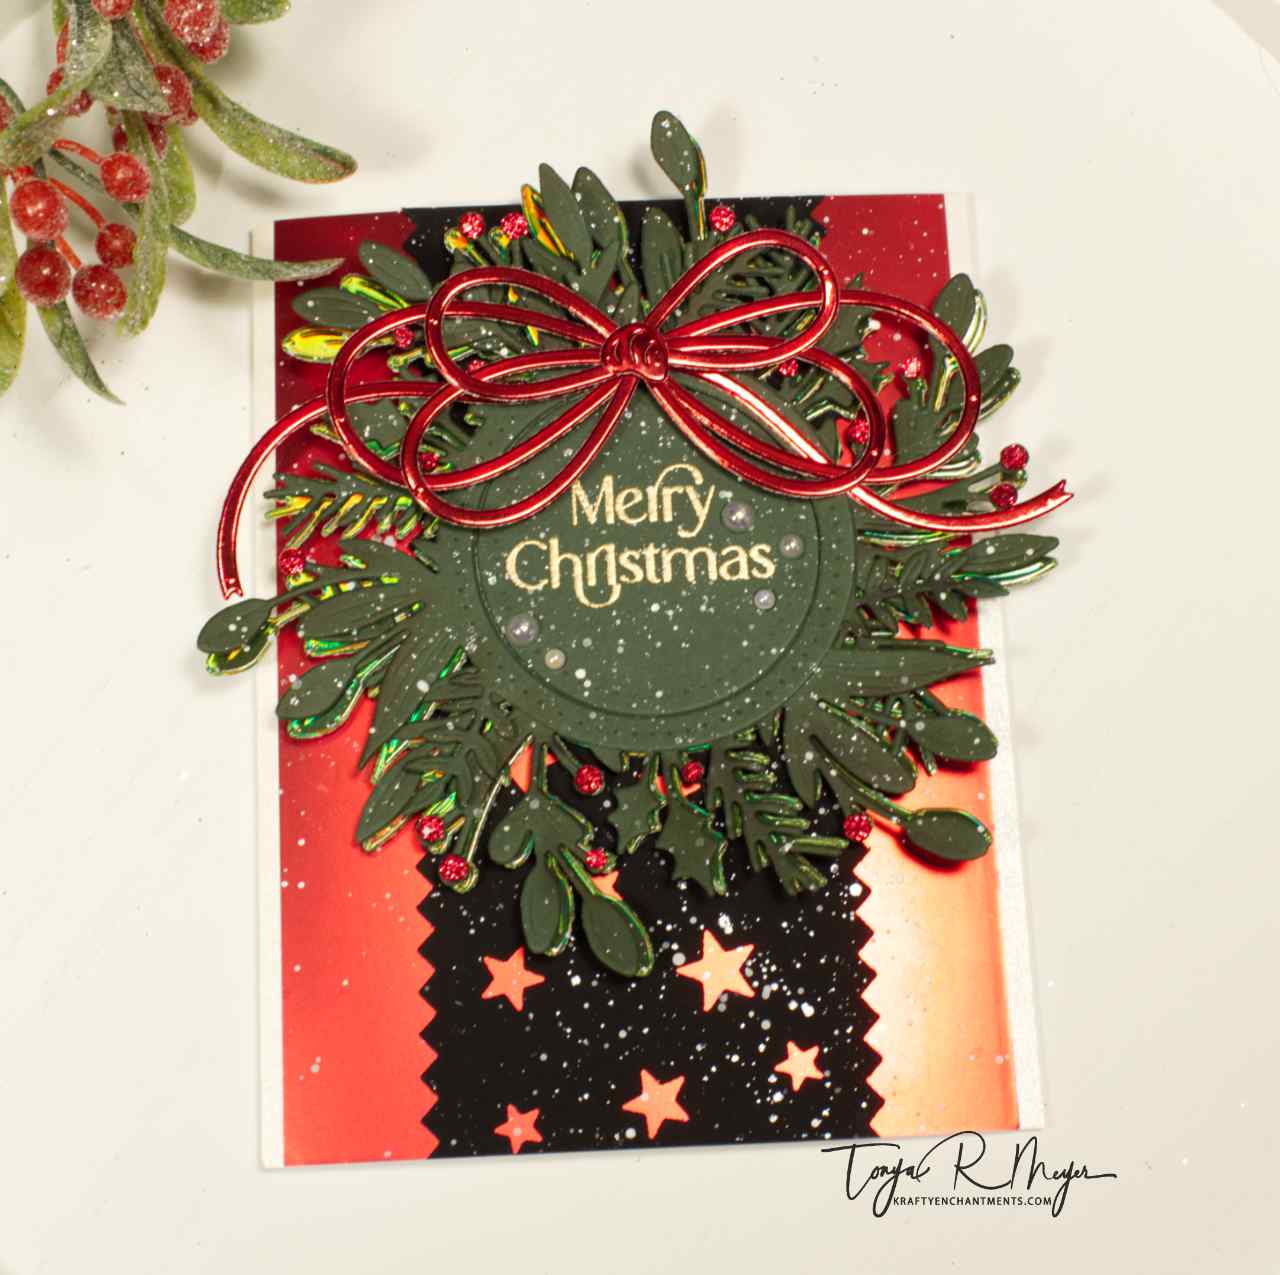
Next, I created a bow for the wreath using the Loopy Bow Builder Die from The Greetery. This fun bow die allows you to create various bow looks by simply layering up the die cuts and placing the ends to the side or bottom. You can add as many or as few loops as you like and then adding a tiny amount of glue to the center and finishing with the little bow center die cut. I cut two of these bows from some Tonic Studios Ruby Red foil cardstock so that I would have 6 loops total
Finally, I added my wreath and background onto a layer of shimmery off-white pearlescent cardstock which peeks out on the left and right of the panel before placing it onto my card base.
Thank you so much for stopping by, I hope you have enjoyed my cards today and are inspired to create something sparkly today!
Have a very Merry Christmas, Happy Hanukkah, Happy Kwanzaa or whatever it is that you are celebrating! Peace and love to you all!
Hugs,
Tonya

https://linkdeli.com/widget.js?id=f5e8378456858c916708

