It’s April & Dare 2B Artzy Says “Anything Goes”
Wowza Dare 2B Artzy fans its April! The start of a new month and Dare 2B Artzy has a new challenge for you. This month’s challenge theme is
ANYTHING GOES
Anything Goes…well that’s just a license to be footloose and fancy free with your fabulous Dare 2B Artzy creations this month isn’t it?!
We want you to join this challenge and share your amazing Dare 2B Artzy creations. There are no limits or specifications on what you can create this month. The sky is the limit just be Artzy and get crafty! There’s an awesome Dare 2B Artzy prize up for grabs so you want to be sure to get your submissions in before the end of April!
Here’s my inspiration for the challenge:
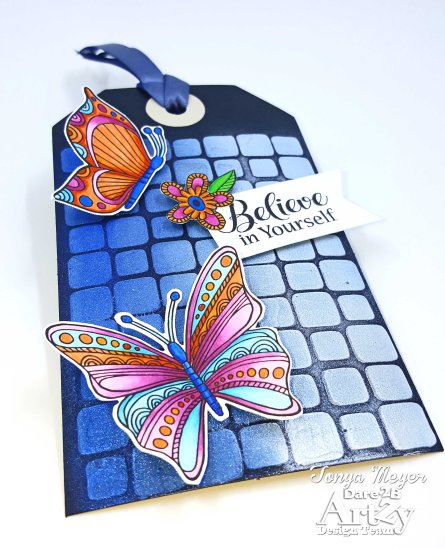
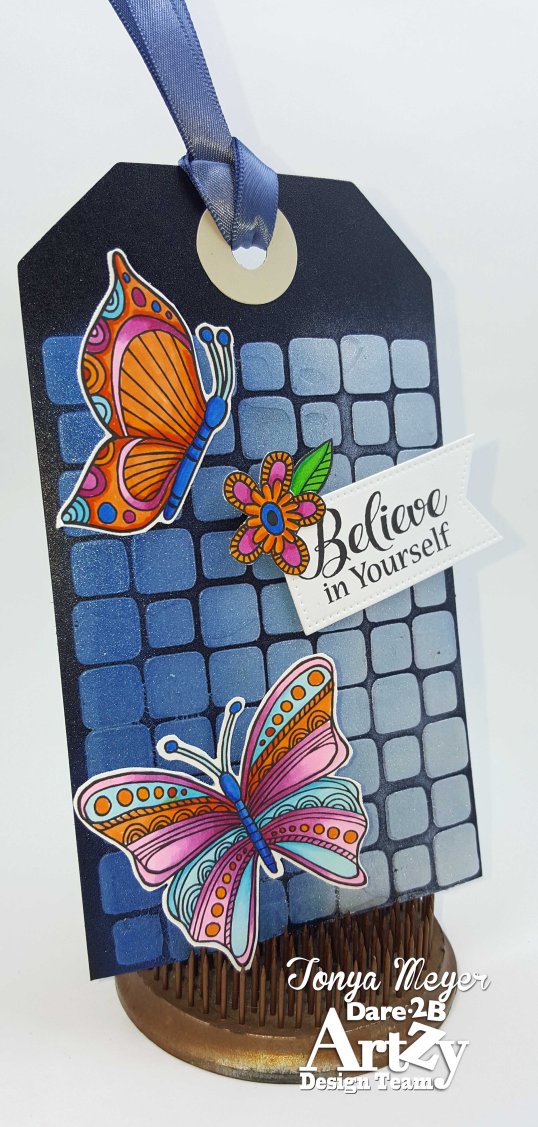
I created this fun tag that would make a beautiful book mark for someone or even a gift tag.
I used a pre-cut chalkboard tag that I picked up at my local craft supply store. I wanted the tag to have a layer of dimension to it as well as a bit of visual interest in the background. To achieve this look I used some Faber Castell Whipped Spackle in matte. If you’ve never worked with spackle before, a little goes a long way.
I used a pallet knife for painting and scooped out two ¾ teaspoon sized dollops and placed them in two separate places on my craft mat. Next I grabbed a re-inker for my stamps. The re-inker I used was a blue water-based ink. I added 1-2 drops of the ink to one of the dollops of spackle and used my pallet knife to mix the ink into the white spackle. Originally I’d planned on mixing up the spackle with two different ink colors, but ultimately decided to have one blue and leave the other the white color of the spackle. The more ink you add to the spackle the deeper the color will be, but it doesn’t take much ink.
With my ink & spackle mixed together to form a nice shade of blue, I placed my stencil over the tag. This stencil is from Tim Holtz #THS042. They are a good size stencil to work with and are tag shaped. I didn’t tape the stencil in place on my tag, but rather just held it in place with one hand. Once the spackle was applied the stencil didn’t move around too much. Working quickly I spread the blue tinted spackle from left to right stopping at about the midpoint of the tag. When I was satisfied with even coverage across the stencil, I cleaned the blue spackle off my knife with a baby wipe. I wanted to make sure I didn’t have any blue remaining on the knife. Next, I used the knife again to pick up the plain white spackle and began spreading it from right to left over the stencil until I had even coverage. Once again, I stopped pulling the white any further than the mid-point of the tag. The colors did begin to blend together a bit as they met in the middle and that gave me a nice mid-tone blue color. When I was happy that all the squares on the stencil had even coverage, I very carefully lifted the stencil and pulled it away from the tag. The result was a really cool ombre effect from blue to white.

This was the first time that I’d worked with a matte spackle. I will say that it begins to set pretty quickly so it’s good to have everything ready to go so that you don’t get the spackle drying too quickly. It’s a good idea to wipe off and wash your craft mat, stencil and pallet knife right away because the spackle is difficult to remove once it dries.
I set my tag aside so that the spackle could dry completely. In the meantime, I colored the gorgeous butterflies from the Dare 2B Artzy, Butterfly Inspiration set using my Copic Markers. I chose bright pink, orange and blue colors in celebration of spring.
When my butterflies were all colored, I fussy cut them out along with the cute little flower and leaf that comes with this stamp set.
I created a fishtail tag using the sentiment Believe in Yourself using some white cardstock.
The textured background of my tag took about an hour or so to be completely dry. I probably could have heat set it to have a quicker drying time.
I started playing around with placement of my butterflies, but just felt like something was missing. The matte background did add and interesting texture to the tag, but there was quite a huge contrast between the blue and white. It seemed to take away from the butterflies.
I started looking through my craft supplies to see what I could add to the background to tie it together. Ultimately, I decided on one of my favorite supplies…Perfect Pearls powder.
I’ve said it before and I’ll say it again, I love this stuff. I think I’d wear it and just shimmer all day long if I could, LOL!
Perfect Pearls powder is a fine powder that comes in several colors and you use it in conjunction with Perfect Medium which is a sort of sticky ink pad.
I decided to add some Perfect Pearls shimmer to the background to tone down the matte look. To do this I used a mini Perfect Medium pad and daubed it across all of the matte background on my tag making sure to cover all the spackled areas.
I chose two colors of Perfect Pearls Powder, one in Forever Blue and the other in the original Perfect Pearl white color. Using a brush I dipped it into the powder and tapped it off onto the lid and then brushed the Forever Blue from the left side to the center of the tag. I brushed off the excess Forever Blue with my hand and then dipped it into the white Perfect Pears and tapped off the excess once more. This time I brushed the white Perfect Pearls on the tag from the right to the left side.
The result was a cool metallic ombre effect which toned down the background somewhat, but gave it a gorgeous metallic shimmery texture. I really love the way it looked.
The final step was putting my butterflies, flower and sentiment tag in place. I used some thin strips of dimensional foam on the butterflies and bent their wings up a bit. I glued the little flower to the corner of my sentiment with the leaf popping out from underneath, then added some dimensional foam to it as well. The sentiment tag was added at a bit of an offset angle hanging off the tag.
I added a couple of strips of a blue-grey ribbon to the top of the tag as well and cut the ends to be fishtailed also.
Hope you enjoyed my inspiration for the Dare 2B Artzy Anything Goes challenge for April!
We can’t wait to see what kind of fun projects you create for this challenge!!
Be sure to check out all D2BA’s products here!
Hope everyone will join the Anything Goes challenge this month. The team is looking forward to seeing your Anything Goes inspired projects featuring Dare 2B Artzy stamps & dies! Happy Stamping!


Gorgeous. Love this. The beautifully stencilled sparkly background is perfect for your bright and beautiful butterflies. Hugz
LikeLiked by 1 person
Thank you!
LikeLike
Love this, Tonya!
LikeLiked by 1 person
Thank you!!
LikeLike