Dare 2B Artzy May Challenge
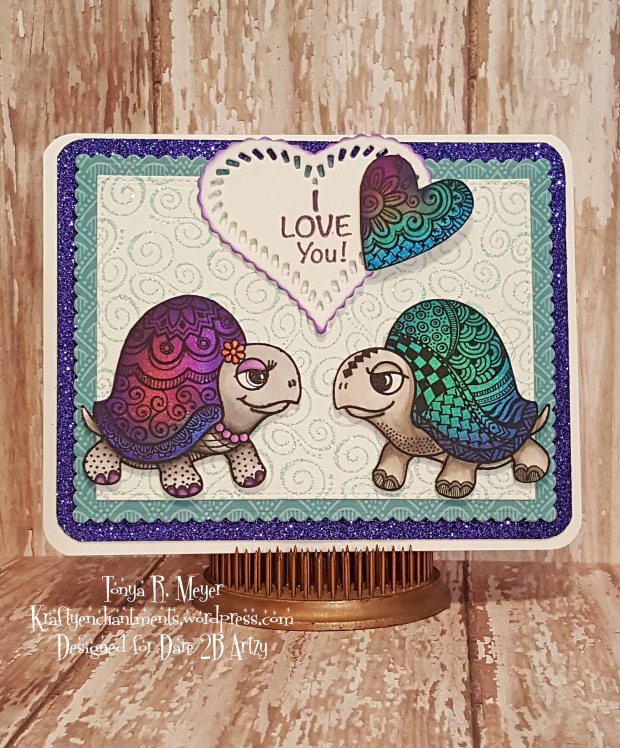
Today I’m thrilled to be sharing my card for this month’s Dare 2B Artzy challenge using the adorable Turtle Couple stamp set and the Swirls Pattern Stamp for the background.

This month’s challenge features my favorite colors: Purple & Turquoise. There’s definitely no shortage of ideas that come to mind featuring these gorgeous colors together.
We want you to join this challenge and share your amazing Dare 2B Artzy creations featuring a PURPLE & TURQUOISE color scheme. There’s an amazing Dare 2B Artzy prize up for grabs so you want to be sure to get your submissions in before the end of May!
Here’s my inspiration for the challenge:
To create this card, I first had to create a mask for my Turtle Couple. I did this using some Avery Removable Multi-Use Labels in 4×6 size. I find that these work great for creating masks of small stamps. I first stamped my image onto the removable label front. If you have the Turtle Dies you can easily die cut the stamped image from the label to create your mask. I unfortunately don’t have the dies for this stamp set (adding to my must-have list) so I used an X-acto knife to carefully cut around the stamped image.
For the turtles I was going to airbrush the shells of each turtle so when I used the X-acto knife, I just cut around the shell as that was the only part of the image that would need to be masked since I would color the body by hand.
Next, I re-stamped my turtle images onto some heavy white cardstock. I stamped them on the same white cardstock, but left quite a bit of space between them for masking purposes. Once stamped, I removed the backing on one of my masks and placed it over the turtle image. With the mask in place, I used my Craftwell e-brush and some Sharpie markers and airbrushed the turtle shells. Each shell was masked and airbrushed separately so I wouldn’t have any ink overflow accidently. I colored the boy turtle in shades of blue & turquoise and the girl in shades of purple & orange.

Once I’d finished the airbrushing I removed the masks and colored the turtle bodies with my Copic markers in shades of Grey using the Toner & Warm shades. I kept the turtle body neutral so the shells would really pop with color.
When I was satisfied with the coloring I fussy cut my turtles out and set them aside.
For the background, I used the Swirls Background Stamp from Dare 2B Artzy. I love this stamp, it’s so fun. I cut a piece of 4×6 cardstock in white and stamped my swirls image with some Versamark ink and then added some turquoise embossing powder that had holographic glitter in it over the entire stamp and then tapped off the excess and heat set the embossing powder. It created this gorgeous sparkly swirled background.
Next, I die cut the background with a stitched rectangle die and set is aside. I die cut a second piece of the turquoise Dare 2B Artzy Artzy Doodle’s paper with a mini scalloped rectangle die. I added some dimensional foam to the back of the Artzy Doodle’s paper. I layered these on top of each other and over a piece of purple glittered cardstock that I’d rounded the corners on. I added some dimensional foam to the turtle couple and placed them on my swirls background.
For my sentiment, I die cut a fancy heart and heat embossed the I Love You sentiment from the Turtle Couple stamp set with some purple embossing powder. I sponged a hint of purple ink around the edge of my heart to make it stand out a bit.
I created one final mask with the heart from the Turtle Couple stamp set and airbrushed it with a combination of purple and turquoise. I fussy cut the finished airbrushed heart out and added some dimensional foam to the back and placed it on top of my sentiment heart.
This card looks so amazing in person. It really pops with the Turquoise & Purple colors of our challenge theme and all the sparkle is so pretty.

We can’t wait to see what you create!!
Be sure to check out all D2BA’s products here!
Hope everyone will join the Purple & Turquoise challenge this month. The team is excited to see your creations! Happy Stamping!


Pingback: Dare2BArtzy Blog
Simply adorable! Thank you for doing the step by step also. I use the copics some in my own art but seeing how others use them is such an inspiration! Looking forward to seeing more as I follow along with you.
LikeLike