Secret Santa Tutorial Card
Hi All –
Hope you all had a fabulous Thanksgiving with family and friends over this long holiday weekend. My husband and I spent Thanksgiving with my parents and enjoyed my mom’s fabulous cooking which included Turkey and all the fixins and a fabulous homemade pumpkin pie. It doesn’t get much better than that.
I wanted to take some time to share a step by step card tutorial with you today using The Greeting Farm’s recent Secret Santa stamp set. When this stamp set was released for pre-order I was quick to order because this set is terribly cute. It has 15 adorable stamps which include 4 boy and 4 girl stamps and several sentiments to use for your Christmas projects.
For my card tutorial I’m using the cute little girl with the package and the little boy with the glasses.
For each set of pictures I’ve listed the Copic color combinations I used to color the images.
I started coloring the little boy first. I always try to tackle the part of the image that I feel will be the most challenging to color and work on that first. That way if you make a mistake – you’re not 3/4 of the way done and have to scrap it or try to fix a big mistake. For me, I usually start by coloring the skin or the hair first as they take the most time.
For Step 1, I pretty much used a standard skin tone blend here on him, using E04 as my darkest shadow and blending down to an E000 with R20 to add a little cheek color. In Step 2, I used my favorite brown hair combo and colored darkest to lightest using a flicking motion and leaving a bit of a highlight across the crown of his head. For Step 3 and 4 I picked some basic colors for his blue jeans and scarf and made sure to follow the artist drawn lines for the scarf to show where the fabric folds are and blended from darkest to lightest again. This gives his scarf a little movement. For his sweater I colored it a basic cool gray combo (not shown).

For my little girl stamp, I knew I wanted to give her hat a little texture so I colored it first in a bright Christmas green (colors listed in Step 13). Then for Steps 5 and 6, I used my Copic Colorless Blender solution and put a little bit (a few drops is all you really need) on a new microfiber cloth I had. Then in Step 7, I dabbed that microfiber cloth onto the hat that I’d colored. As the paper dries, you can see in Step 8 how it gives a mottled texture. The more times you blot the paper the more texture you will get as it dries. You can also see in Step 8 that I had some bleeding – this was because I accidently put too much blender solution onto my cloth. At this point you may want to panic and scrap your coloring and start over – DON’T as there is a simple fix for this.

Whenever you have a marker bleed outside of the lines you can easily take your Colorless Blender also known as the 0 marker and push that ink back in. In my case above it was a pretty significant bleed outside of the hat and on her face. I worked at it a little at a time – pushing it back into the hat and then letting it dry a bit. Pushing the color back in some more and letting it dry. You can also turn your cardstock over and blot those areas outside the lines from the back with the brush end of the colorless blender pen which will help them fade away as well. You won’t be able to entirely erase the bleed, but you will be able to reduce it. One final thing you can use is a Signo gel pen in white to draw a fine line outside of the stamped image to help cover up any additional bleed you may not have been able to get rid of. This works especially well if you are going to fussy cut or die cut your image.
Once I was satisfied with the removal of the bleed, I proceeded to color her skin and hair. I used the same basic skin tone blend in Step 9, coloring from darkest E04 to E000 and adding R20 for cheek color. For her hair I went with a reddish-brown color combo in Step 10.
Next I added some color to her jacket collar and her boots in Step 11. To give a bit of different texture to her collar and the poof-ball on the end of her hat, I used a pointillism where you place dots of varying colors. It’s a neat effect to use to make things look fluffy like on coats and around cuffs.
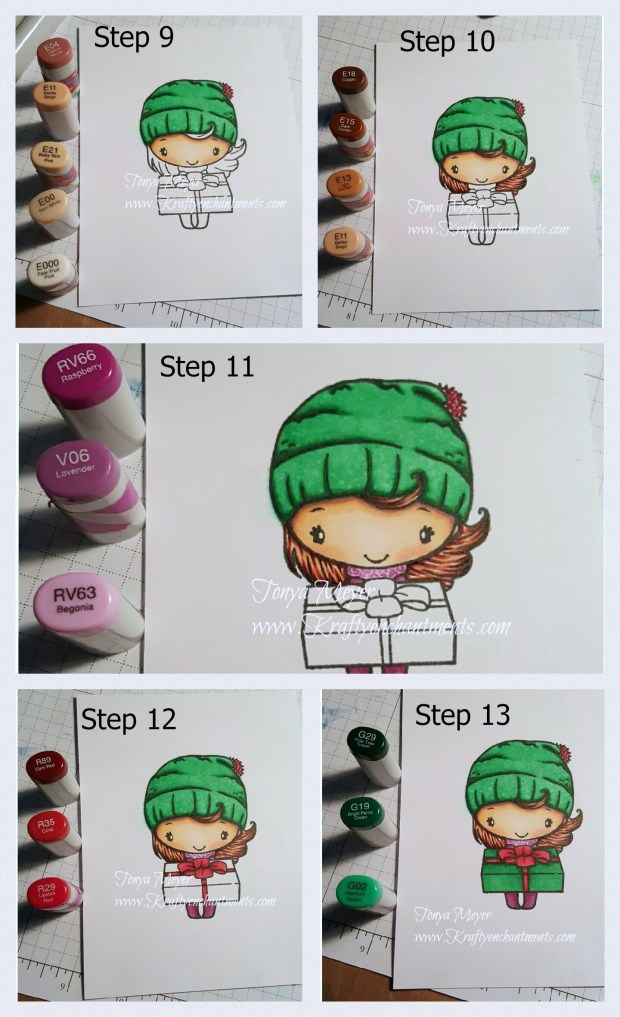
For Steps 12 and 13 I began to color the package using some bright Christmas red for the bow and the same green for the package as was used on her hat. Again, I used the artist drawn lines on the bow to give it some shadows and depth.
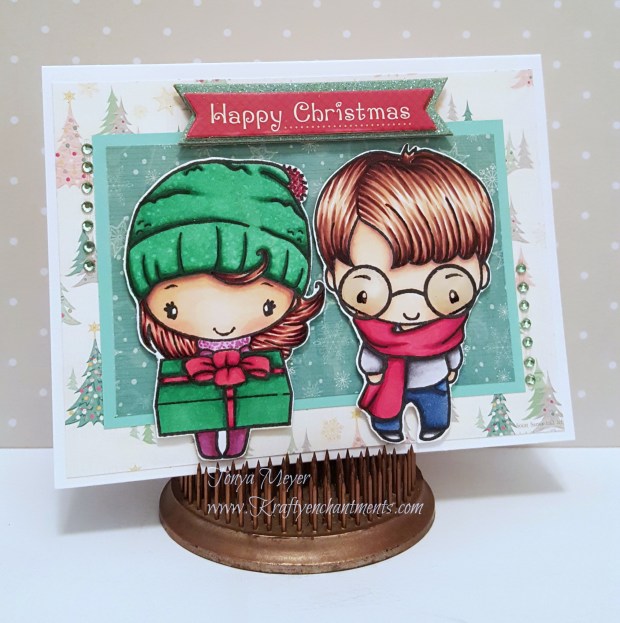
In step 14, I fussy cut her out and added some Clear Wink of Stella to the package bow to give it some sparkle. The little girl is finished in Step 15.

I wanted to make the glasses on the little boy look realistic so I used some Ranger Glossy Accents in Step 16 to fill in the area where the glass would be. I find this easier than trying to figure out shading inside of the glasses to make it look realistic. The end result with the glasses is seen in Step 17. Note that Glossy Accents does take a bit of time to dry – particularly if you get it on too thick. You can heat dry it but it still takes some time. Don’t touch it while it’s drying. It will look more clear and less cloudy when it’s fully dry as you can see in Step 18.

For Step 19, I picked out some coordinating paper from the Bo Bunny Candy Cane Lane 6×6 stack, and a little sentiment embellishment and a few adhesive gems and prepared my card base.
Once I’d layered my paper, I added my Secret Santa images to the card with some dimensional foam and placed my sentiment and my gemstones.
Here’s a look at the finished card. I really love how it turned out. The best part is that my little bleed through with the blender solution is not even noticeable in the finished card.
Hope you enjoyed this. If you have questions about this card, please feel free to reach out to me here on my blog. Your comments are always welcome.
Here’s a list of the supplies used for this card:
The Greeting Farm – Secret Santa Stamp set
Bo Bunny – Candy Cane Lane 6×6 paper pad
Christmas Sentiment Embellishment – purchased from Hobby Lobby
Various gemstone embellishments – purchased from Hobby Lobby
Various cardstock – teal green – purchased from Michaels
Scissors


So very cute! Great tutorial.
LikeLiked by 1 person
Thank you!
LikeLike