Beyond Basic Backgrounds with Altenew
Hi All! I am happy to say that I am finally jumping back into the Altenew Educator program and starting my Level 2 Educator classes. I finished my Level 1 final in July of 2020. It was my intention to start my Level 2 courses last year but life gets in the way sometimes. I am happy to getting back into these courses as I really want to finish and earn my Level 2 badge to display on my blog and learn some fantastic new ways to take my card making skills to the next level.
My first class for the Level 2 program is called Beyond Basic Backgrounds taught by Lydia Evans.
Many times when creating cards, there is a central image of focus. That can be a gorgeous flower that we have spent time water coloring or a cute critter that we have used colored pencils to create realistic looking fur with our carefully placed pencil strokes. How many times is the background of the card the main focus?
The Beyond Basic Backgrounds provides some great ideas for taking card backgrounds to the next level and making them stand out or even making them the focal point of your card or project.
I decided to approach my card background in a bit of a different direction by using a product that has been reintroduced into the stamping world called Stamping Foam. This product is new to me as I had never seen it before but it opens up many possibilities in the craft room.
Stamping foam allows you to make an impression into the foam using dies and possibly even stencils and that you can then use to ink up and then use to create stamped images. Imagine all of the background dies that you love that can now be turned into stamps. The possibilities are endless and the best part is that the stamping foam can be used over and over again.
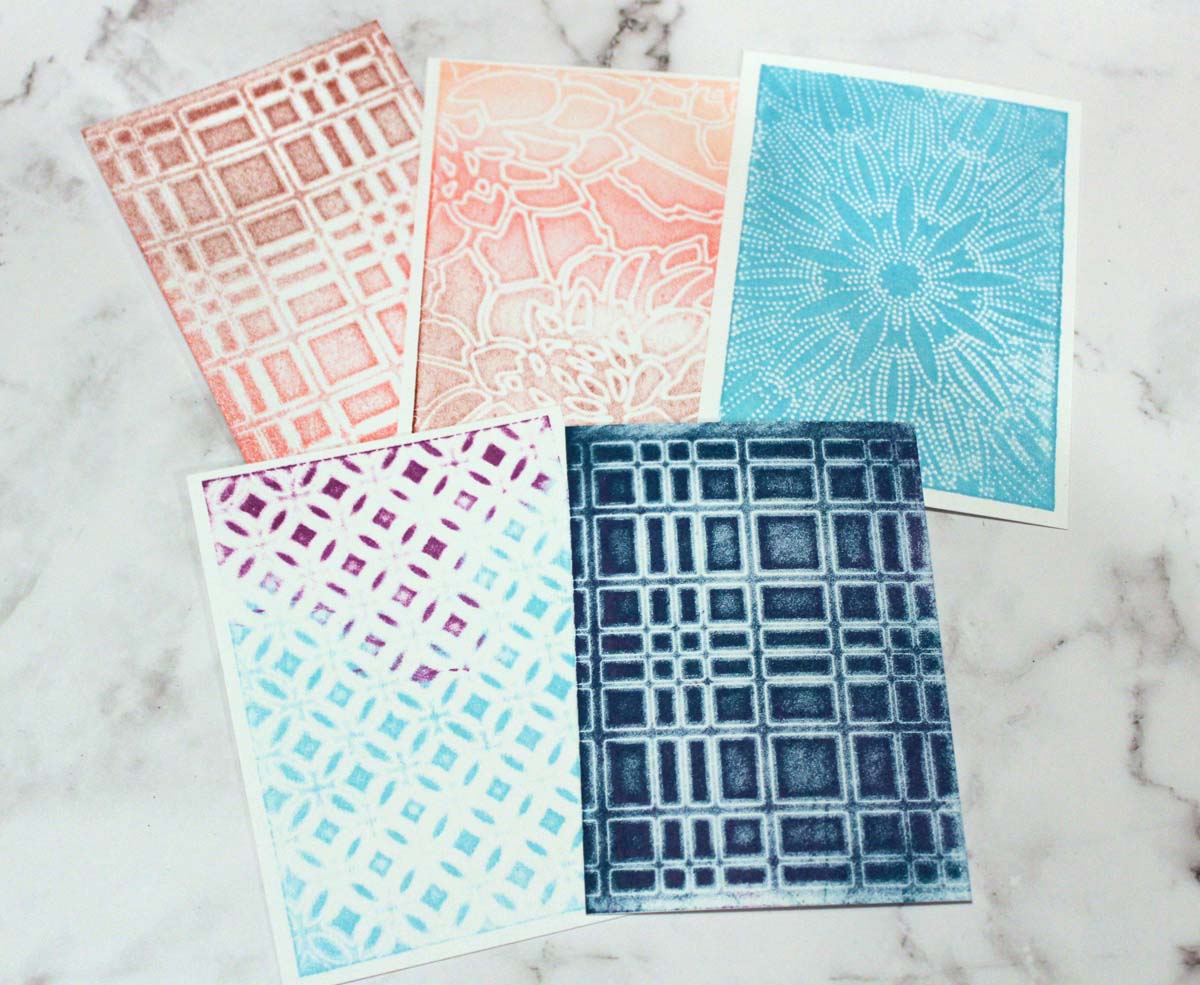
To create my background for today’s card, I played with several of my Altenew background dies to discover what they would look like as stamped backgrounds. I tested the foam using the Altenew Layered Floral Cover Die A, Circle Quilt Cover Die, Dotted Starburst Debossing Cover Die and finally the Layered Plaid Cover Die A. It was so much fun finding out what a background die would look like as a stamp. It had me wishing I owned more of Altenew’s background dies.
The process to create the backgrounds is pretty simple. I placed one of the background dies on my glass crafting surface. A good hard surface will provide the best results.
I prepped my stamping foam by taping it to a clear stamping block using some purple tape to give it a bit a stability and make it easier to press into my die. The stamp foam is fairly small as it only measures 4 ¼ x 3, which is a bit of a downside as the finished stamped images are smaller than A2. I didn’t try taping two stamping foam blocks together but that’s probably an option.
Next, I took a heat gun to my foam stamping block. The trick is to keep the heat gun moving and not to overheat it. A good 15-20 seconds is plenty if your heat gun is warmed up first. NOTE: You’ll need to be careful to not get the heat gun too close to the stamping foam and don’t touch the tip of the heat gun to the foam as it can melt it (I learned the hard way on one corner of my block when I heated it too long, lol).
Once the foam is heated up, quickly take it too your die and press it into the cutting side. You’ll want to make sure to press firmly and all around to get an even impression – this is where the taped on stamping block comes in handy.

If for some reason the impression didn’t come out good, you can always re-heat and try again. That’s the magic. The stamping foam when re-heated returns to its normal shape and can be reused over and over.
Now it’s time to begin inking and stamping. I cut several pieces of 100 lb. white cardstock down to A2 size. I only have a few of the full size ink pads from Altenew so I grabbed both the dye and the mixed media inks to see which one worked better.
When it comes to inking up your impressed image on the stamp foam, you want to make sure the ink stays on the surface of the stamp and does not get into the impressed areas. The best way is to lightly tap the ink onto the foam or carefully rub the ink onto the foam until the surface is fully inked up and ready to stamp. Using the Altenew mixed media inks allowed me to lightly mist my stamps with water as well so that opens up more possibilities for creating unique backgrounds. I also tested the Altenew Crisp Inks which I really liked the results with them as well.
As I mentioned, I got carried away trying out my Altenew background dies. I heated, impressed, inked and stamped several backgrounds – it was just too much fun! I think you could also use this for small word dies or maybe even border dies to create some unique stamped images.
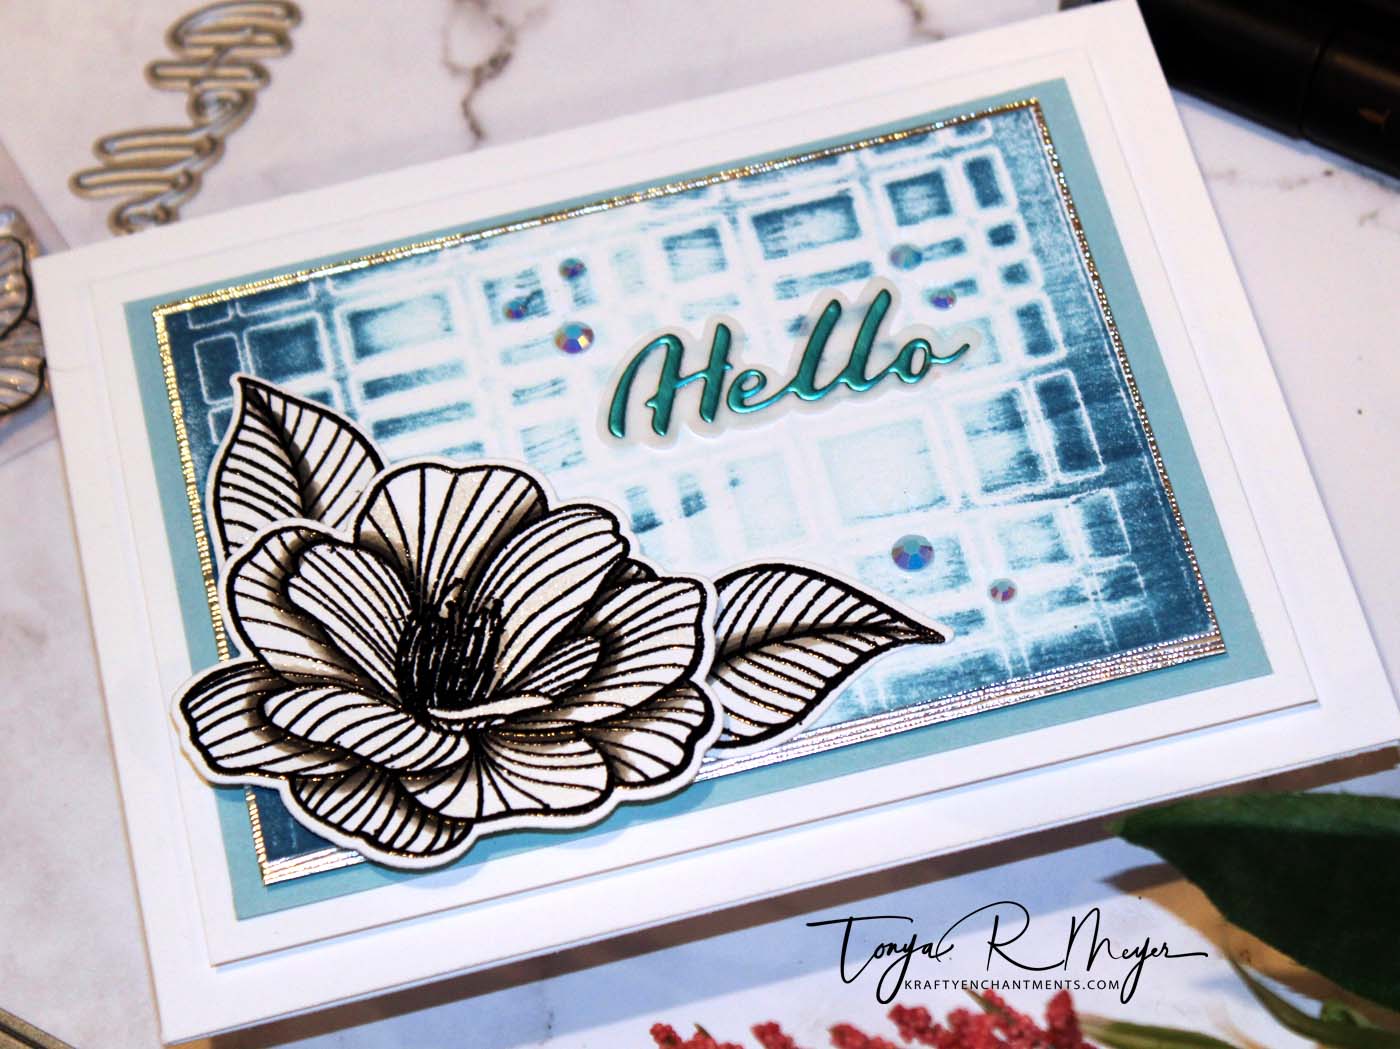
I decided I liked the way that the Plaid Cover plate A die looked once I’d stamped it. I had one background that came out perfect, but I actually chose the less perfect image as it had a bit of a distressed look to it.
I cut my background down leaving no white space around the edge. I matted it to a silver textured piece of cardstock and then added a blue mat and another white mat and added to an A2 sized card base.
Since the background was my focal point, I decided to use the Cherished Memories floral stamp set from Altenew to add to my card front. I love these flowers for their unique look with all of the drawn lines on the petals and leaves. I stamped all of the flowers onto some 100 lb white cardstock and heat embossed with some black detailed embossing powder.
I wanted to add a bit of shading to my flowers, but I didn’t want them to detract from the background which is the star of the show. I decided to add some grey shadows to the base of the flower using my Altenew Alcohol markers in TG02, TG03 and TG05. This gives the flower petals some dimension and makes it look like they’re popping off the card.
For a finishing touch I added some clear Aqua Shimmer to the flower petals. The flower was added to my background with a bit of dimensional foam under the flower and the leaves were adhered directly to the background.
I finished the card with a simple Hello sentiment from the Simple Greetings Die set. I cut the shadow layer from some vellum and the script hello from some matte blue metallic cardstock.
I added a few blue crystal gems to my card front to create a bit more dimension and sparkle.

The Beyond Basic Backgrounds class from Altenew is chalk full of amazing ideas to bring your card backgrounds to life and make them stand out. It really makes you look at your stamps and dies in a different and very creative way.
You can check out the Beyond Basic Backgrounds class here over in the Altenew Academy.
Thanks for stopping by today. I hope you’ve enjoyed my card. I have listed links below for the products used in today’s card.
Hugs,
Tonya
https://linkdeli.com/widget.js?id=f5e8378456858c916708


Glad you are getting back in to this again!
LikeLike
Welcome back!! So glad to see your post! Beautiful work! Thank you for submitting your work to the AECP assignment gallery.
LikeLike
Thank you Erum!
LikeLike