AECP Seasonal Scene Building
Happy Sunday everyone! I’m back with another card from my Altenew Educator Program journey! I am so excited to be learning new techniques and skills to help elevate my card making and be able to share with all of you.
My latest class was the Seasonal Scene Building which happens to be taught by my crafty girl crush, Nichole Spohr Magouirk. I don’t think that Altenew could have selected a better person to teach the scene building class than Nichole. She’s a master at building scenes and makes it look so effortless.
The Seasonal Scene Building class looks at different ways of creating cards with scenes. It covers stamp layering, oversized scenes, background building with inks, cardstock or patterned paper, creating window scenes and even shaker scenes. There’s so many ways to create wonderful scenes for your cards.
I decided to do a stamp layering scene for my card. Stamp layering is something that I really have to focus and plan to get my card to come out right without lots of trial and error. It’s definitely a technique that can produce amazing card scenes.
To start I searched through my stash of Altenew stamps and tried to find sets that I could build a cute scene. Of course scenes can be built with any kind of stamps such as florals, shapes, characters, and objects. However, I think that if you’re creating a scene that it’s important to consider the size of your stamps to make sure that they are proportionate to each other. In other words, you don’t want a really large flower and a small bird for example.
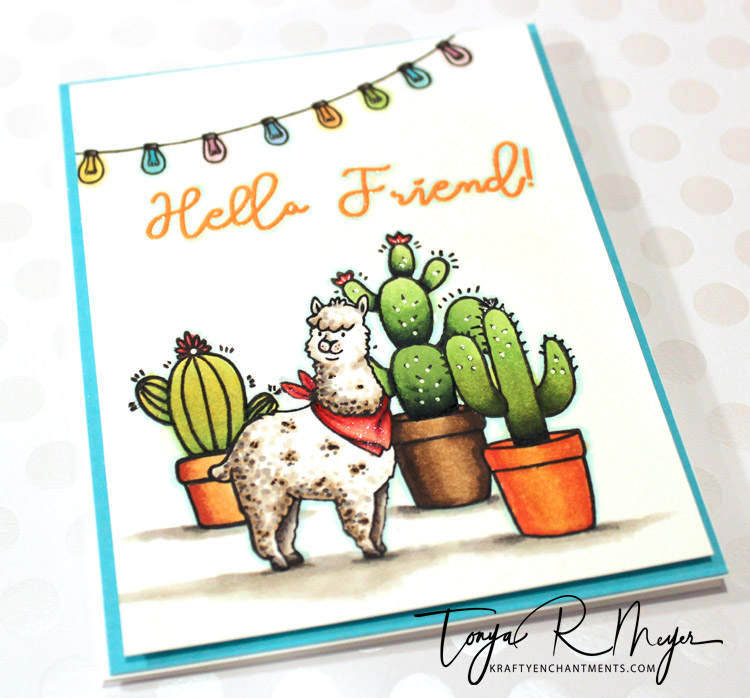
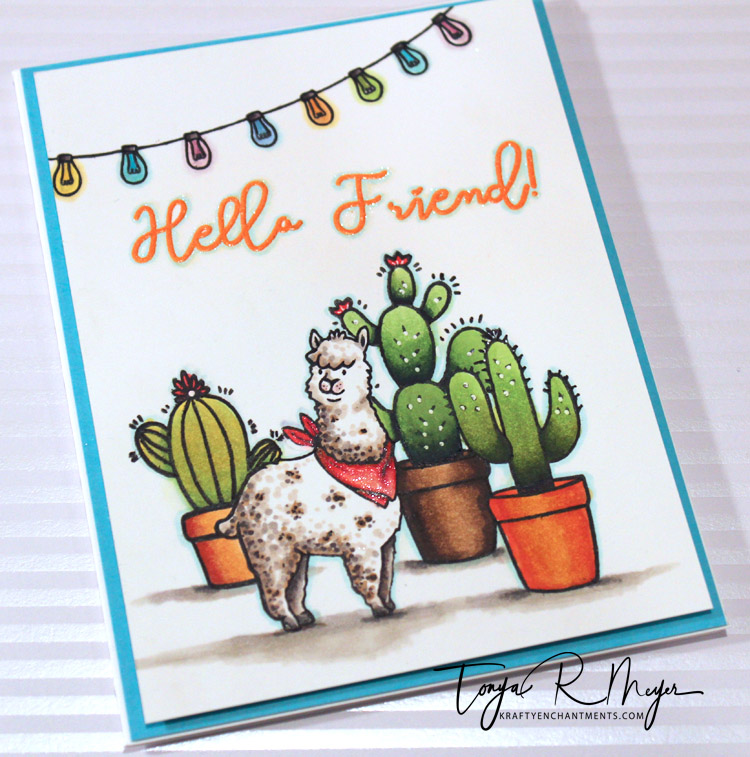
I decided to combine two stamp sets for my scene. First, the adorable Alpaca stamp with his scarf and the Be Strong stamp set which has a ton of great images and sentiments.
For my process, I cut a peice of Neenah Classic Crest 100lb cardstock to A2 size. This is so that I have an idea of the area I have to work with.
I place the cut cardstock into my MISTI and then start layering my stamps to build my scene. This initial step helps me decide exactly where images will go on my panel, which images will be in front and back and quickly gives me a visual of any areas of white space.
Once I have a scene layout that I like, I close the door and pick up all of my stamps on the MISTI door to hold them in place. I remove my 110lb cardstock from the MISTI and replace it with a piece of scrap cardstock or printer paper so that I can stamp a template of my layout for reference. This also helps with determining which stamps will need to be masked off. I’ve included my stamped template below.

Since creating scenes can be a bit confusing, I like to stamp my template in different colors so that I know where each stamp falls in the layering process. It’s just a visual way for me to keep the order of things straight. You can see that I made a correction in my template above with the order on the cactus to the right.
Once my template is created, I stamp all of the images onto some Post-It Note paper to create my masks. A mask is what is used to cover up a stamped image so that you can layer another stamp on top of that image to appear in the background. Each of my stamped masks have to be fussy cut in order to use them. Masks can be created from any kind of removable paper like label paper or Post-It notes.
In building a scene you’ll always stamp the foremost image in your scene first. In this case it is my Alpaca and the skinny cactus in the foreground. I stamped both with the Altenew Jet Black ink and then placed the Post-It note masks I made on top of my stamped images. The stamp masks should be cut so that they are on the line or inside the line in order to line up correctly when creating the layers. You don’t want white halos around your images when you remove the masks.
Next, I stamped the images in green from my reference template. So that layer included the pot for the skinny cactus and the large barrel cactus on the left. Stamped both with the Altenew Jet Black ink.
At this point I also decided that I didn’t like the pot for the flowering cactus in the back because the pot leaned forward too much and didn’t look quite right for my scene so I changed it. I used the same pot that was used on the skinny cactus. I had a mask for the skinny cactus and created a mask for the pot to place over those images. Then I simply stamped the pot I wanted into the background behind the Alpaca and the skinny cactus. Easy-peasy! Can you see the couple of mistakes I made? On both cacti to the right, I should have wiped off the stamp on the back edge of the pot at the top where the cactus would be. I forgot, but I colored that area a bit darker so it’s not too noticeable. When I’m building a scene, I try not to start over for simple mistakes that can be covered up.

My final stamped images were the large flowering cactus and the string of lights across the top of my card panel.
At this point, if there are any areas that didn’t stamp due to the masks, I go in with a fine liner pen or a Micron pen and draw those small areas back in.
I colored all of the images with my Altenew Artist markers and then went over and outlined all of the images with a Micron pen to make the lines pop. Sometimes when coloring with alcohol markers the lines can fade back a bit and outlining really helps define the images. To provide a ground to my images, I colored in some shadows underneath them.
For the sentiment, Hello Friend I stamped it onto the card panel with some Versamark ink and heat set it with some Hero Arts Tiger Lilly embossing powder. I felt that the orange balanced out the scene and matched the orange pots.
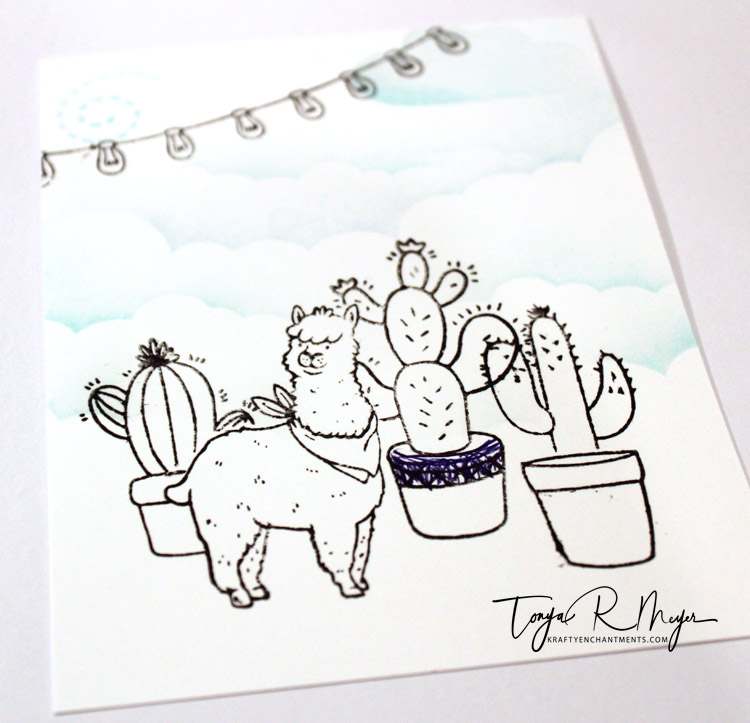
I had an afterthought when my card was finished, but wasn’t sure how it would look so I used one of my stamped templates to ink blend on some clouds which you can see below. Ultimately I decided against it, but at least using my template and getting a visual saved me from possibly just inking up my card and making a mistake. If I were to do this again, I might build in some clouds first before starting the stamping an coloring process.
Thanks for stopping by. I hope that you enjoyed today’s card and learned a little about my process for building scene cards.
You can check out the Seasonal Scene Building class here. There are so many ways to build a scene and get creative with your next card project.
Hugs,
Tonya


Wow, this is gorgeous! I love your coloring!
LikeLike
Thank you so very much Leslie! Appreciate it!
LikeLiked by 1 person
Woah! That is some gorgeous colouring on an equally gorgeous scene there, Tonya! I think a few clouds would have looked cool. But I do like the card as is. Such a well-written post too!
Thank you for entering your work to the AECP assignment gallery. Well done!
LikeLike
Thanks Erum! Next time, I’ll plan it out better to get some clouds in the scene first and not as an after thought.
LikeLike