CAS Boutique Cards
Hi everyone! Welcome back! I’m sharing a new card from my AECP Classes. This class was called Clean & Simple Boutique Cards.
I have struggled with the idea of CAS Cards (clean and simple) cards for a long time. I think there’s a real skill set involved in creating something simple as a focal point for the card and not feeling the need to tweak this or add a little something more to the white space, background or other card elements.
This class taught me so many ways to create simply beautiful cards with few elements, minimal coloring or color accents as well as different ways in which to create a focal point. I really enjoyed exploring all the different techniques I learned from using a mirrored cardstock as a focal point to letter press and creating simple one layer cards. All of the lessons in this class teach you easy techniques that can take a card to the next level of style and simplicity.

To start this card, I used a 3 inch circle die from my stash and cut a circle from a piece of scrap cardstock that was 4 ¼ x 5 ½. I centered the die on the paper and ran it through my die cut machine. I set the circle aside as I wasn’t going to need it; I would be using the negative piece for my project.
I cut another piece of 4 ½ x 5 ½ inch cardstock from some 110lb Neenah Solar White cardstock. Once cut, I laid my negative die cut piece over the white cardstock and taped them together using some Purple Tape (painters tape works well too). Having the two pieces of cardstock taped together created a mask.
Next, I placed my Altenew Bubble Wrap stencil over the taped together layers of cardstock. I flipped it over and used some more Purple Tape to hold the stencil in place on the cardstock.
With my stencil secured, I used some Nuvo Glimmer paste called Moonstone and my palette knife and spread a layer over the stencil onto my cardstock. Since I created a circle mask that I taped to my white cardstock, it would only allow the glimmer paste to be within that circular area on my cardstock. When I had a smooth layer of glimmer paste evenly spread over the stencil onto the masked area of my cardstock, I carefully removed the purple tape holding it in place on the back. Before doing anything else I quickly went and washed my Altenew stencil and palette knife with some warm water and soap as it dries fairly quickly and can be difficult to remove once dry.
I set my cardstock aside to give the glimmer paste time to dry while I worked on the other elements of my card.
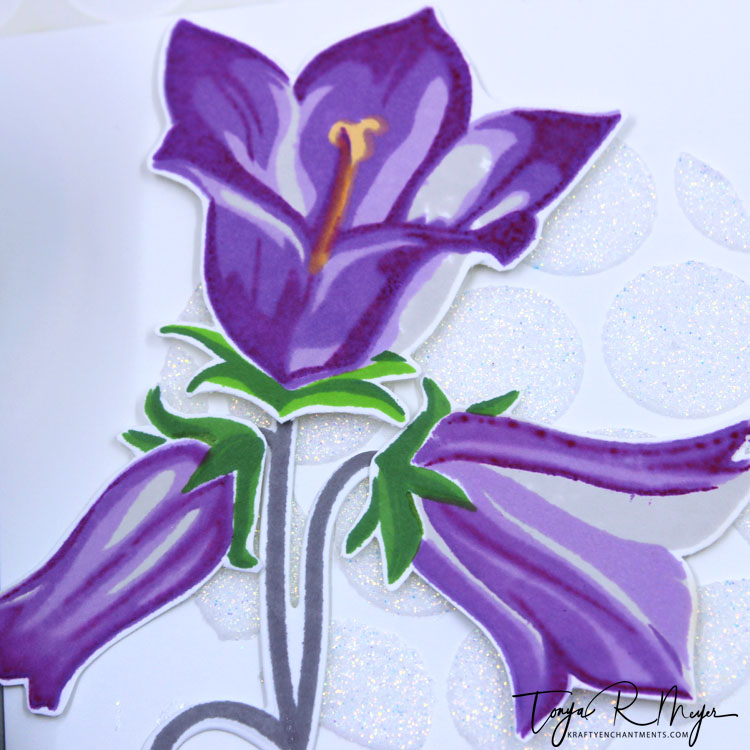
I was excited to get one of the brand new Build a Flower stamp sets from Altenew just before I began this class. The new Bellflower stamp set is amazing! I just love watching how the layers of this stamp set come together to create these stunning flowers. There’s also a coordinating die which makes life easy.
This stamp set comes with the layers clearly numbered so it takes the guess-work out of any layering as you can easily tell which stamp is next in the layered image. There are 3 sizes of flowers in this set and my card today uses all three.
I used the same ink colors for all 3 stamps. To start, I placed all of the base layer flowers into my MISTI stamping tool and stamped them using one of Altenew’s cool-grey ink called Limestone. It may seem strange to use a grey ink for a flower image, but I loved the way the grey looked when paired with the purple colors. They complimented each other well.
Using the MISTI allowed me to re-ink and double stamp in case there were any areas missed in the initial stamping. I usually don’t have that issue as I generally season or prime my stamps. You can season or prime by rubbing your fingers or an eraser over the stamp before using it.
For the other 3 layers of my Bellflowers, I used the gorgeous purple inks from the Altenew Shades of Purple collection. These are my favorite Altenew ink colors. I used the Lavender Fields, Deep Iris and Midnight Violet inks from this collection. I omitted the lightest ink (Soft Lilac) since I’d used the Limestone as my lightest layer.
Next, I stamped the leaves for the flowers. The leaves all have 2 layers. I used Altenew’s Shadow Creek and Grass Field inks from the Green Valley ink collection to stamp the leaves.

The wonderful thing about this Bellflower Build-A-Flower stamp set is the dies. The dies cut the completed flower and leaves as one, which is such a nice bonus!
I learned a neat trick as part of this class too! The Bellflower stamp set comes with a long flower stem which has a coordinating die as well. Sometimes when you’re stamping a long stem that can be moved and manipulated easily it’s difficult to get the die to line up when it comes time to die cut the image. An awesome trick I learned is to position the die on your paper to be stamped first, then lay the stamp inside that die and pick it up with your stamping block or MISTI door. It’s then perfectly aligned and you can remove the die and stamp the image. Works like a charm for the Bellflower stem. I stamped the stem using the Silver Stone grey ink from the Rock Collection of inks and used the coordinating die to cut it out.
Once my stenciled background was dry it was time to finalize and assemble the card.
For my sentiment I used the new Just Because sentiments set and paired a cursive “Just” with a lower case, san-serif “Because”. I stamped the words onto my background using the Altenew Midnight Violet ink. It’s the darkest ink in the set. I let the ink dry a bit and then put my background panel back in the MISTI and restamped the same words using some embossing ink. I wanted to add a bit of shimmer to my sentiment and I didn’t like any of the shimmery embossing powders I had so I decided to create my own shimmer. After I’d stamped with the embossing ink, I sprinkled on a bit of ultra-fine white glitter. I tapped off the excess and then put some clear embossing powder on top and heat set it. I didn’t feel like I’d gotten enough embossing powder on to hold the glitter in place so I placed it back in the MISTI and restamped over it with more embossing ink and sprinkled on more embossing powder. I loved how the effect of the glitter with the clear embossing powder also darkened the Altenew ink. It’s so pretty!
I positioned the Bellflowers over the stenciled circle with my glimmer paste and used a combination of liquid glue and dimensional foam to adhere to the card. I ended up cutting down the stem a bit to make it fit better on my card and to keep the design balanced.
I added a piece of grey cardstock under my panel so that it would just show a little on the sides and adhered the whole thing to a 110lb card base. The card size ended up being just a little over 4 ½ x 5 ½.

I love how this card turned out with its simple focal element in the Bellflowers, but the shimmer from the glimmer paste gives it that pop.
This class was a lot of fun to experiment and learn that less is more in most cases when it comes to Clean & Simple Boutique Cards.
Thanks so much for stopping by! I really hope you’ve enjoyed today’s card.
Hugs
Tonya


This is such a beautiful card! The design may be simple but the addition of the sparkle really sets the design off.
LikeLike
Saundra, thank you so very much! I’m glad you enjoyed the card!
LikeLike
This is stunning! It is just gorgeous. I love it!
Thank you for entering your absolutely classy work to the AECP assignment gallery. Top job!
LikeLike
Thanks so much Erum! I really appreciate the kind words!
LikeLike
So beautiful x
LikeLiked by 1 person