Dare 2B Artzy 3-D Holiday HOP
Welcome to Dare 2B Artzy‘s 3D Holiday Blog Hop!!
Can you believe the Holidays are right around the corner once again?!
We at D2BA are so excited!! We decided to have a fun holiday blog hop featuring 3D projects!! We hope we inspire you to get artzy this holiday season!!

You should have arrived here from Chris Pozzi’s blog! If you haven’t and would like to hop along with us, please go back to the Dare 2B Artzy Blog to start at the beginning!
Be sure to follow each blog and leave comments along the way for your chance at winning! We will randomly choose a winner from one of the blogs, so the more you comment, the more chances you have to win!!
Winner will receive a stamp set and ink pad!!
Blog Hop will end Sunday, November 19th at 7:00pm Central.
We will then post a winner!!
———
Whoo-hoo! Hope everyone is having fun with this 3-D Holiday Hop! Are you getting lots of ideas for your holiday projects? I know I am inspired! The wonderful Dare 2B Artzy DT ladies inspire me every day with their talent and creativity!
On to my project. I created some fun ornaments to give as gifts to friends and family or even to hang on your own tree. These would be great projects for the family to get together and create.
To start, I purchased a package of ceramic ornaments from my local Hobby Lobby store. I tried to select ornaments that had the most area to stamp on. The package came with 2 ornaments. The regular price was under $3.00 but I happened to get them on sale so they were about half price – whoo-hoo! The ornaments had already been painted with a primer coat so I didn’t have to do that.
I also purchased some Rustoleum Chalkboard spray paint from Walmart and a couple different colors of Acrylic paint from the craft store.
My plan was to paint the ornaments with half acrylic and half chalkboard paint so I needed to mask them off. To do that I used blue painters tape and masked off the section that I didn’t want to get the chalkboard paint on it. I made sure to press the painters tape down firmly with my fingernail along the leading edge to get a good seal. You could get very creative with your masking and create a fun design with the masking tape as well (think stripes or criss-cross designs).

With the masks in place I headed outside to a well ventilated area to spray on the chalkboard paint. I could have purchased Chalkboard paint to use with a brush, but I was afraid I wouldn’t get an even coat onto my ornament. I wanted the surface to be as smooth as possible since I would be stamping onto it. The Rustoleum chalkboard spray paint worked really well. I sprayed on a couple of coats on one side and allowed it to dry before turning over and covering the back side with two coats. The spray dries very quickly so it didn’t take long at all to do the back and front of the ornaments. I left the ornaments to fully dry for a couple of hours while I worked on some other projects.
Once they were fully dry, I carefully peeled off the painter tape. I was surprised to find that I only had one tiny area the bleed into the masked section which I would easily be able to fix with my other paint.
Now it was time to mask off the chalkboard painted section. Using the same painters tape, I tore off some strips and stuck them to my skin first to remove some of the sticky adhesive so that I didn’t risk it lifting the chalkboard paint off my ornaments. I just masked off the leading edge that I would be painting up to on the ornaments.
Next, I was ready to add on my acrylic paints. I chose the Glorious Gold from DecoArt and a very pretty, holographic color shift acrylic paint from Folk Art as well called Red Flash, but it turned out looking hot pink to me.
I squirted a generous amount of the paints onto some cardstock scraps and painted the other half of the ornaments. I made sure to swipe the paint brush away from the masked line so that paint wouldn’t get underneath the masked section. It took about two coats of paint for each ornament to have good even coverage.
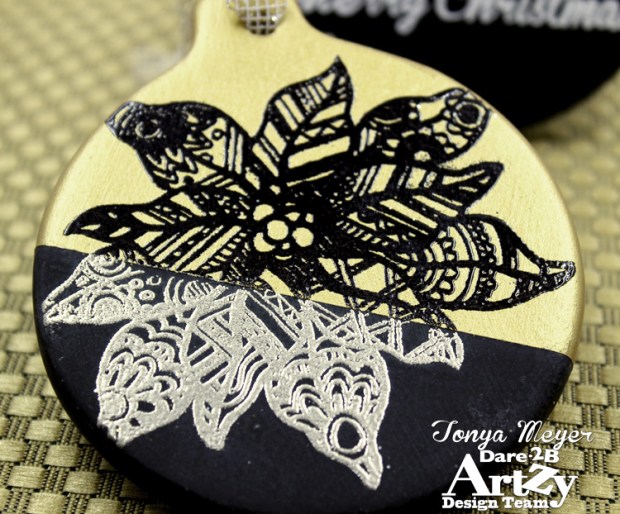
Once dry, I was finally ready to stamp on my Dare 2B Artzy images. I knew I wanted to do a cool half & half ornament using the Poinsettia Tangle stamp set but it was going to require a bit of precision.
I placed my ornament into my MISTI stamping tool after removing the foam pad. I had a piece of grid paper underneath and I traced the outline of the ornament onto the paper. This was so I’d have exact placement of my ornament to get the stamping lined up. Then I figured out where on the ornament I wanted the poinsettia to be positioned. Once I had it ready, I brushed on some anti-static powder and placed a quick sticky note mask on the half of the ornament I didn’t want to stamp onto. I was stamping on the chalkboard side first so my sticky note masked off the gold side. I inked the poinsettia stamp really well with Versamark and closed the door and pressed firmly but not putting too much pressure on the MISTI door because I didn’t want to break it. The ornament is much thicker than intended for the MISTI so you have to be careful. A little patience is required for this as it took me multiple re-inking and restamping the poinsettia to get it to fully stamp all of the detail in the poinsettia.

Once I had a clean image I removed the ornament and sprinkled on my Platinum embossing powder and heat set it. A word of caution, the chalkboard paint gets pretty hot under the heat tool so you’ll want to be careful.
With one side done I was ready to repeat the same process for the gold painted side of my ornament only using black super fine detail embossing powder. Having the poinsettia stamp and the traced outline of the ornament already in my MISTI made lining up the image to stamp the other half very easy.
For my second ornament, I used the Tis the Season stamp set. I started with stamping the Merry Christmas in Versamark and heat setting with some white embossing powder.
Next I stamped the little decorative border stamp and heat set it with some silver embossing powder on my pink background. I also used the floral medallions from the stamp set and heat embossed them in silver and white on the ornament.

My second ornament was a little less detailed, but I like the way it turned out as well. It’s a little retro looking which I really like.
This project has a lot of steps, but it’s not difficult at all. There are a multitude of Dare 2B Artzy stamps that would work really well in making ornaments. I love the look of the half chalk and half paint as well, however to save time you could easily just paint the entire ornament one color as well. There’s a huge assortment of acrylic craft paints at your local craft store so the sky’s the limit on what colors you could paint your ornaments. I highly recommend the Color Shift Folk Art acrylics – the colors are gorgeous and I would imagine they will look amazing in the lights of a Christmas tree as well!!

Hope you’re enjoying all of the artzy inspiration everyone’s sharing!
Thanks for stopping by!
Your next stop in the hop is the ultra-talented Melody Blake. She’s got something amazing in store for you!!
We hope you are inspired all along the way!
Check out all D2BA’s products here!
Happy Hopping!
Hugs,
Tonya


Tonya your ornaments are fantastic love the way you did double colors and stamping!
LikeLike
Glad to be here as a new follower!
Such pretty ornaments! You are so creative and Thanks for sharing the steps and your talent!
LikeLike
Wow! Love your ornaments! Great project!!!
I’m already following your blog.
LikeLike
Amazing! Love the ornaments! Very cool idea!
LikeLike
Your ornaments are amazing! I never would’ve thought to put the ornament in a Misti! Maybe one day I’ll get brave enough to work with paint!
LikeLike
Your ornaments are so very beautiful! Very festive looking. I am following by email too.
LikeLike
How fun are these! Turned out great~
LikeLike
What beautiful ornaments, I love them! Great job!!
LikeLike
Super cute ornaments
and great ways to stamp
on them.
Carla from Utah
LikeLike
What cute, fun ornaments!
LikeLike
I love how you split the ornament with the black chalk paint and bright color. The embossed Dare 2B Artzy images look great on them!
LikeLike
I love this idea! love the stamps and colors you chose
LikeLike
Beautiful ornaments!
LikeLike
These DIY ornaments would make great gifts. Thanks for sharing the detailed steps used to create them.
LikeLike
These are gorgeous!!!
LikeLike