Home for the Holiday’s New Release from Dare 2B Artzy
Hi Artzy friends! Who is working on their Christmas cards in July? Drop a comment below if you’re an early-bird Christmas Card maker! I applaud all of you who are! I can honestly say that I officially have completed two of my Christmas cards thanks to the new Home for the Holiday’s Collection from Dare 2B Artzy.
Have you completed the Instagram HOP to see all of the new product inspiration that the other Design Team members have created? You can start her at Dare 2B Artzy’s Instagram page: https://www.instagram.com/dare2bartzy/

This brand new collection of holiday stamps, dies, hot foil plates and paper will have you eager to get started and get your Christmas cards done early!
Today, I am sharing the two cards I made using the Season to be Jolly stamp and the Cozy Fireplace stamp. Both of these stamp sets pair well together since there are lots of possibilities to mix and match the Santa with the fireplace and the Christmas tree.

For my first card today, I made a fun card featuring the adorable Santa Claus and the sprig of greenery which I believe is mistletoe, that I used to create a wreath.
To start, I used a piece of 110lb cardstock cut to 6 x 6 and stamped the Santa in the lower left side of the card. I then restamped the Santa onto some removable label paper and fussy cut it out to create a mask for the Santa. I wanted the Santa to be in the foreground of the card so that is why I stamped and created the mask for it before stamping anything else.
Next, I used a new stamp positioner from We R Memory Keepers called the Rotating Precision Press. I followed the directions and placed my paper into the stamp platform under the dial based on the size of my paper. My cardstock was placed at the 6-inch mark on the platform. Starting at the zero mark on the dial I placed my mistletoe sprig stamp onto the platform and inked it with Dare 2B Artzy Totally Black ink. I positioned the platform back into place and pressed it down to stamp onto my paper.
The platform makes it easy to create a wreath shape because you just rotate the dial which rotates the paper as it’s held in place by some really strong magnets Then you just decide what percentage you want to rotate to the right or left depending on what you want your design to look like. For my wreath, I rotated to the right at 30-degree intervals and then repeated the same process until I had a complete wreath. It sounds very complicated but it’s really quite easy.
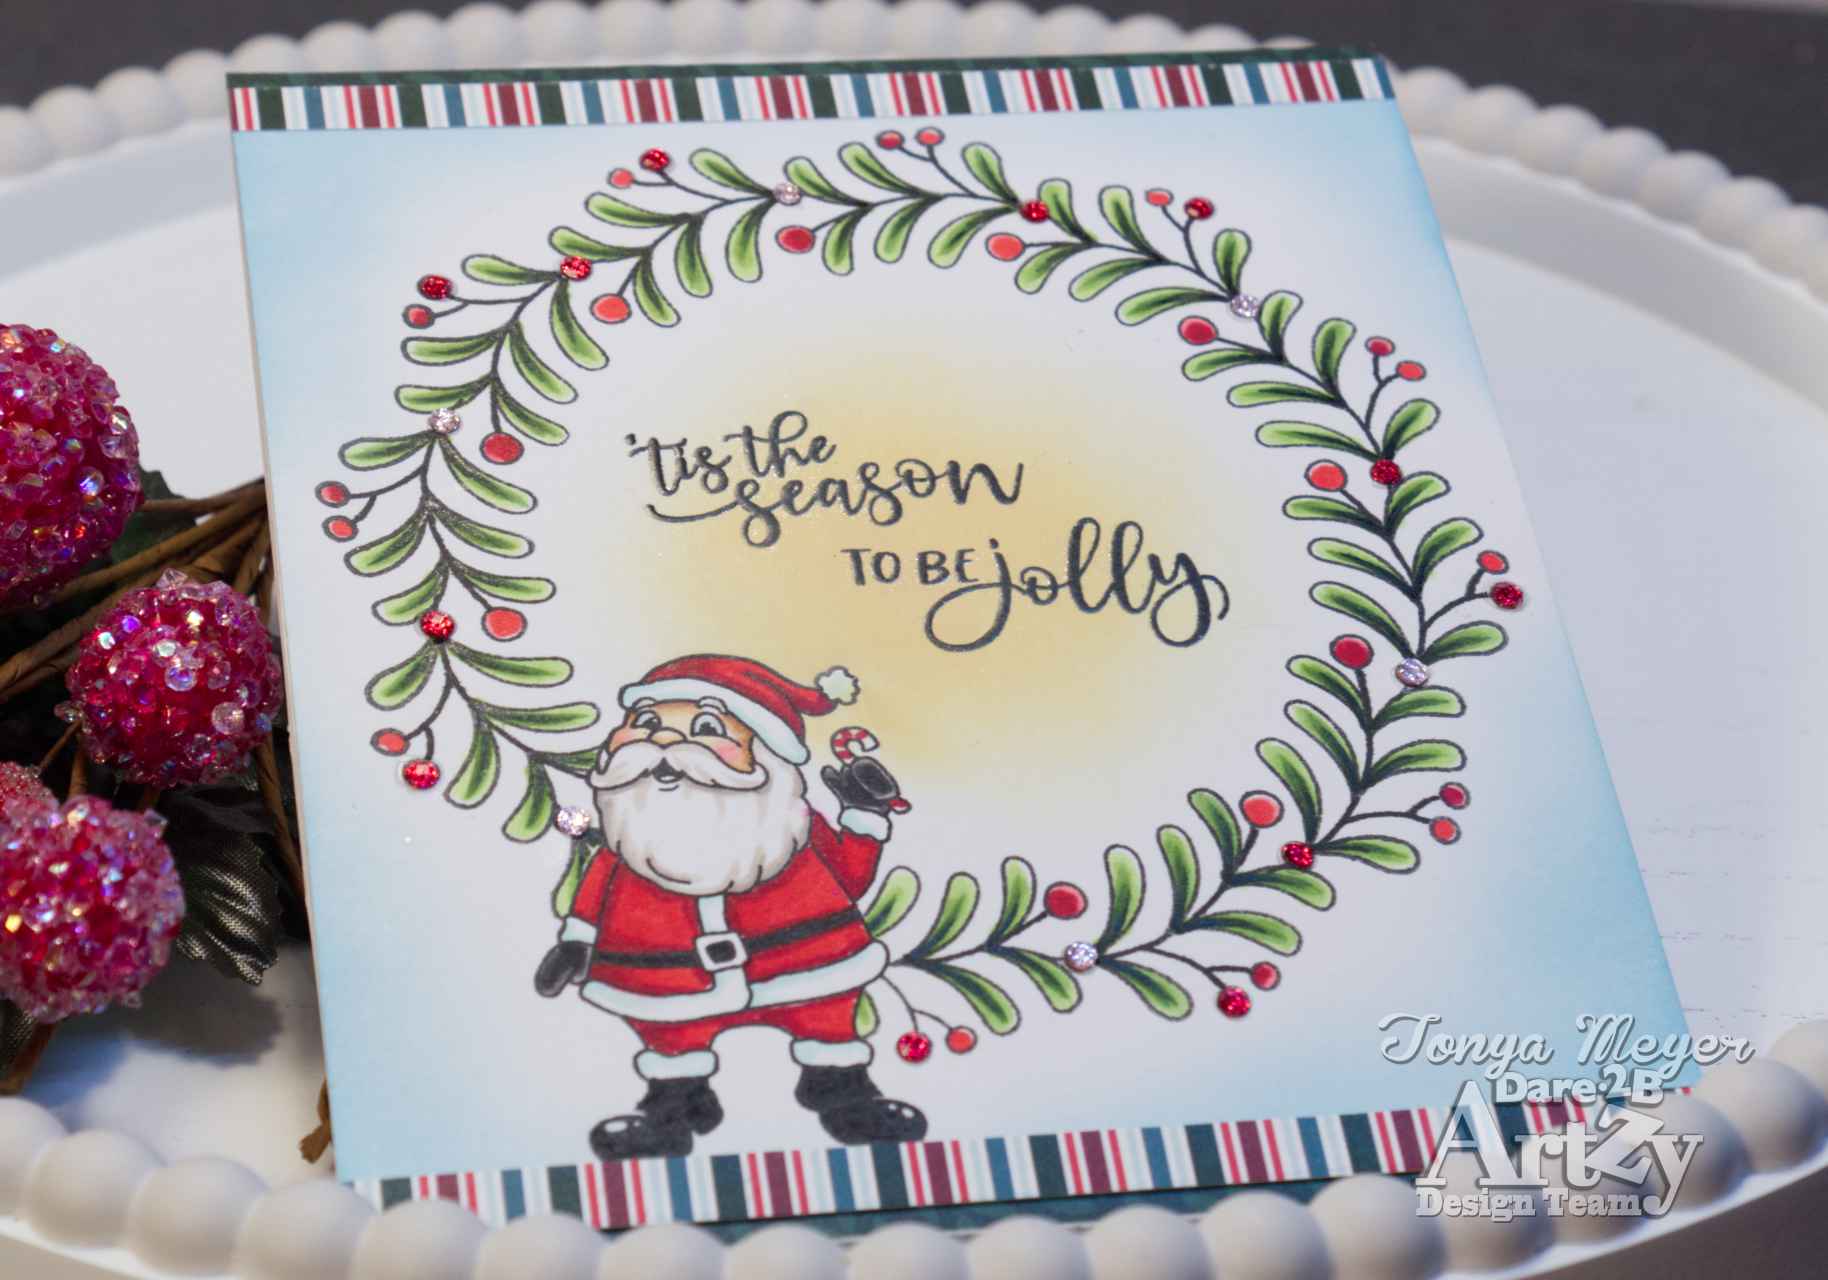
Once all of my greenery was stamped, I was able to remove the mask that was covering up my Santa and I was now ready to color.
I colored Santa and all of the greenery with my Altenew Artist Alcohol Markers. Once I finished coloring, I decided that I needed to add a bit of color to the center of my wreath and the exterior as the bright white paper was lacking some warmth and color.
I used a circle stencil I had in my stash to mask off the wreath so that I could ink blend into the center without blending over my wreath. I used some Antique Linen Distress Oxide ink for the warm glow in the center of my wreath. For the outside of the wreath and edges of my card panel I blended on some Broken China Distress Oxide ink.
Next, I stamped and clear heat embossed the sentiments Tis the Season and To Be Jolly. I think these two fonts work so well for this card.
I trimmed down my card panel and added the ¼ inch trim piece of paper from the previously released Holiday Magic paper to the top and bottom of the panel.
I then added my colored Santa wreath onto a piece of the dark green Cable Knit paper that was cut to 5 ¾ by 4 7/8.
Because my card was a bit of an odd size, I had to add a trim piece to the inside to make the inside panel even with the outside panel.
For the sentiment on the inside of the card, I stamped the May Your Home be Filled with the Magic of Christmas.

I could not resist adding some sparkle to the wreath. I added some little red gems onto some of the wreath berries and on the inner greenery parts, I alternated the red with a very light pink color gem. I also added a bit of Jelly Roll shimmer over the sentiment on the front of the card to give it a bit of reflective light when you tilt the card.
For my second card, I created a cozy scene using the fireplace stamp from the new Cozy Fireplace set and paired that with the Christmas tree from the Season to be Jolly set.
I started with a piece of 110lb Neenah Solar White Cardstock. I honestly didn’t measure it because I knew I would be using the Rectangle Framelets Slimline Dies to cut the image down once it was colored.
To create my scene, I needed to once again stamp the Christmas tree image that would be in my foreground and then restamp it onto a piece of masking paper which I fussy cut and layered over my stamped tree.
Next, I stamped the fireplace that would be in the background of my scene.

I still had the mask still in place over the tree, I stamped the bottom of the fireplace onto some masking paper and masked the very bottom where the logs and fire would sit. With that second mask in place, I was able to stamp the fire and the logs for the fireplace.
On the mantle of the fireplace I stamped the lantern but this time I didn’t create a mask for it as it would be easy enough to cover up the unmasked section once my image was colored. It’s a neat trick when you don’t feel like masking, LOL!
The best part of any scene building is the removal of all of the masks so you can see how it looks. It always makes me smile when all my hard work pays off (and when I stamp my layers correctly, LOL).
Next, I used my OLO markers and colored all of the elements for the scene. When I got to the lantern, I added a bit of a darker line on the Holly leaves where the top line of the mantle was showing on the leaves. This gave the leaves a bit more depth and covered up the area that I didn’t mask. I also took a black fine liner pen and added a bit of a base to the back of the lantern. Little tricks that can fix some things when you don’t mask your image.
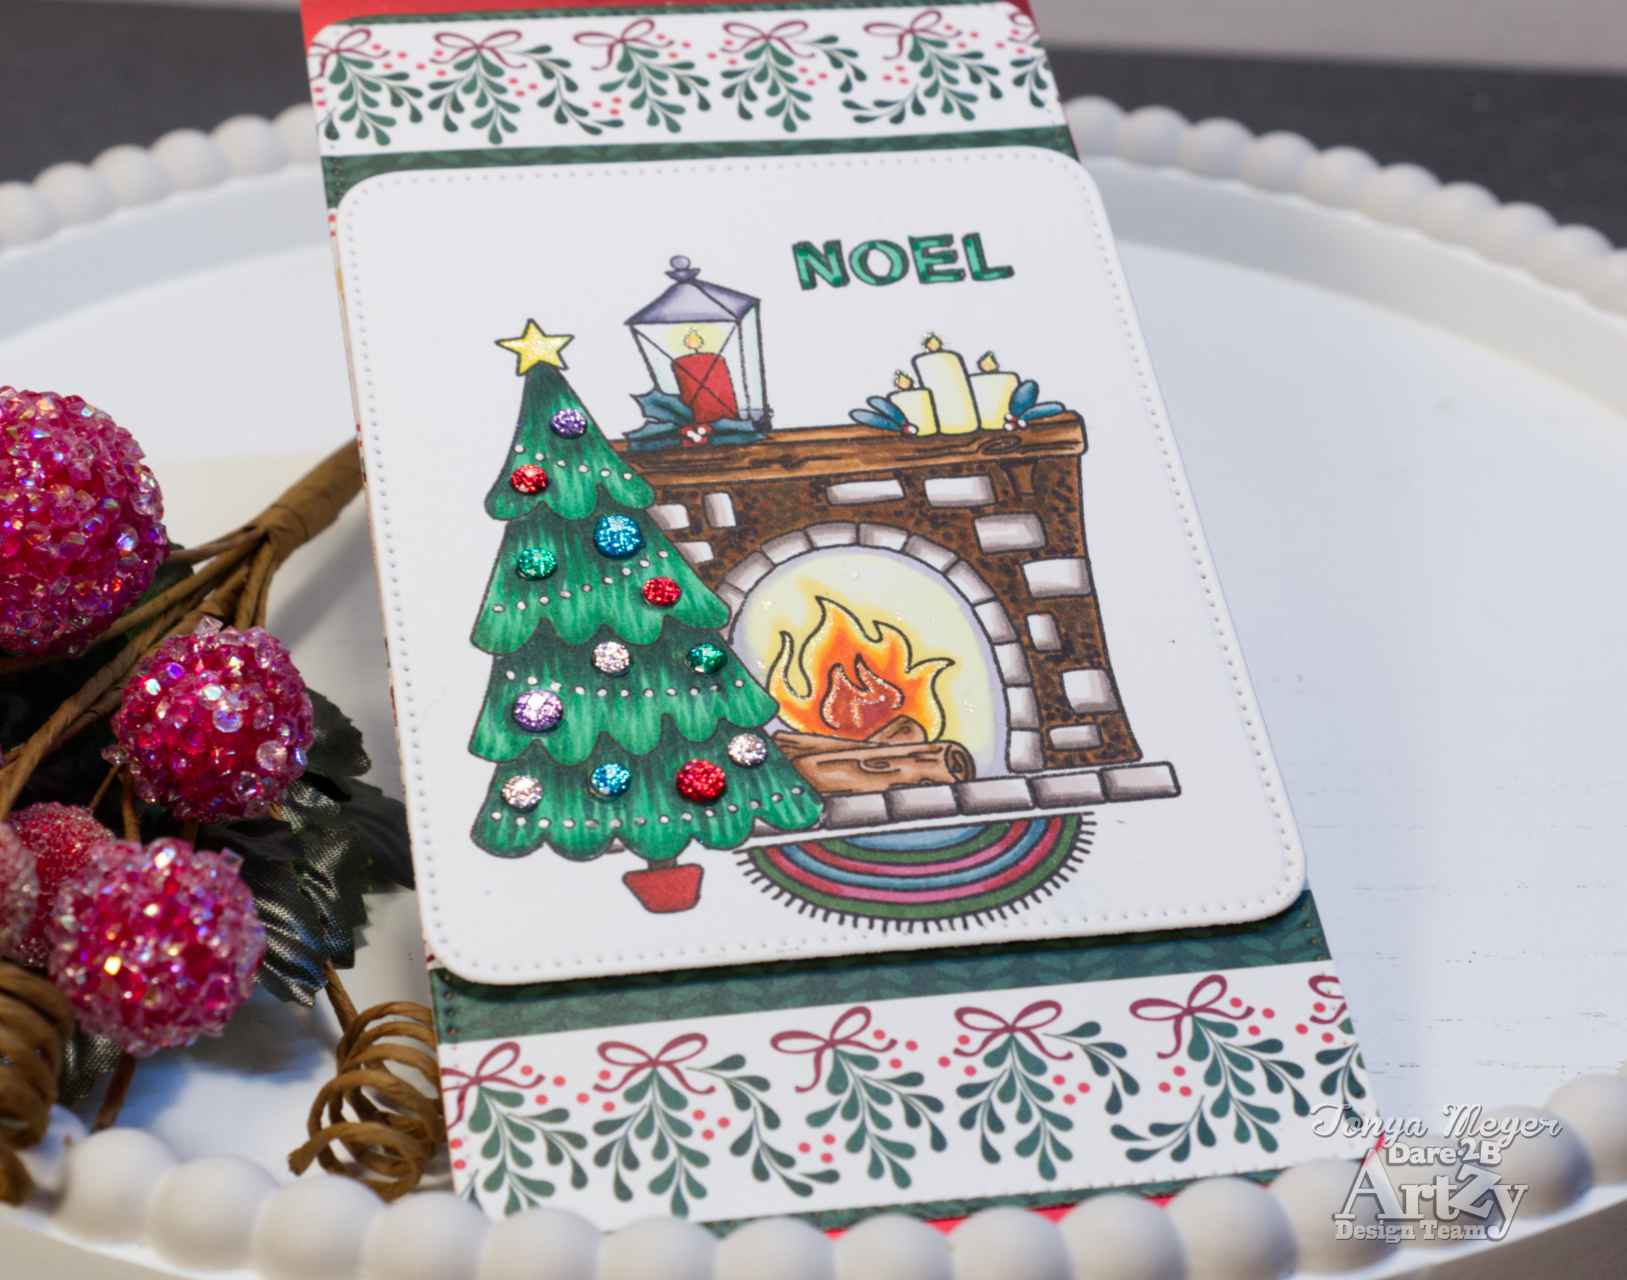
Once my coloring was done, I went back with a Jelly Roll Shimmer pen and added some sparkly “spark” details to the fire. I added some little sparks inside the fireplace and to the flame on the candles on the mantle and of course to the star on the top of the tree.
To light up my tree, I added colorful gems where all of the ornaments would be with some liquid glue and used a silver Jelly Roll pen to add little dot detail to the garland on the tree.
I stamped the sentiment, NOEL at the top and colored it with the same greens used on the tree.
Using the largest Rectangle Framelet Slimline die, I cut one end of the cardstock that I colored my cozy scene on. Then I used the die once again to cut the opposite end of my cardstock down to a size of about 4 ½ x 3 ½ with the dot detail all the way around it.
I cut a piece of the Holiday Stripe paper with the same Rectangle Framelet die so that it would have the mistletoe details at both ends to mat my colored scene onto.
I created a card base that measured 7 x 3 ½ and added a piece of matte red cardstock to it and then adhered my colored image and mat to the card base with some Score-tape.
For the sentiment on the inside of my card, I stamped have a Warm and Cozy Christmas.

I hope you have enjoyed my card creations featuring the new Season to be Jolly stamp set and the Cozy Fireplace stamp set from the brand-new 2023 Home for the Holiday’s release from Dare 2B Artzy.
If you have not checked out all of the other inspiration from the Design Team, you should head over to Instagram now and start the hop here: Dare 2B Artzy Stamps, Dies & Papers! (@dare2bartzy) | Instagram.
Thank you so much for stopping by! Hope you have some inspiration to start working on your Christmas cards with the new holiday release at Dare 2B Artzy.
All of the products used today will be linked below for your convenience.
Hugs,
Tonya

https://linkdeli.com/widget.js?id=f5e8378456858c916708

