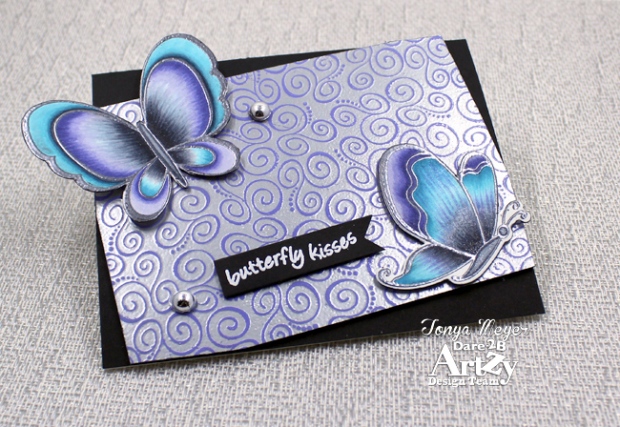
Butterfly Kisses
Hello and happy Wednesday crafty friends! I’m back today with a new card creation featuring the Dare 2B Artzy Tangle Jumpstart 1 stamp set and my favorite Swirls background stamp from Dare 2B Artzy.
First, I’ll start with the details for the background I created. I saw this background technique featured by Jennifer McGuire and had been itching to try it out for myself. This technique uses just embossing powder, background stamp and embossing ink.
To start, I cut a piece of white cardstock to approx. 5 x 6 and took my Versamark embossing ink directly to the cardstock and smooshed the embossing ink all over the entire piece of cardstock until it was covered entirely. Note – I did re-ink my Versamark pad prior to starting this process.
Then I sprinkled on some silver embossing powder from Hero Arts and made sure the entire surface was covered with the embossing powder. I tapped off the excess and then used my heat gun to set the entire piece. Although it may seem like you’re using a lot of embossing powder for this process, it’s really not as much as it seems.
Once the background was fully set, I placed it into my MISTI tool and positioned my Swirls background stamp from Dare 2B Artzy over the now silver embossed cardstock.
Before stamping, I used my anti-static powder tool and generously brushed it across the entire silver embossed background. This will help prevent the additional embossing powder from sticking to areas you don’t want it.
I inked my swirls background stamp with Versamark ink and stamped a couple of times directly onto the solid silver embossed background. When I was happy with the embossing ink coverage in all areas I removed it from my MISTI tool and used some Violet embossing powder and sprinkled it over the entire background area. There were a couple of places that I did have to use a fine tipped paint brush to brush away some stray embossing powder in some other areas.
Now I was ready to heat set the background again. After a couple of trial and error sessions with this technique, I discovered that it is possible to over-heat the embossing powder and reactivate the base layer of powder. When that happens, your stamped image can disappear into the background. The trick is to keep your heat gun moving, moving, moving. You don’t want to leave it in one area too long. Moving it allows the embossing powder to start to melt and adhere to the background, but it doesn’t heat the background up too much in the process. It took a good 10-15 min to get the violet embossed image to set.
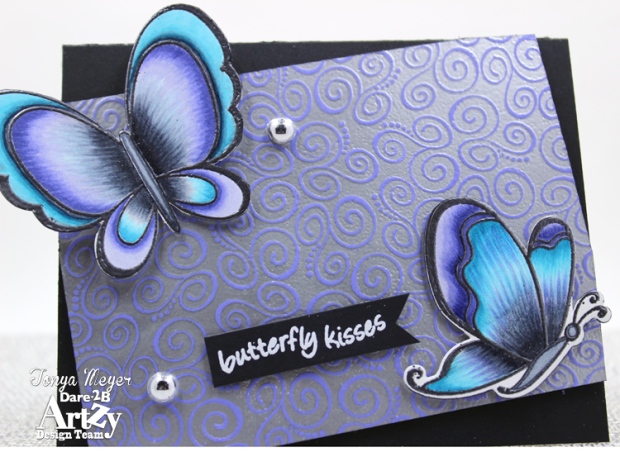
I think the result is amazing! It’s so pretty in person. I love the violet and silver together. There are so many colors of embossing powder out there that there would be endless possibilities for this background.
Since I’d used the soft violet in my background swirls, I wanted to play up that color a bit so I used that as one of my color choices with the Dare 2B Artzy Butterfly Tangle Jumpstart 1 stamps. I stamped each butterfly with Versamark and used Pewter embossing powder to emboss them. Next, I colored up the two butterflies that are in this set using my Copics using a mixture of cool grey, violet and blue greens.
Flicking out from the center with my darkest grey and going over each stroke with the next lightest color then flicking from the outer edges with my darkest violet color and flicking inwards towards the grey. I think it gives a pretty cool look to the color of the butterflies.
When I was finished coloring, I used the coordinating dies to cut out my butterflies which makes it so convenient and quick.
My original plan was to trim down my background swirls panel and frame the top and bottom with black cardstock. I’m sure as crafters, we’ve all had days when nothing seems to cut straight. I was having that kind of day. I trimmed the ends, top and bottom of my Swirls background and when it set it against the black cardstock it just looked wonky and crooked. I tried a different trimmer and proceeded to trim off a little more. No matter what I did it just didn’t look straight. I even trimmed my black cardstock twice thinking maybe that was the issue. Rather than continuing to trim and potentially ruin the background, I opted to place the panel over the black cardstock at an angle and trim off the excess – that way it’s all crooked, LOL! I’ll just tell everyone I was being Artzy! My panel was added to the black cardstock with some dimensional foam.

Finally, I stamped the sweet sentiment, Butterfly Kisses on some black cardstock and embossed with some white embossing powder, trimmed it down and placed it on my card front at a bit of an angel.
I added two silver dots to embellish the front of the card a bit but didn’t do much else because the shiny silver and violet panel doesn’t need much embellishment as it makes it’s own statement I think.
I love the final results with this card background and how the colors work so well with the finished butterflies. It’s such a pretty card.

I hope you’ll try some fun techniques using your Dare 2B Artzy stamps. You’ll find links to the the supplies I used today listed below.
Thanks for stopping by! Have a wonderful day!
Hugs
Tonya


Beautiful! What a great background technique!
LikeLiked by 1 person
Thanks Melody! The pictures don’t really capture how pretty the background is in person.
LikeLike