Dare 2B Artzy’s Dreaming of Flowers HOP
Welcome to Dare 2B Artzy‘s Blog Hop!!
Summer is such a beautiful time of year!
It’s always so fun to see all the beautiful flowers blooming!!
In honor of summer, we decided to have a fun Blog Hop with the theme of
Dreaming of Flowers!
A few DT members are using previously released floral stamp sets and a few are using two of our newly release floral stamp sets!
If you haven’t had a chance to see our newest two floral stamp sets, be sure to check them out; Wishing Happiness and Playful Posies!! They are beautiful and so much fun to use!!
You should have arrived here from Melody’s blog! If you haven’t and would like to hop along with us, please go back to the Dare 2B Artzy Blog to start at the beginning!
Be sure to follow each blog and leave comments along the way for your chance at winning! We will randomly choose a winner from one of the blogs, so the more you comment, the more chances you have to win!!
Winner will receive a stamp set and ink pad of their choice!!
Blog Hop will end Sunday, August 27th 7:00pm Eastern.
We will then post a winner!!
———
Hi Dare 2B Artzy fans! I know you’re going to love the inspiration in this Dreaming of Flowers hop!
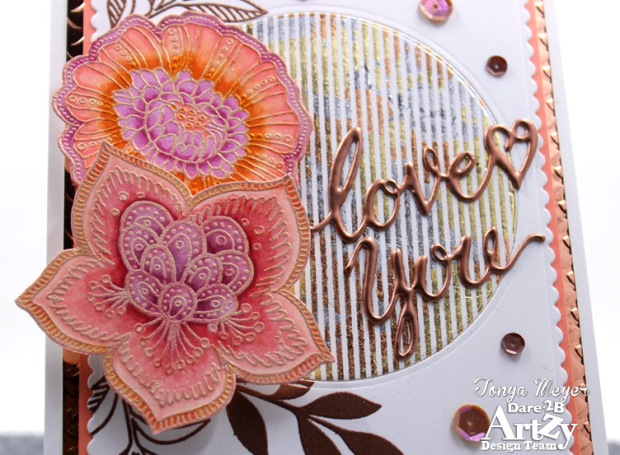
I’m happy to share my project today using the brand new floral stamps, Wishing Happiness! I really love these stamps. They’re big and bold flowers which are perfect for coloring and adding dimension which is what I’ve done with my card.
I stamped and heat embossed both flowers with some Rose Gold embossing powder and then colored them with my Copic markers. I used primarily pinks, orange and purples.
Next, I wanted to start working on my background. I’m always eager to try new techniques and adventures in crafting, I had to try my hand at guilding flakes. I’m a big fan of all things sparkly and guilding flakes definitely fit the bill. I purchased some guilding flakes from Nuvo in 3 colors; gold, copper and silver.
There are a couple of ways (or maybe more than a couple of ways) of using guilding flakes. I chose to use a special glue stick from Nuvo. I used the glue stick directly onto a large background stamp that had pinstripes on it. I applied a thin layer of glue directly to the stamp. The glue goes on a blueish-white and then becomes clear as it dries. I immediately pressed the stamp onto some white cardstock using my MISTI. I left the stamped cardstock to dry for about 30 seconds. I took this opportunity to scrub my background stamp with some soap and water. It’s really important to wash your stamps right away as the glue will dry on your stamp and can ruin it.
Once I’d washed and dried my stamp I pulled out my glue stamped cardstock and placed it inside of a clear stamp protector box on top of a sheet of scrap paper. I opened up one of the jars of guilding flakes and pulled out a pinch of the flakes and began randomly placing them on my cardstock and pressing them lightly so that they’d adhere to the glue on my cardstock. I did the same thing with all three colors until my background was pretty well covered across all areas that had glue. Once I had good coverage, I made sure to close up all the guilding flakes. Next, I used my fingers to rub the flakes into the cardstock. This causes the flakes to break down into smaller flakes which you can continue to rub into the background until you have complete coverage of all areas with glue on them. So here’s my disclaimer about guilding flakes: You will want to turn off any fans, air-conditioners or anything that causes air-circulation – trust me. Guilding flakes are light as a feather – lighter than I’d expected and they float and move very easily. Just breathing caused flakes to float across my desk landing on everything; desk, computer keyboard, mouse, my clothes and even my dog who was sitting underneath my desk was decorated with gorgeous metallic guilding “snowflakes” when I was finished. Just embrace the mess!
Once all areas are covered, you’ll want to use a stiff bristle brush to rub the excess guilding flakes off the cardstock. This is where having the piece inside the clear stamp protector is really good because it’s catching all of the excess flakes which can be reused so don’t discard those flakes.
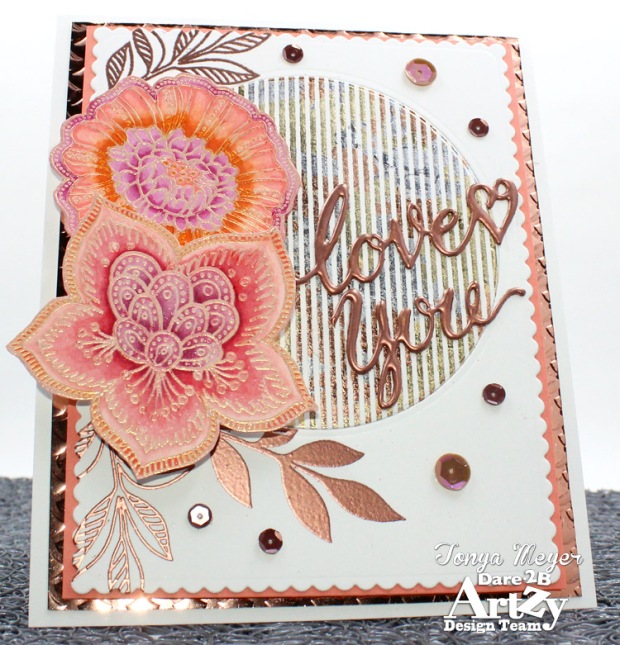
Once all the excess guilding flakes were removed, I was left with a gorgeous pin-striped background that was a blend of the gold, copper and silver colors. It is so stunning in person and that makes it totally worth all the mess!
I die cut the background using a circle die. I had a considerable amount of scrap left over which I saved for a later project. Next I cut a piece of 110lb cardstock with my scalloped rectangle die and then used the same size circle and centered it on my rectangle and die cut it. I placed the circle cut guilding piece into the space left in the plain white cardstock.
Next, I used the leaf outline and solid leave stamps from the Dare 2B Artzy Wishing Happiness stamp set and stamped them around the left side of my circle and heat embossed with some copper embossing powder to compliment my guilded circle. I made sure that my flower placement worked well with the leaf background and then adhered them to the cardstock using some dimensional foam.
To create my sentiment, I used the new Dare 2B Artzy scripty word die Love You. I die cut the word from some 110lb cardstock. The word was a bit too long to fit on the front of my cardstock, so I cut it into two pieces. Once they were cut, I stamped each section of word with some Versamark and then sprinkled on some copper embossing powder and heat set it. I did this 3 times to each word to create the dimensional metallic looking words. I love this effect for creating dimensional words. It gives the appearance that I wrote the words with a metallic puffy paint pen, however they are indeed die cut and embossed. I added a bit of clear glue to the back of the words and positioned them on the card.
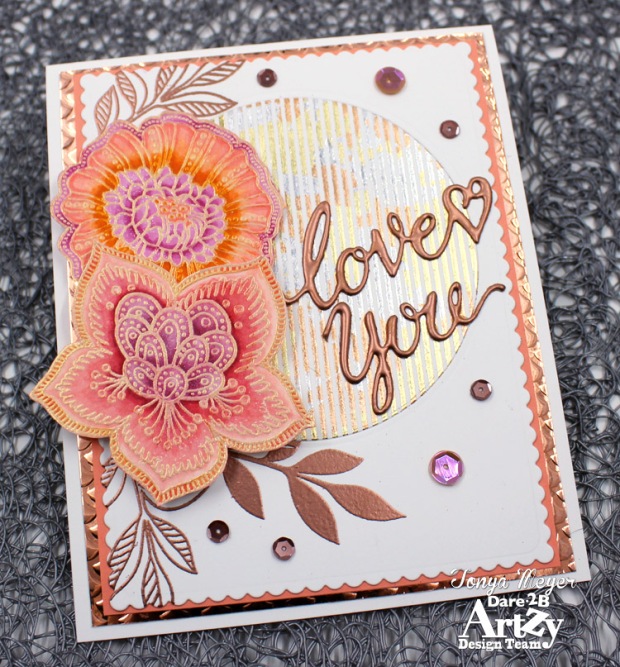
Final steps were to cut some peach and some copper cardstock in 1/8 inch larger increments and layering up my card elements onto a white 110lb cardstock base. I added some neutral colored sequins to my card front.
I’ve added links below to all the stamps, dies and products used at no cost to you.
I hope you’ve enjoyed my inspiration for the Dreaming of Flowers HOP with Dare 2B Artzy
Thanks for stopping by!
Your next stop in the hop is the crazy talented Michelle’s blog! Make sure to leave her and all of the lovely DT ladies some love along the hop!
We hope you are inspired all along the way!
Check out all D2BA’s products here!
Happy Hopping!
Hugs,
Tonya


Gorgeous flowers against that beautiful pinstripe background! Wow!
LikeLiked by 1 person
Thank you!
LikeLike
Wow. What a beautiful card and thanks for sharing how you made that amazing background.
LikeLiked by 1 person
Thank you!
LikeLike
Your card is absolutely stunning love the colors and the shimmer!
LikeLiked by 1 person
Thank you Pam!!
LikeLike
Gorgeous card! You have inspired me to pull out my gilding flakes!
LikeLiked by 1 person
Glad I inspired you Janis! Thank you!!
LikeLike
Wow, this is just spectacular! I love the gorgeous gilding and embossing. I’ll bet this is even more impressive in person with these beautiful colors and artsy florals. I subscribe through WordPress
LikeLiked by 1 person
Awe, Thank you for the kind words!
LikeLike
Lovely! The copper sentiment looks amazing
LikeLiked by 1 person
Love the rose gold embossing powder! Can’t wait to see what you make with the extra background piece!
LikeLiked by 1 person
Wow, that card is gorgeous. I love the embossing.
LikeLiked by 1 person
Thank you so very much!!
LikeLike
Stunning card! Love the embossing and all the layers!
LikeLiked by 1 person
Thank you for your kind words!!
LikeLike
Gorgeous card. Love the detail on these stamps. Hugz
LikeLiked by 1 person
What a beautiful card! Love how the flowers “pop ” off the card. The rose gold embossing is beautiful!
LikeLiked by 1 person
Thank you!
LikeLike
This is just amazing and gorgeous. I really love your metallic embossing and gilding with those pretty colors.
LikeLiked by 1 person
Thank you for your kind words! Much appreciated!
LikeLike
Wow! Gorgeous card!!!
I’m already your blog follower.
LikeLiked by 1 person
Thank you for your kind words and for being a follower!
LikeLiked by 1 person
stunning!
LikeLiked by 1 person
Thank you!
LikeLike
Wow beautiful card!! Stunning flowers!
LikeLiked by 1 person
Thank you!!
LikeLike
Beautiful card. I love the textures and the colours
LikeLiked by 1 person
Thank you!
LikeLiked by 1 person
What an incredible piece of art! Your attention to detail shows so well in this card. TFS
LikeLiked by 1 person
Thank you so much!!
LikeLike
Beautiful! I love this color combo with the shimmering rose gold 🙂
LikeLiked by 1 person
Thank you Elise!!
LikeLike
Beautiful card! Love the colors, all the layering and texture. Good job!
LikeLiked by 1 person
Thank you!
LikeLike
The flowers look so 3-dimensional. Pretty card.
LikeLiked by 1 person
Thank you so much!
LikeLike
I just ran across your site and thought I would play along on the blog hop. I am so impressed with Dare2BArtsy stamps and dies that I ordered one from the site. The stamps allow one to be very creative and original when making cards.
LikeLiked by 1 person
Diane, I’m so glad you’ve discovered Dare 2B Artzy stamps!! They really do lead to creative ideas. I hope you’ll enjoy your order and share your creations with us!
LikeLike
Really lovely! The Fall colors with the gold is just divine!
LikeLiked by 1 person
Thank you so much Karen!
LikeLike