Dare 2B Artzy Holiday Blog Hop!!
Welcome to Dare 2B Artzy‘s Holiday Blog Hop!!
Can you believe the Holidays are right around the corner?!
It’s already the middle of December!!
Our Designers thought it would be fun to have a Blog Hop sharing Holiday inspiration with you! Just in case you still need some holiday crafting ideas!! They all have created some lovely 3D Holiday Gifting Ideas!!
You should have arrived here from Monica’s blog! If you haven’t and would like to hop along with us, please go back to the Dare 2B Artzy Blog to start at the beginning!
Be sure to follow each blog and leave comments along the way for your chance at winning! We will randomly choose a winner from one of the blogs, so the more you comment, the more chances you have to win!!
Winner will receive a stamp set and ink pad!!
Blog Hop will end Sunday evening at 7:00pm Central.
We will then post a winner!!
———
Hope everyone is enjoying the hop and getting lots of wonderful inspiration. Wasn’t Monica’s project amazing!
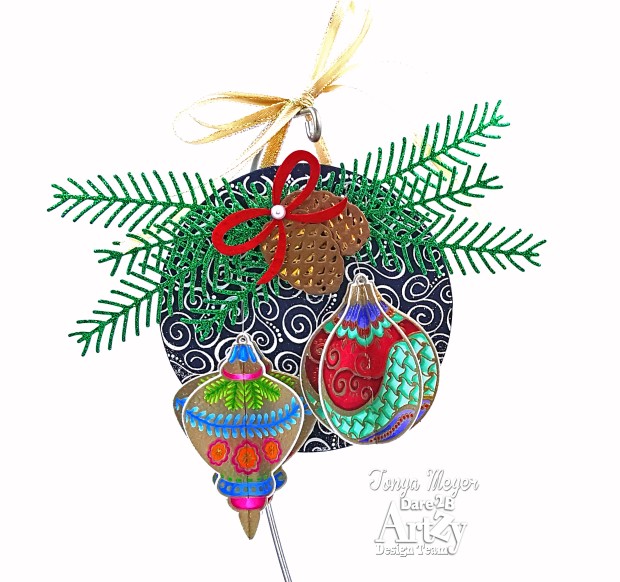
I’ve always loved giving Christmas ornaments with my gifts. I usually attach them to the package as an adornment. I think it gives the recipient something special to remember the occasion with in the years to come as they hang it on their tree. So my holiday inspiration project for you today is an ornament.
For the purpose of saving time, I actually purchased a package of craft wood that was pre-painted with black chalk paint from my local Joann’s store. It was actually meant to be a banner so there were 4 or 5 of them in the package (which gave me a couple to experiment with). You could certainly get some unpainted wood and paint it in any color you’d like for this project.
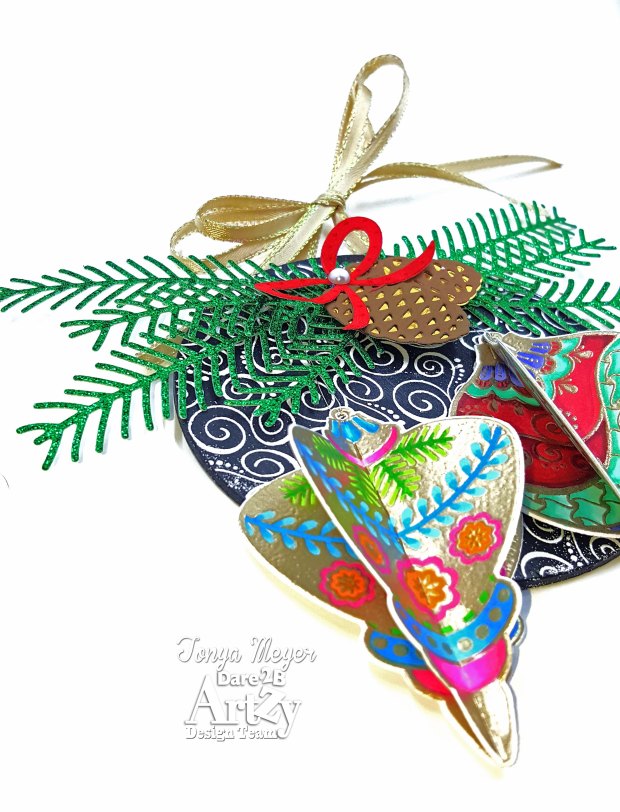
I knew I wanted to use my Dare 2B Artzy Swirls Background stamp on the background of the ornament. I made a fun discovery in my experimentation. I’d tried using a white pigment based ink on the background, but had issues with it smudging and not drying – even after heat setting it. Scrap that! Next, I‘d wondered about embossing powder on wood. It was something I’d never tried so I gave it a whirl and was ecstatic to learn that it did work. I used a bit of antistatic powder from my EK Success powder tool and brushed it onto the face of the ornament. Next, I placed my background stamp onto the craft mat on my desk with the stamp side up. I inked the background stamp really well with some Versamark Shimmer ink. I used the shimmer version of the Versamark so that I’d be able to see how well I was getting the stamp inked up. When I was satisfied that there was enough ink on my stamp, I took one of the wood ornaments and carefully laid it face down onto the stamp. Once in place I pressed firmly and rubbed the back of the ornament base to ensure a nice even coverage of the stamped image, being careful not to move or slide my ornament base around. When I felt that I’d probably achieved a good coverage, I lifted the ornament straight off the stamp and set it onto some scrap paper, being careful not to touch the face with my fingers and smudging the ink.
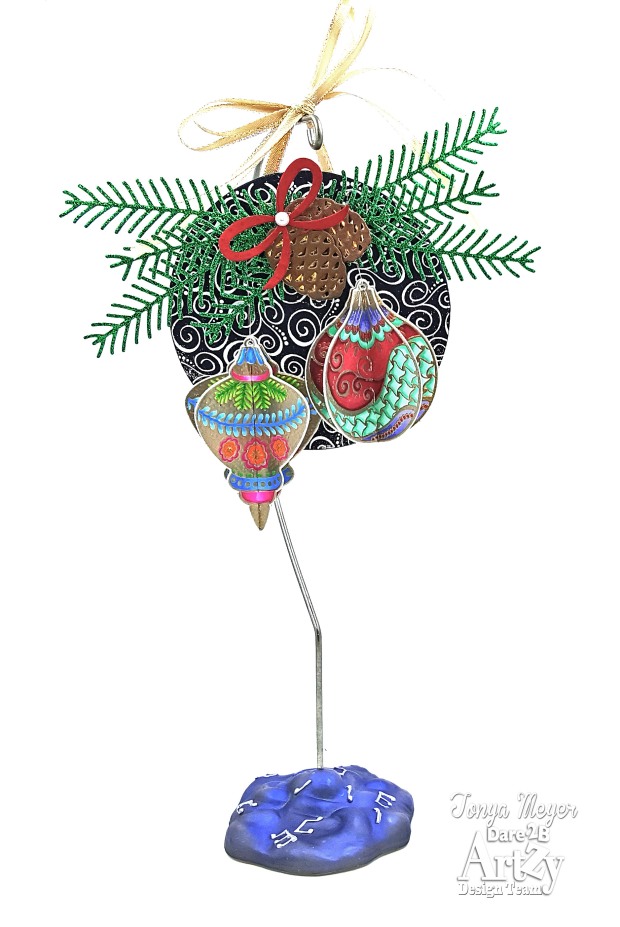
Once it was on the scrap paper I used some Ranger Super Fine white embossing powder and poured over the entire ornament until every section was covered. I picked up the ornament holding the sides only and tapped off the excess powder. To heat set the background I let my heat gun warm up first and then placed the ornament flat onto my craft mat and continuously moved the heat gun back and forth across the ornament until the embossing powder turned to a glossy white. I can’t tell you how excited I was to discover that you could heat emboss on wood – I actually did a little dance, which made my hubby look at me funny. LOL!
With the base of my ornament done I moved on to creating my 3-dimensional elements. In this case using the Dare 2B Artzy’s new Tis the Season ornament stamp set and the Ornament Tangle stamp set as well.
To create ornaments that look dimensional, I actually had to stamp each image 3 times. I stamped each one using my MISTI tool with some Versamark and then used some Champagne embossing powder on them and heat set each of them. Once they were embossed I was able to use the new Dare 2B Artzy Ornament Die Set and die cut each of the images. I know I’ve said it before, but I LOVE, LOVE, LOVE the fact that the die sets for Dare 2B Artzy are created so that they can be used with multiple stamp sets so you don’t have to purchase a different die set for each stamp set you have. That is so awesome!
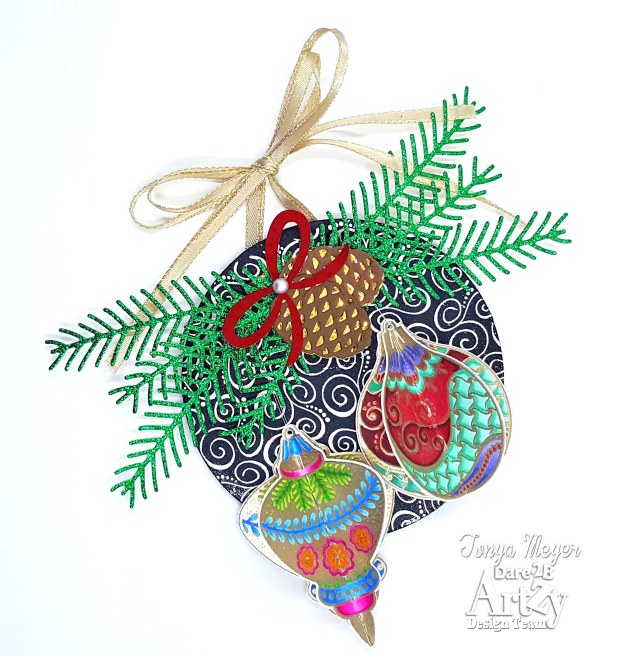
With all of my ornaments, stamped, embossed and die cut I was ready to color. I selected a color scheme for each ornament and colored all 3 layers identically using my Copic markers.
Once colored, I glued two of each of the ornaments together so that the front sides were facing out. I let the glue dry a bit and then I scored them down the center of the ornament. Because the ornaments were doubled up it didn’t score completely through so I carefully folded them along the score lines. I didn’t fold them entirely in half because I didn’t want too much of a crease – just enough to give it some dimension.
Once they were scored, I placed some clear liquid adhesive on the backside of the scored ornaments and placed them on the center of the remaining die cut & colored ornament. I had to hold the glue in place a bit until it set and the scored side stayed up on its own. I set the completed ornaments aside for 24 hours to make sure they were fully dry and sturdy.
Finally, I die cut several sizes of tree branches from some pieces of green glitter cardstock as well as the pinecones which were die cut from some really pretty shiny gold cardstock and some brown cardstock. I also cut the red ribbon from some velvet cardstock.
To assemble the ornament, I first added the ribbon hanger using two pieces of the thin gold ribbon. Next I used some silver thread and threaded my ornaments and then placed them on the front of the ornament to see how far down I wanted them to come. Once I had the placement of the ornaments just right, I glued the knotted end of the silver thread in place on the base of my ornament using some Ranger Glossy Accents. I let that dry overnight to be sure that the thread was holding sturdy.
The following day, I glued each of the green branches in place and added the pinecones to the center and glued them down as well. Next I added the little velvety ribbon at a bit of an angle on top of the pinecones and placed a white pearl at the center of the bow.
I could have left my ornaments to dangle since the thread was glued in place, but I wasn’t sure how sturdy that would be so I actually did adhere them in place with a bit of dimensional foam on to the back of each ornament.
I am so excited at how beautiful this ornament turned out. It really was a lot of fun to make and I discovered heat embossing on wood which was so cool.
I feel that making something by hand to give at Christmas time is giving the gift love because a lot of love goes into a handmade gift and I’m sure the recipient appreciates all the thought that went into creating it that much more.
Thanks for stopping by!
Your next stop in the hop is Kendra’s blog! You’re going to love her project. It’s so beautiful!
We hope you are inspired all along the way!
Check out all D2BA’s products here!
Happy Hopping & Happy Holidays to Everyone!
Tonya


Such gorgeous ornaments!! I absolutely LOVE them!!
LikeLike
So beautiful, great idea. X
LikeLiked by 1 person
Forgot to leave my details. Lol.
LikeLiked by 1 person
Lol! Thanks Debra!
LikeLike
What a beautiful ornament!!! Thank you for sharing the tutorial and close up of your project. I love how the embossing turned out on the chalk background and the gold on the ornament stamps is beautiful!
LikeLiked by 1 person
Thank you Cindy!
LikeLike
Beautiful!
LikeLiked by 1 person
This is beautiful! You have inspired me to try embossing on wood! I would never have thought to do that! Someone on your Christmas list is so lucky to be receiving this!
LikeLiked by 1 person
Thank you!
LikeLike
So unique and beautiful!
LikeLiked by 1 person
Thank you!
LikeLike
Very awesome, I have the wood rounds, but not the chalk type… that can be worked around. hmmmmm
LikeLiked by 1 person
I’m sure that you could make something gorgeous even with an unpainted wood ornament. It would be sort of rustic and beautiful with the Dare 2B Artzy ornament stamps. Glad your inspired!
LikeLike
very beautiful ornament!!! sooo pretty!!!!
LikeLiked by 1 person
Thank you!
LikeLike
Very cool, Tonya. I love your ornament.
LikeLiked by 1 person
Thank you Karen!
LikeLike
this is stunning!
LikeLiked by 1 person
Thank you Chris!
LikeLike
So pretty. Love your 3D ornaments. Such pretty colours. Hugz
LikeLiked by 1 person
Thank you!
LikeLike
Oh Tonya, I can see why you are excited at how this came out because I am excited right along with you! The richness of the colors on the glitz and the brilliance just pops !! I really love your generous step-by-step instructions, too 🙂 TFS and Merry Christmas!
LikeLiked by 1 person
Thank you so much Kelly!
LikeLike
So colorful and cleverly put together. Who wouldn’t want to have this for the holidays?
LikeLiked by 1 person
Thanks so much Helen. The hard part is deciding who to give it to, lol!
LikeLike
such a fabulous ornament love how you did this and you take the best photos
LikeLiked by 1 person
Thanks Monica!
LikeLike