Dare 2B Artzy’s Christmas Blog Hop
Welcome to Dare 2B Artzy‘s
Christmas
Blog Hop!!
With Christmas a few months away (3 months to be exact on Sunday!!), our Designers thought it would be fun to have a Blog Hop sharing some inspiration with our new Christmas stamps!
Creating Christmas cards is so much fun and we have a bunch of fun Holiday stamps for you to choose from!!
You should have arrived here from Monica’s blog! If you haven’t and would like to hop along with us, please go back to the Dare 2B Artzy Blog to start at the beginning!
Be sure to follow each blog and leave comments along the way for your chance at winning! We will randomly choose a winner from one of the blogs, so the more you comment, the more chances you have to win!!
Winner will receive a stamp set and ink pad!! (Whoo-hoo!)
Blog Hop will end Sunday evening at 7:00pm Central.
We will then post a winner!!
———
Happy Friday! Hope everyone is having a fun hop and getting lots of ideas and inspiration along the way.
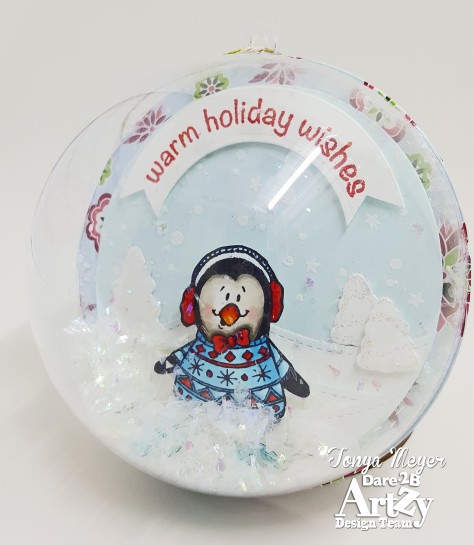
I wanted to create something a bit different for the hop this week. I decided to create a cute ornament that you could give as a gift to friends and family or you could even pre-cut all the pieces and have a fun family night with everyone assembling their own unique ornaments.
I apologize in advance but this is a bit of a long post, but I figured everyone might want to know how to make these fun ornaments.
To create this ornament, I purchased the clear 4 inch ornaments from Michaels. They’re pretty inexpensive so you can pick them up for a couple of dollars. Each package comes with two halves of the ornament as they are meant to make one whole ornament. For this project you will need one half of a 4 inch diameter ornament. They do have other sizes available, but this is a good size for building your scene.
There are a couple of stamp/die companies that make dies specifically to fit these clear ornaments. You can do a quick search on the internet and find several options or even check out Pinterest. I don’t have any of those types of dies in my stash so I sort of had to wing it for this project.
I found the easiest thing was to die cut everything I needed at once and set it aside until I was ready to assemble the ornament. That way it gives you a chance to look at the placement of all the layers before you start gluing everything in place.
For my base, I used a nesting circle die set that contained several sizes of circles. My outside layer (the back) that attached to my ornament was also 4 inches wide which made it a bit tricky to glue in place. There may be some other die companies that make a circle die that is just a smidge bigger and that would probably be a better option for this project.
I cut one, 4” circle from some of the fun new Dare 2B Artzy Christmas paper (ooohhh, I love this paper – it’s so fun and the patterns and colors are awesome).
Next, I used a scalloped circle that was also 4” in diameter and cut two of those out of some more Dare 2B Artzy Christmas paper. On one of the scalloped circles, you’ll need to stamp your sentiment or the “To/From” if you’re going to give this as a gift. Set that aside as it will be the last layer to go on the back of the ornament. (Note: if you don’t have a scalloped circle you can just use one that’s the same size as your other circle that your scene will be attached to).
For the inside backdrop of my ornament, I used my next smallest circle die which was 3 ½ inches wide and I cut a piece of light blue cardstock with it. I stamped the top 2/3rds of it with a snowy looking dots stamp I had in my stash. It has little circles and stars on it to look like snow. I stamped with some Versamark Dazzle white embossing ink and used some white embossing powder on it.
I used my stitched hillsides dies and cut 3 varying layers of stitched hillsides from some Neenah Solar White cardstock. Once I had them cut, I layered them together and tried to determine how I wanted the placement of the hills to look. When I was happy with how they looked I used some removable tape and taped them together to hold them in place and positioned and taped down my 3 1/2 inch die over the layers and ran it through my die cut machine. This creates the hillsides but gives them a rounded bottom edge which lines up with the light blue circle background that I die cut.
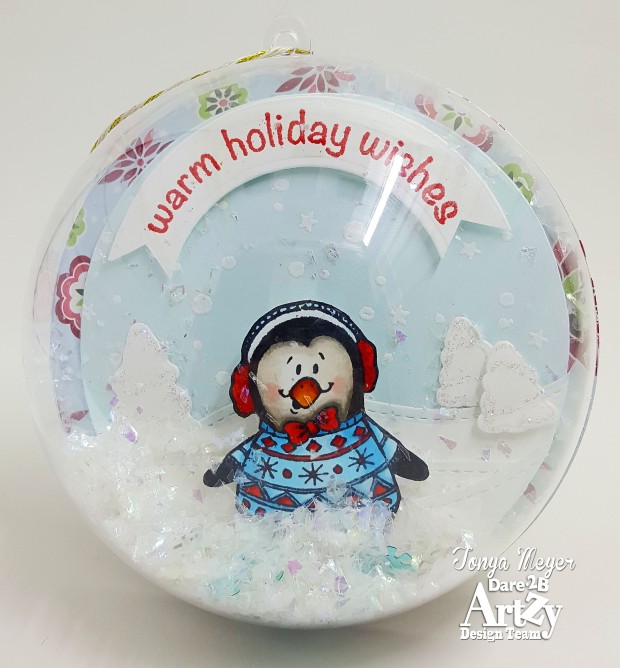
Next, I cut 3 little trees from some white cardstock. I added a bit of Stickles to the trees in Star Dust to give them a bit of shimmer as if they had snow on them.
To create the arched banner, I used my 4” and my 3 ½” dies and positioned them on some white cardstock so that the smaller circle was centered inside the larger one. I used a piece of Post-it tape to hold them together and I ran them through my die cut machine. This created a circle ring. I cut the ring in half with my scissors.
Using my MISTI, I placed my half of the ring and held it in place with the magnets and then positioned my sentiment stamp, “Warm Holiday Wishes” so that it would stamp in the arch. The sentiment is curved so it was easy to get it positioned. I stamped it with some Versamark ink and heat embossed it with some red embossing powder. When I was done, I trimmed off the excess on each end and made the V-cuts to make it look like a banner.
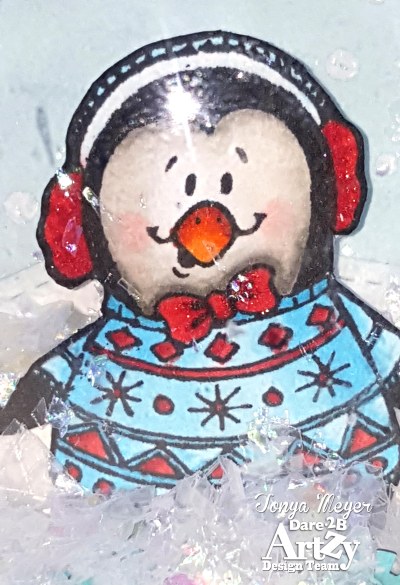
After all that die cutting, I was ready for some stamping and coloring. Since my scene inside my ornament was going to be a wintery one, I just knew I had to use the cutest penguin ever from the Dare 2B Artzy stamp set Penguin Fun. Who doesn’t love a penguin in a sweater? They’re irresistible I say! I decided that he’d look even cuter with the ear muffs that the other penguin in the set had on. I didn’t want his ears to get cold standing in the middle of this wintery scene, LOL.
To create my mask, I stamped the penguin in the sweater first onto some white cardstock. I used my MISTI to make sure I got a good, clean impression. Then I stamped the same penguin on a 3 x 3 Post-it Note, making sure to stamp his head near the top of the Post-it where it was sticky. Post-it’s work great for masking small stamps like this. Next, I fussy cut the penguin from the Post-it note making sure that I cut directly on the very edge of the image. When he was all cut out, I placed him over my original stamped image, making sure that all the edges were covered.
Using my Misti again, I carefully positioned my ear muff penguin over the sweater penguin, making sure that the heads lined up. There is a bit of a difference in the angle of the two penguins but for this purpose I didn’t care too much because I knew I was fussy cutting out my finished penguin. Once I was satisfied with the placement of the penguin, I closed the MISTI door so that it would stick in place to the door and then I inked it up and stamped it over my original image with the mask in place. Voila, when I removed the mask from my original penguin, he was now adorned with ear muffs. I love it! I colored the penguin with my Copics and fussy cut him out.
Finally, I was ready to assemble my ornament.
I placed my 4” circle on my craft mat first, making sure that the pattern paper you want to see through the ornament is face up. I added some dimensional foam to my light blue 3 ½” circle background and positioned it in the center of my large circle die cut. Next, I placed my arch banner with my sentiment at the top and held it in place with some dimensional foam as well.
I used some permanent adhesive on the back layer of my first stitched hillside and glued it directly to the bottom of my light blue background so that it was centered. I used dimensional foam on the other two layers of stitched hillsides and carefully aligned them in place as well.
Next, I used glue and dimensional foam for the trees in the background, being careful that the trees are not placed at an angle to the rest of the background.
Finally, my top most layer in the foreground was my penguin. I added some dimensional foam to him and centered him beneath the sentiment.
Once everything was glued in place, I was ready to attach the ornament dome. To do this, I took a piece of scrap acetate that I had from some packaging and set it aside.
I put about 2 mini-spoonful’s (you could use an ice cream taste tester spoon from your favorite ice cream store or probably a baby spoon would work well also) of the shimmery Buffalo Snowflakes and spooned them into the center of my scene. You can buy the snowflakes at almost any craft/hobby store. I picked mine up at Joann’s and they had a bit smaller bag there which is perfect for what I needed. Once you’ve spooned some snow onto your scene – DON’T SNEEZE! Trust me. The snowflakes are light and it takes very little for them to blow everywhere. I also added a pinch of sequin snowflakes in light blue & white that I found a Michaels.
When I was satisfied with the amount of snow, I put some glue onto my acetate. For this project I used 3D Crystal Lacquer. It works well on paper as well as plastic and it sets relatively quickly. I took my ornament dome and gently ran the edge through the glue on my acetate sheet, making sure that it had glue all the way around it. Then I used the ribbon loop at the top of the ornament as a guide on where to place the ornament on top of my paper. I held it in place for about a minute to make sure it was going to stick. When I finally picked up the ornament, I took my finger and ran any excess glue that squeezed out around the edge to help create a seal. This glue dries very clear so if you get a little extra on or put extra on to sort of caulk around it, it’s not really noticeable.
Because the plastic dome is a bit heavier than the paper scene that I created, it wants to tilt a bit. To correct this, I took 3-4 pennies with some permanent glue dots on the back of them and carefully stuck them to the back of the ornament at the bottom (don’t push hard or you run the risk of pushing in the back). This helps balance the ornament a bit more. Then you just take some dimensional foam and fill in the gaps between the pennies and then the rest of the back as well. Next, you’ll take your scalloped cardstock, with your stamped sentiment or to/from and place it over the back to cover the pennies.
For the finishing touch add your favorite holiday ribbon or bakers twine to hang the ornament.

Of course the penguins make perfect Christmas ornaments, but you could really use this technique for most any holiday or special occasion. It helps that they’re so fun to make and really allow you to look at your supplies and stretch your imagination as to what you can make with what you have.
Thanks for stopping by!
Your next stop in the hop is Karen’s blog!
We hope you are inspired all along the way!
Check out all D2BA’s products here!
Happy Hopping!
Tonya


So very adorable!!! What a great ornament you created!! I love it!!! Beautiful job!!
LikeLike
Thank you Kendra!
LikeLike
someone is going to be very happy to receive this precious ornament to hang on their tree! just so cute with the little penguin stamp! 🙂
LikeLike
Thank you Jen! That’s very sweet! It was a lot of fun to make.
LikeLike
georgeous !!! thanks for sharing how to make them!!!
LikeLike
Thanks Jean!
LikeLike
Lovely ornament.
LikeLike
Thank you Steph!
LikeLike
Your ornament is such a happy looking one–the penguin in the sweater and ear muffs along with the Warm Wishes. I didn’t mind reading through all the directions. Even though long, they were complete and non-assuming, which is not what is generally found in directions. Great job coloring the sweet penguin.
LikeLike
Thank you so much Parker! Glad you liked it!
LikeLike
Love, love, love! You definitely put a lot of TLC into this project! It’s amazing!
LikeLike
Thank you so much Leslie! That’s very sweet!
LikeLike
Awesome ornament! Thanks for sharing the how-to!
LikeLike
Thank you! Happy to share the how-to!
LikeLike
This is gorgeous and adorable! What an awesome ornament.
LikeLike
Thanks so much Kim!
LikeLike
Love this ornament. I would have several of them if I could! Very unique!
LikeLike
Thank you!
LikeLike
Darling ornament! Love that cute penguin and your pretty coloring!
LikeLike
Thanks Denise! Glad you liked it. It was lots of fun to make.
LikeLike
Wow! this is fabulous. I googled for clear ornaments. But how would I know which ones could be decorated?
LikeLike
Thank you! You’ll want to look for the ones that are fillable. They usually come as two halves that can be put together. I found mine at Michael’s. A quick search on the internet, I found this also: https://www.partymill.com/products/plastic-round-hanging-balls-ornament-decoration-for-home-arts-crafts-supplies?utm_medium=cpc&utm_source=googlepla&variant=750524331&gclid=COfx1L3oqs8CFZCIaQodClsA7w
NOTE that they come in 3 different sizes on this web site. Mine would be closest to the 3 1/4 inch size. You probably could make them with the medium size as well – just have to think smaller on what you put in it.
Hope this helps!
LikeLike
Thanks so much for the info.
LikeLike
Your very welcome!
LikeLike
Love your ornament! Very creative. This penguin set is super cute.
LikeLike
Thank you Lisa!
LikeLike
I just love this! Snow globes are my favorite!!!!!!!!!
LikeLike
Thank you Chris! I love snow globes as well, I have a small collection that I put out at Christmas.
LikeLike
What a cute project. Hugz
LikeLike
Thank you!
LikeLike
Absolutely adorable! Love the ornament!
LikeLike
Thank you Karen!
LikeLike
This is super cute – thanks for the detailed instructions – will be helpful to recreate!
LikeLike
This is so pretty love how the buffalo snowflakes give it a really soft snowy look beautifully coloured too
LikeLiked by 1 person
Thanks so much!
LikeLike